If you look around the web - on Youtube or Vimeo, on Twitter, Instagram or Facebook - there’s a wealth of effects artists posting their latest Houdini tests and R&D projects. Some of these are for specific projects. On some the artist is trying out a new feature or technique. And of course some of them are just for fun.
In this article, we’ve collected a small sample of Houdini tests and R&D clips from around the world, and had each artist weigh in with a brief description of what they were looking to do with the particular piece. Hopefully they might inspire you to experiment with your own tests or learn more about how to approach the particular Houdini feature used.
Robert Hodgin
Interactive Director, Rare Volume
Project: Animating Jupiter
Robert: I have recently been experimenting with how to render planets so that they look like massive bodies and not just textured spheres. I was working on creating a realistic atmospheric scattering effect when I got distracted by a beautiful high-resolution photo of Jupiter taken by the Juno probe. I wondered if it would be possible to slightly advect the texture to make it look like the surface was non-static.
I manually defined some stripes in a 2-D flip sim that corresponded to density. I made sure the stripes lined up with the stripes from the Jupiter texture. I manually dropped in a few points to represent the centers of the most prominent cyclonic storms and used the points to define a vortex force. The final step was to make the stripes have velocity in alternating directions and was pleased to see beautiful details emerge from the fairly basic setup. I never got around to making proper renders, but find the flipbook renders hold up fairly well.
Junichiro Horikawa
Architectural Programmer/Designer
Project: Mathematical Visualization
Junichiro: Personally, I've loved using programming to express myself through math for 10 years now. I used to use real-time coding tools such as Processing, but in the last 1-2 years, I have been experimenting with Houdini to find interesting algorithms and implement them because it has become easier to express in 3d space using mathematical expressions. I enjoy it because it is relatively easy and quick to form geometric patterns, fractal shapes, depictions of complex planes, Fourier transforms, and other slightly complex expressions using a combination of nodes and scripts.
Thomas Helzle
3D Artist and Designer
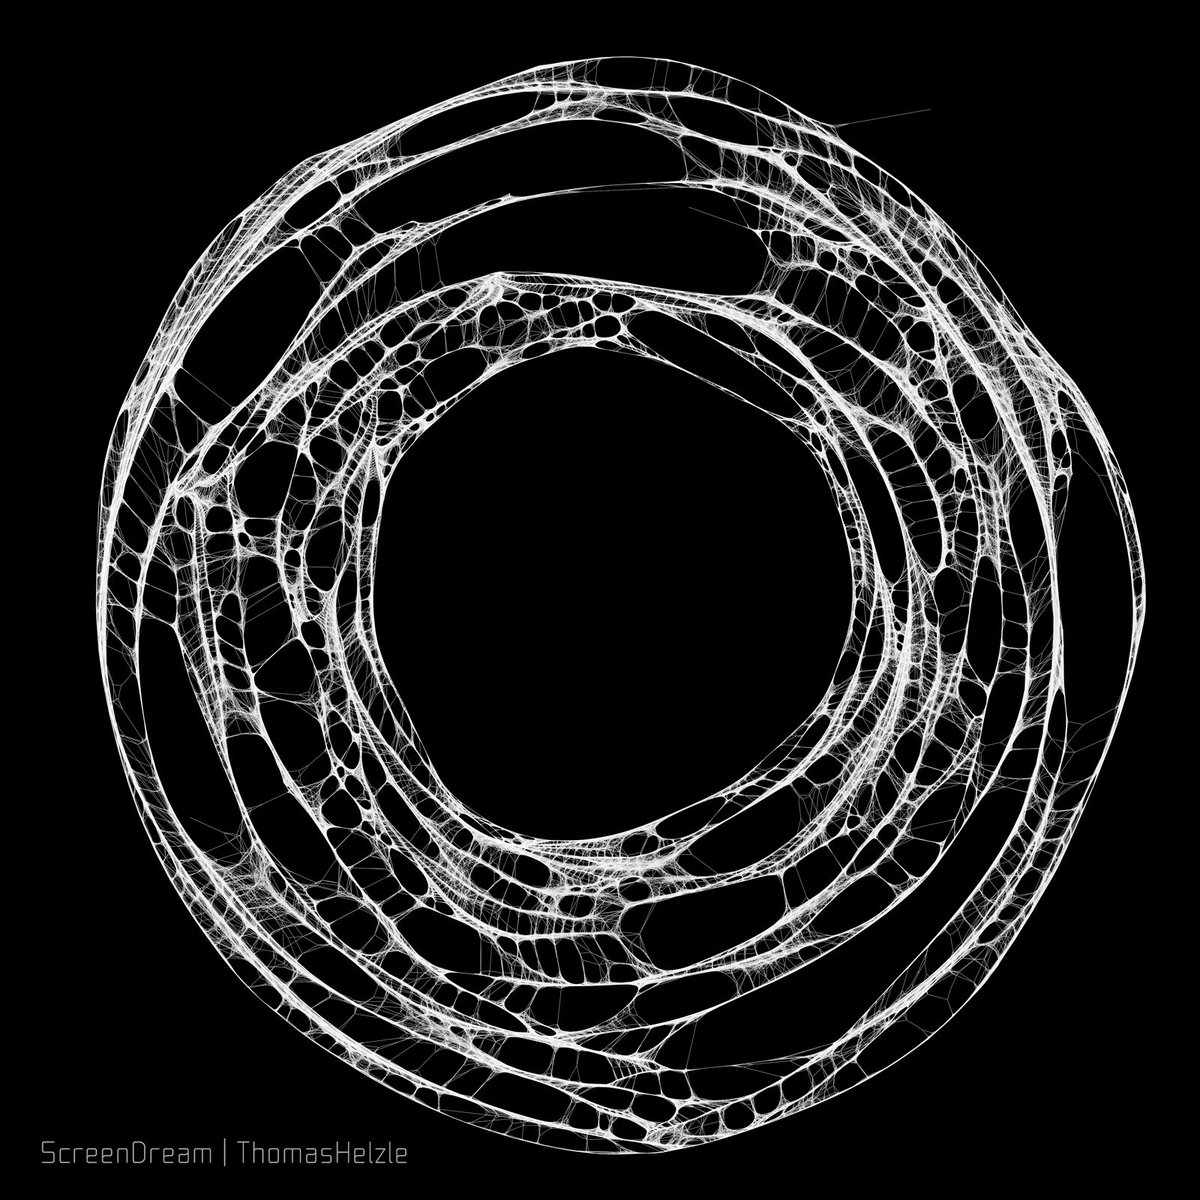
Project: Organics
Thomas: During a project a while ago I stumbled over what happens if you use "Connect Adjacent Points" on a bunch of overlapping resampled polylines and then apply a strong "Smooth”. The connections act a bit like springs and draw whatever is connected together. This on one hand rounds out things but also creates concentrations of lines where things are dense while opening areas that are sparsely populated. The result is very organic and creates beautifully natural structures, often reminiscent of microscopic cross-cuts or what's left over from last years leaves in spring.
Thomas notes that prints of his “Organics” series are available at: https://www.artstation.com/thomashelzle/prints
Wirginia Romanowska
Senior VFX Artist, Epic Games
Project: Particle Spew
Wirginia: “Particle Spew” is a basic, procedural audio-reactive setup. It lets you input any song and you can get animation that responds to the amplitude of the music. I’ve resisted temptation to use heavy subdivisions, VDBs, and tons of particles, because I wanted to keep the render time short.
I started making these short renders regularly couple of years ago when I began my adventure with Houdini. At the time my husband was experimenting with electronic music, so we thought it could be interesting to marry the two. From there, I’ve found the topic of procedural audio-reactive music videos fascinating.
First, I bring the song in CHOPs and manipulate the amplitude curve to make the beats visible, but not too ragged. I use envelope CHOP to reduce the sample rate and smooth the curve, then filter CHOP to relax the curve further if needed. There is no “one recipe fits all”, as every song is different.
In SOPs the trick is to make an interesting topology. I’ve started with a sphere and used divide SOP with “Compute Dual” flag on, and that results in very cool honeycomb pattern. From there I apply a color to the sphere using a turbulent noise. I’m using the same Cd attribute to deform the sphere by pushing the brighter points away from the center. This is where the sound control comes in – the noise amplitude is referencing the sound output curve from CHOPs. To exaggerate the result, I’ve extruded the polys and used point color - promoted to primitive attribute - as the “Distance Scale” in the “Local Control” of the poly extrude SOP. That creates the tallest peaks where the noise and sound amplitude are the highest.
The particle setup is very simple as well – all magic happens in the emitter itself. I deleted most of the sphere, isolating the front of the extrusion and the brightest color. I kept only points and fused them by proximity to have a single point per extruded peak. To amplify the effect, I’ve created a velocity attribute, that I animated with few keyframes that corresponded to the song progression and loudness. Thanks to the emitter setup the POP network can be very basic: particles are sourced from all points, they have short lifetime, inherited velocity and some drag.
For shading I used the Cd attribute to control few color ramps, one for color and subsurface scattering color, second one for subsurface scattering amount, and third one for emissive color. It was rendered in Redshift.
Quentin Lengele
Technical Artist, Creative Director, Software Engineer
Project: Orbs
Quentin: I started to create these orbs for fun. I got inspired by the material spheres of Allegorithmic’s Substance materials. This gave me the idea to create small dioramas with moving things inside, simple as that. The video is a HD compilation of the orb renderings I made during this past year. All these orbs are done with Houdini, Redshift, 3ds Max and Substance Painter. I had relative success with these orbs. Will Smith and his crew in LA contacted me to create one for them for the last Bad Boys 3 movie.
Ben Watts
Houdini FX Artist
Project: Rock Attraction
Ben: As I geared up to present with SideFX in Barcelona at the end of April, a thought come to mind about creating a bespoke CG sequence as the core subject matter rather than speaking about the usual client work, something that could be broken down from start to finish, explaining the process and challenges I experienced. The turnaround was extremely tight – around 3 weeks from start to finish.
This clip was one of the first RnD tests from the sequence. I decided all of the shots would have a fairly heavy emphasis on volumetric lighting but needed maintain a very dark atmosphere throughout. Each shot has silver cloth like flakes floating around in the environment which really helped add random spec hits and depth.
The rock geo is pulled into the centre of frame with an animated attraction force. I created the environment and rocks procedurally using various noises and displacement, they were all Tri-Planar mapped. Everything was rendered in Redshift v3.
Below is a still of the final shot as a comparison to the RnD.

Linus Rosenqvist
Producer, Vice President of Lillasyster Production
Project: Mutated Squid
Linus: I was doing some tests with FEM with bones, muscles and skin and I wanted to try to take that approach into vellum and see how much detail I could get from the new ARAP constraints. So, it’s a multi-layered vellum simulation where I have interior muscle with animation that drives the fat and skin.
Richard Lord
Freelance Artist
Project: Our Pleasures, Musical Video for Plus Device
Richard: The final look went through a few changes. Originally the fiction was more like the movie Innerspace. The camera would fly inside the subject and witness a bunch of aliens cells. At first I pretended the camera was a tiny craft flying through a body, so the lighting came straight out of the camera as if it was the vehicles headlights. This made very hard shadow edges around each creature, making them somewhat ill defined and hard to read. Also I was doing a lot of camera shake to try to give the impression that the camera was a craft flying through some viscous fluid.
Over time, I changed the fiction so the idea was more like a stack of creatures, rather than the interior of something. I threw out the camera light, and lit them as if they were sat on a table. The skin shading, which was originally very strong colors got tuned down into the final fleshy look. The camera shake got heavily reduced too. All this made the creatures much easier to read and even when the camera is going quite fast, I hoped you'd get a pretty good sense of what each creature looked like.
Adding strong Sub Surface Scattering came in quite late. At first, I couldn't get it to look right across the multiple scales of the creatures. After awhile I hooked up a system to read the size of the creature at each frame and adjust the strength of the SSS to suit. It took a lot of fiddling, but once it was in place, everything lost the plastic look it had and looked way more real and squidgy.
Sasa Budimir
3D Artist and Animator
Project: Vellum Creatures RnD
Sasa: Getting convincing motion from minimal input could describe this bunch of creature tests. All their motion comes from a simple set of rules that describe feet movement (step length/speed/direction, lift amount etc.), and then Vellum solver takes care of the rest. Initial inspiration came from Richard Lord's amazing procedural creatures. Besides having fun watching them walk and stumble around they served as a fun base for testing other particular areas in Houdini I wasn't very familiar with, that were required for the next job. Learning new things while having fun at the same time makes the whole process more enjoyable.
Project: Houdini Crowds RnD
Sasa: This one was quite different but the main idea of the test was similar, transforming few simple run and jump cycles into animation that would otherwise be very tedious and time consuming to animate by hand. Getting familiar with Houdini crowds system was the main goal, but also seeing what kind of bumps I'll hit along the way while importing rigs and animations from another package with bendy limbs, lot of squash&stretch and unusual bone hierarchy. Ended up redoing rig few times to make it rag-doll friendly, but in the end I was quite satisfied with the result considering I only animated two run/jump variations.
Matt Estela
VFX lead, UTS Animal Logic Academy
Project: Cube
Matt: This was a test I made when I was trying to learn about the new for-loops in Houdini. I'd been watching a lot of 'bees and bombs', an amazing feed of looping gifs made in Processing, which inspired this setup. I'd also recently been cajoled into buying Redshift by the very talented Ben Watts. The core idea is to recursively split shapes by a clipping plane, and animate each shape away from the origin a little bit, and rotate them a little bit. Adding a nice refractive shader and rendering in Redshift plussed the effect a lot, and didn't take too long to render. But more time than I can usually be bothered to put in, so this is the only 'proper' rendered FX test I've done!
COMMENTS
Tesla_s_fan 4 years ago |
awesome
trtrlfx 4 years ago |
Can we please consider this to be a recurring series?
redkoartyom 3 years, 12 months ago |
I think there are no more decent Houdini artists, lol
NicTanghe 3 years, 11 months ago |
I highly doupt there arent allllloooot of decent houdini artists.
dddmod___ 3 years, 11 months ago |
it's just brilliant
Please log in to leave a comment.