| On this page |
Before you begin 
You have to have done LOPs Lighting Tutorial 1 before you can begin this tutorial.
Let’s start lighting 
We are now ready to get creative and start lighting. In a sophisticated pipeline, most of what we did in LOPs Lighting Tutorial 1 will have already been done for you as a lighter… all you should have to do is import a USD file or a Houdini .hip file and start lighting.
One way to set up the initial view from your lights is by tumbling to where you'd like the approximate light view to be, and using the “Lights and Cameras” shelf, CTL + LMB on one of the “Light” buttons. This creates a light through the current view. However LOPs has many handy tools to make viewport-centric (or “camera-centric”) lighting easy, so that’s the approach we are going to take, (although you could certainly use the technique just mentioned).
Camera-centric lighting 
We will do the rest of our lighting while looking through our render cameras.
-
Append a
 Light LOP to the end of your LOP chain. This light is now sitting at 0,0,0 in the world.
 -
Rename this LOP “key”.
-
This is an point light by default, if you wish you can change light types via the parameter interface or the bar at the top of the scene view. A Disc Light is usually a good option.
Let’s adjust the light. Again, we are going to do all of our lighting from the camera view.
In order to take full advantage of the light handles, you will use the ⇧ Shift + s, d or f toggles. When you use one of these hotkey combos, and then select an Area of Interest on a prim in the viewport by clicking on it, you can interactively choose the location of the specular reflection, the diffuse reflection and the shadow area respectively. If you have used one of these to tune your light, you will see a slightly different handle than if you had not.
-
While in the Light State:
-
SHIFT + d - go toggle diffuse placement mode. Click on the area you would like your diffuse reflection to fall.
-
You can use SHIFT + s to toggle specular mode so you can choose the specular highlight location.
-
You can use SHIFT + f to toggle shadow mode, (more on this soon)
-
-
CTL + SHIFT + LMB - adjust light intensity
-
CTL + LMB - adjust distance of light from target
-
In the video below, we have a light at the origin. We use SHIFT + d to toggle diffuse mode, and we click on a bottle and the diffuse reflection is placed where clicked. We then use CTL + SHIFT + LMB to adjust light intensity and CTL + LMB to adjust distance of light from target.
Note that CTL + LMB will move the light closer/further from the target, while maintaining the brightness of the lit object. You can toggle this behavior off in the Light menu if you like. (Note that if “Keep Brightness” is toggled on, it means “Keep Brightness consistent and do not adjust automatically for distance.”)
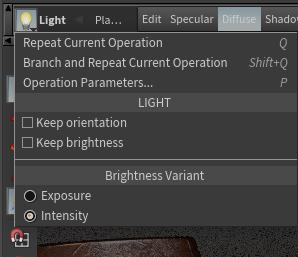
Note
To get into the Light State in the viewport, select a light VOP, move the mouse over the viewport and hit ESC then ENTER.
Note
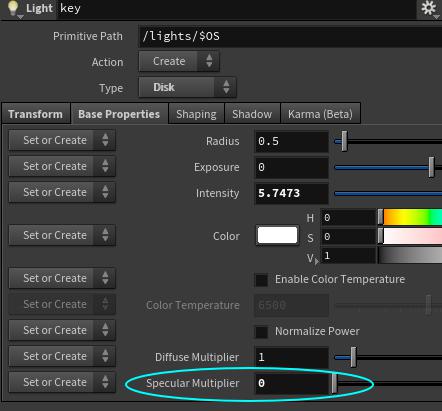
Each light has a Diffuse Multiplier and a Specular Multiplier. This way you can easily have diffuse-only and spec-only lights.
Continue lighting 
Let’s create some more lights. You have one key light so far and a light that represents the light bulb. Let’s list all the lights we would like to see:
-
Light bulb light
-
Key light
-
Rim lights(s)
Of course, there might be many others too. But let’s go ahead and place some of these lights now.
Create additional lights 
Let’s start with a rim light.
-
Mute the existing lights so you can see the influence of the new light.
Note
You can mute lights a few different ways (from least to most convenient):
-
While in the Select State in the viewport, RMB click on a light and select “solo light” from the menu. (Note similar functionality exists for geometry too.)
-
NOTE: To get to the Select State, mouse-over the viewport, hit ESC then S.
-
-
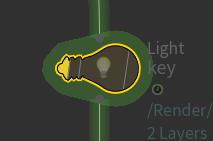
Bypass all existing Light LOPs. (Image below shows a light with the bypass flag on.)
-
Using the “active” toggle in the Scene Graph Tree to make other lights inactive.
-
Using the “solo” toggle in the Scene Graph Tree to make the given light solo (this column may not be exposed by default).
-
In the image below, the green circle is the “active” toggle (toggle off to mute light), the blue circle is the “solo” toggle, (toggle to mute all other lights). The red circle contains the display options, (in case you don’t see the “active” or “solo” columns).

-
Warning
Be careful not to mute “/lights” in its entirety. This will cause any new lights you add not to affect the scene as you would be muting all lights under lights, even ones you have not added yet.
-
Append a Light LOP to the bottom of your node chain.
-
Rename this “rimRight”
-
Make it a disc light.
-
In the viewport, SHIFT + S to enter “specular placement” mode, and click on the right side of the middle bottle. Drag the resulting handle around to get a pleasing rim light.
-
-
Repeat for a “rimLeft”.
Note
The easiest way to create the left rim light is to simply copy and paste the right rim light, and while in the specular mode, just click to select the new specular position.
Tip
At this point you may want to turn off the specular contribution of the key light.
Let’s now create a “rimBack”. For this light, we are going to use the “shadow placement” mode.
-
Append a Light LOP to the bottom of your node chain.
-
Rename this “rimBack”
-
Make it a disc light.
-
Solo this light.
-
In the viewport, SHIFT + F to toggle shadow mode. Following the prompt in the viewport:
-
LMB click to place the handle pivot.
-
SHIFT + LMB to place the target.
-
-
In the video below, we first solo the “rimBack”. This makes the render almost completely black, so we move to GL shaded. We then use SHIFT + F to toggle “shadow placement” mode, and then LMB to place the handle pivot, and SHIFT + LMB to place the target. We then use SHIFT + LMB to interactively drag the target around to get a pleasing rim light. Note how the handle pivots around where the pivot point was placed.
Tip
If you are in the Light state in the viewport, you can use CTL + SHIFT + LMB to adjust light intensity and CTL + LMB to adjust distance of light from target even if there is no tooltip explaining this.
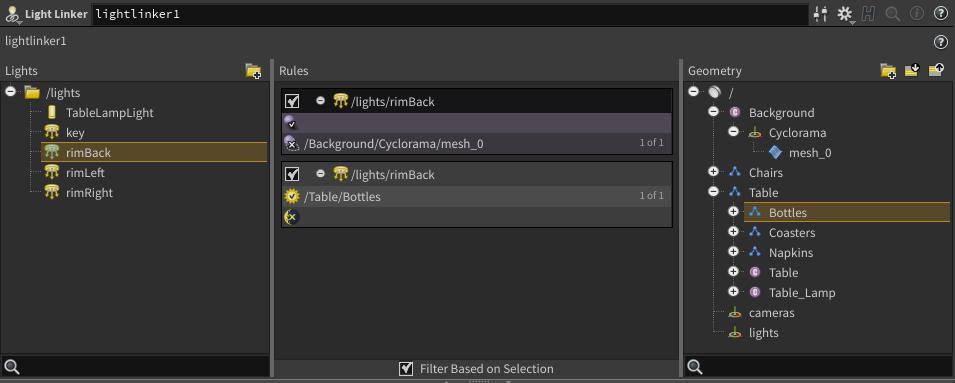
Use the Light Linker 
The back rim light is lighting everything, (we only want it on the bottles), and if we move it too far back, the backdrop blocks its contribution. Let’s fix that by doing some light-centric light linking.
-
Append a
 Light Linker LOP to your chain.
 -
Alt-drag the light “rimBack” into the center, (this creates a Shadow Link).
-
Drag “Background/Cyclorama/mesh_0” onto the bottom icon, (meaning “Do not cast shadows from this object”).
The back rim light is now not blocked by the background.
-
Drag the “rimBack” light into the center of the Light Linker again.
-
Drag “Table/Bottles” into the “Sun” icon.
The “rimBack” light now only lights the bottles.
Tip
You can also drag geometry into the center column for object-centric light linking.
Tweak your lighting 
In the LOPs Lighting Tutorial 3, we are going to tweak our lights and render to disc.