| On this page |
|
About this tutorial 
Prerequisites 
Download and then extract the necessary support files to $HIP/LOPS_DEMO_FILES.
What you will learn 
-
How to create a variant set for an asset.
-
How to prepare an asset for USD.
-
How to export an asset as USD.
Before you begin 
In a regular production pipeline, the Asset department is often made up of multiple sub-departments (like Modeling and Texturing), asset building is typically complicated, and assets usually come from several different sources in many different file formats.
In this tutorial, you will walk through a simplified version of one of the early stages of a production pipeline—asset creation—and you will act as the Assets department. You will import a barrel .obj model, fix a few minor issues with it, import .png textures for the barrel, attach shaders to the barrel, create variants of the barrel, ready the barrel for USD, and then export the barrel USD file.
Notes
-
For this tutorial, please assume that the Assets department is one department.
-
Houdini Apprentice license holders can only write out
.usdncfiles. This is the non-commercial version of USD and can only be read by Houdini (not by other DCC software packages that support USD). However in all other ways,.usdncfiles are equivalent to standard.usdfiles.
Tips
-
Remember to save your scene file frequently as you work. For example, save your file as something like
lopsintro_tutorial_1.hip. -
If you encounter any problems during the course of this tutorial, please see the Troubleshooting section as it may be helpful.
Step 1 - Import an asset into Houdini 
In the first step you will use a ![]()
![]() File SOP node to import an asset into Houdini.
File SOP node to import an asset into Houdini.
-
Start a new Houdini session.
-
Switch to the Solaris desktop.
-
If you do not have a Solaris desktop, make one.
-
Make sure that you can see the Scene Graph Tree in one of your panes.
-
-
In the Network Editor, switch to the
/objcontext. -
In the ⇥ Tab menu, select File.
This creates a
 Geometry Object node with a
  File SOP node inside of it.
 -
Rename the Geometry Object node to Source.
This is where you are going to import your barrels and ready them for USD.
Note
In some pipelines, you would import a USD directly and skip this step.
-
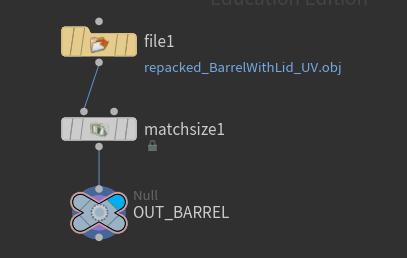
Dive into the Source node.
Double-click the node or select it and press Enter.
-
Edit the File SOP node to load one of the files from the LOPs support archive you downloaded for this tutorial.
In the Geometry File parameter field, type the following:
$HIP/LOPS_DEMO_FILES/BaseGeo/repacked_BarrelWithLid_UV.obj
-
Create a
 Match Size SOP node to ensure that your props are centered in the world, and then in the Parameter Editor set the following:
-
Turn on Translate.
-
Set Alignment Position to
0, 0, 0. -
Set Justify Y to
Min.
-
-
Connect the File SOP node’s output to the first input on the Match Size SOP node.
-
Create a
 Null SOP node and rename it to OUT_BARREL.
 -
Connect the Match Size SOP node’s output to the OUT_BARREL’s input.
-
MMB on OUT_BARREL.
Notice that the barrel already contains geometry groups that identify the lids, the straps, and the barrels.

Step 2 - Import the asset into LOPs 
In this step you will use a ![]()
![]() SOP Import LOP node to import your asset into LOPs.
SOP Import LOP node to import your asset into LOPs.
-
In the Network Editor, switch to the
/stagecontext.Note
You can create a
 LOP network at any level in Houdini. But for this tutorial, please keep your work in the
 /stagecontext. -
Create a
 SOP Import LOP node, and then in the Parameter Editor set the following:
-
In the SOP Path parameter field, type:
/obj/Source/OUT_BARREL
Once geometry is in a LOP, it is then referred to as a primitive (or prim). Note that this definition differs from Houdini’s native definition of a primitive.
-
Turn on Load As Reference.
A reference is one of the most common composition arcs, and is generally used to compose assets and props into a stage (such as assets into a set). While references can give the appearance of instancing, they are not actually instanced unless you explicitly indicate that they should be instances by turning on the Make Instanceable parameter.
Think of a reference as a sort of macro that lets you compactly reuse a scene description. For example, if you used references to assemble a shelf of books, the bookshelf and the books would reference the shelf and book assets respectively.
-
In the Primitive Path parameter field, type:
/Barrel/BarrelGeo
This is where the reference to the primitive will be stored in the internal USD file structure and the LOPs scene graph.
-
In the Layer Save Path parameter field, type:
$HIP/tutorial1/Geo/BarrelBase.usd
This tells USD where to put the actual
.usdfile on disk that contains the prim. For more information, see the notes on the USD ROP node later on in this tutorial.
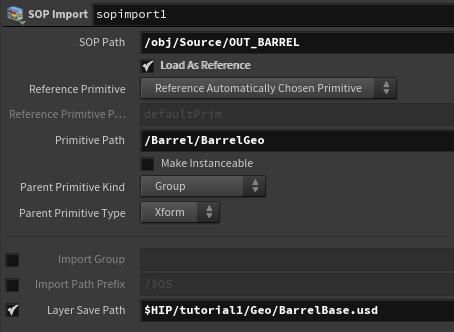
-
-
Look at the Scene Graph Tree pane.
-
You can see the layout of your USD stage in the Scene Graph Tree.
-
You will be referring to the Scene Graph Tree frequently to make sure that your USD stage is composed logically.
Note
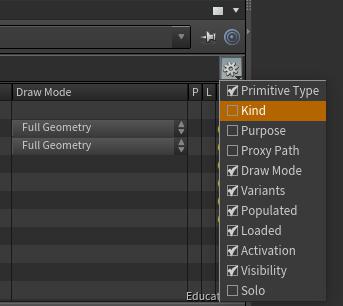
If you do not see the Kind column in the Scene Graph Tree, then click the gear menu and add it.
-
You should see
Barrelas a group andBarrelGeoas a component nested underneath it in the tree.For more information on these kinds of organizational structures (like assemblies, groups, components, sub-components, and so on), please see the Solaris glossary.
-
-
In the Network Editor, RMB-click on the SOP Import LOP node and then select LOP Actions ▸ Inspect Active Layer from the context-sensitive menu that appears.
-
Look at the USD you created. This is the code that contains your composed stage (also known as a scene in Houdini).
-
Barrelis a group, and under that groupBarrelGeois a component. -
The
Barrelis also now a payload.
-
Step 3 - Add a material library to the network 
In this step you will use a ![]()
![]() Material Library LOP node to build a library of materials that you will then attach to your barrel asset in Step 4.
Material Library LOP node to build a library of materials that you will then attach to your barrel asset in Step 4.
-
In the
/stagecontext, create a
 Material Library LOP node.
Do not connect this node to anything yet.
-
Dive into the Material Library LOP node.
Double-click the node or select it and press ENTER.
-
Create a
 Principled Shader VOP node, rename it to Barrel, and then in the Parameter Editor ▸ Surface tab set the following:
-
Set Basic ▸ Base Color to
1,1,1. -
Set Specular ▸ Roughness to
1. -
Set Reflection ▸ Metallic to
1.
-
-
In the Textures tab, turn on Use Texture for Base Color, Roughness, and Metallic.
-
Specify the locations of the textures on disk.
-
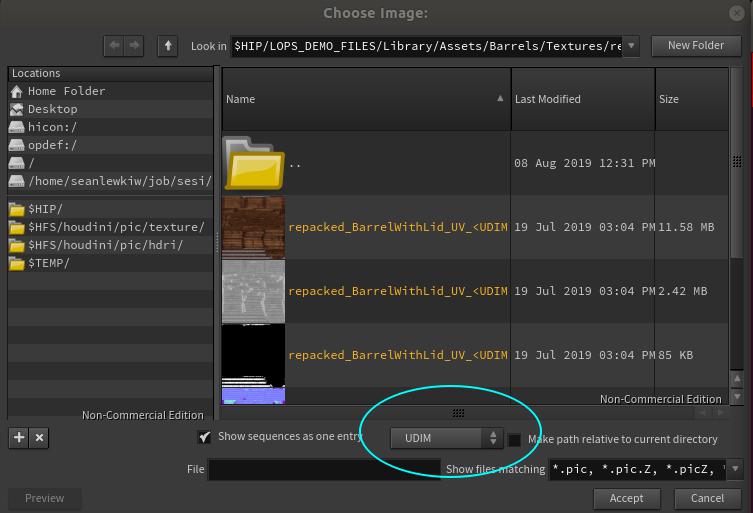
In the Base Color ▸ Texture parameter field, type the following:
$HIP/LOPS_DEMO_FILES/Library/Assets/Barrels/Textures/repacked_BarrelWithLid/repacked_BarrelWithLid_UV_<UDIM>_BaseColor.png
-
In the Roughness ▸ Texture parameter field, type the following:
$HIP/LOPS_DEMO_FILES/Library/Assets/Barrels/Textures/repacked_BarrelWithLid/repacked_BarrelWithLid_UV_<UDIM>_Roughness.png
-
In the Metallic ▸ Texture parameter field, type the following:
$HIP/LOPS_DEMO_FILES/Library/Assets/Barrels/Textures/repacked_BarrelWithLid/repacked_BarrelWithLid_UV_<UDIM>_Metallic.png
Warning
-
Please use the proper UDIM syntax as noted above.
-
If you use the file chooser to navigate to and then select the textures, then make sure
UDIMis selected in the file chooser options. This will make sure that the appropriateUDIMsyntax is used.
-
-
Go up to
/stage.Tip
Press U to move up in network.
-
In the Material Library LOP node’s parameters, click Auto-fill Materials.
This will populate the interface with the Principled shader.
Note
Alternatively, you could instead type
*(star) in the Material VOP parameter field and then turn on Include Only VOPs with Material Flag Set.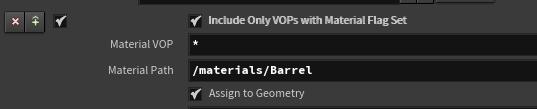
-
Create a
 Configure Layer LOP node, and in the Parameter Editor do the following:
-
In the Save Path parameter field, type:
$HIP/tutorial1/Materials/BarrelMaterials.usd
This will tell USD where to store the materials.
-
-
Connect the output of the Material Library LOP node to the input of the Configure Layer LOP node.
You now have a material library for your asset.
Step 4 - Apply a material to the asset 
You will now add materials to your prims.
-
Select the SOP Import LOP node.
-
Create a
 Reference LOP node, and then in the Parameter Editor set the following:
-
In the Primitive Path parameter field, type:
/Barrel/materials
This is where the materials will be stored for the barrel asset.
-
Select the Reference Type ▸ Reference From Multi-input parameter option.
Note
Think of a reference as a kind of macro for compactly reusing a scene description.
-
-
Connect the SOP Import LOP node’s output to the first input on the Reference LOP node.
-
Connect the Configure Layer LOP node’s output to the second input on the Reference LOP node.
-
Change the Reference LOP node’s Primitive Path to just
/materials, and then inspect the Scene Graph Tree to see how things have changed.Now change Primitive Path back to
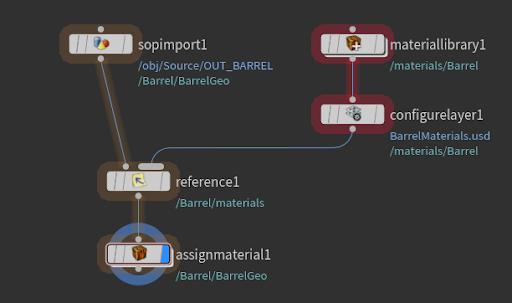
/Barrel/materials. -
Create an
 Assign Material LOP node.
 -
Connect the output of the Reference LOP node to the input on the Assign Material LOP node.
-
Assign the following parameter values to the Assign Material LOP node by dragging and dropping them from the Scene Graph Tree:
-
LMB-drag
BarrelGeoto the Primitives parameter field. The following path should now populate the field:/Barrel/BarrelGeo
-
LMB-drag
Barrelto the Material Path parameter field. The following path should now populate the field:/Barrel/materials/Barrel
-
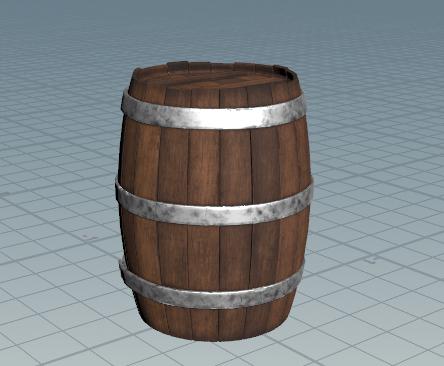
You now have a shaded and textured barrel asset.
Step 5 - Create variants of the asset 
Now that you have a barrel and a material, you can make a simple variant of the asset.
In this step you will hide the lids to make two barrels available: one with a lid and one without a lid. You will also need to make the groups that are visible in SOPs available in LOPs. To do this, you will modify your existing LOP chain.
-
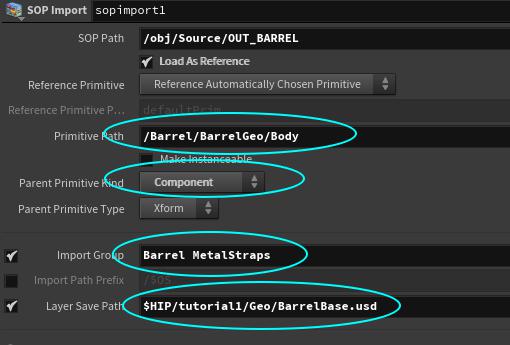
Select the existing SOP Import LOP node and in the Parameters Editor set the following:
-
In the Primitive Path parameter field, type:
/Barrel/BarrelGeo/Body
This is the directory location to which the asset variant will be saved in the USD internal structure. You can view this location in the Scene Graph Tree.
-
In the Parent Primitive Kind parameter drop-down menu, select the Component option.
This will make the different parts of the barrel variant components and help you organize your asset.
For more information on these organizational structures, please see the Solaris glossary.
-
You do not have to modify the path in the Layer Save Path parameter field as it has not changed from when you set it earlier in the tutorial.
-
In the Import Group parameter field, type:
Barrel MetalStraps
You can use the drop-down menu on the right to select these groups.
-
-
Alt-drag the existing SOP Import LOP node to create a copy of the node, and then drop the copy onto the wire underneath the first (original) SOP Import LOP node.
-
Select the second (copy) SOP Import LOP node and then in the Parameter Editor set the following:
-
In the Primitive Path parameter field, type:
/Barrel/BarrelGeo/Lids
-
In the Layer Save Path parameter field, type:
$HIP/tutorial1/Geo/BarrelLids.usd
-
In the Import Group parameter field, type:
Lids
Warning
Make sure that
Lidsis only present in the Import Group parameter field. It is easy to accidentally addLidsto an existing selection. -
-
Create a
Null LOP node, rename it to Barrel_W_Lid, and then connect the output of the Assign Material LOP node to the input of the Barrel_W_Lid node. -
Look at the Scene Graph Tree. You should now see
BodyandLidsas components underBarrelGeo.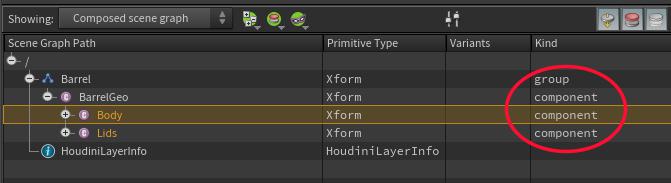
-
It would make more sense if
BodyandLidswere subcomponents of theBarrelGeo.Create a
 Configure Primitives LOP node and then connect the second SOP Import LOP node’s output to the input of the Configure Primitives LOP node.
 -
Select the Configure Primitives LOP node and in the Parameter Editor, set the following:
-
In the Primitives parameter field, type:
/Barrel/BarrelGeo/*
Note
The asterisk (star) at the end of the path means match everything.
-
In the Kind parameter drop-down menu, select the Subcomponent option.
-
-
Look at the Scene Graph Tree again.
Notice how the hierarchy goes from group to component to sub-component. You cannot break this hierarchy (like if you had group to sub-component to component) or your USD will fail.

Tip
If you had a pallet with ten barrels on it, you could also have an assembly in the hierarchy.
For more information on assemblies, please see the Solaris glossary.
Create a simple variant 
In this step you will create a simple barrel variant.
-
Create a
 Prune LOP node, and then connect the output of the Assign Material LOP node to the input of the Prune LOP node.
 -
Select the Assign Material LOP node.
-
LMB-drag
Lidsfrom the Scene Graph Tree to the Primitive Pattern parameter field in the Parameter Editor. -
Select the Prune LOP and turn off its Display flag.
Lidsshould now no longer appear in the viewport. -
Create a
Null LOP node and rename it to Barrel_No_Lid. -
Connect the output of the Prune LOP node to the input of the Barrel_No_Lid node.
-
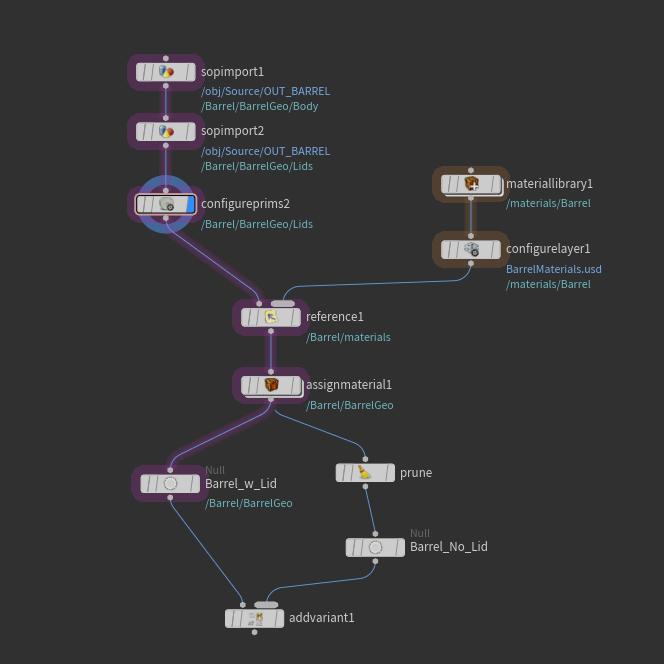
Create an
 Add Variant LOP node by selecting Add Variants to New Primitive from the ⇥ Tab menu.
 -
Connect the output of the Barrel_W_Lid node to the first input on the Add Variant LOP node, and then connect the output of the Barrel_No_Lid node to the second input on the Add Variant LOP node.
-
RMB-click on the Add Variant LOP node and then select LOP Actions ▸ Inspect Active Layer from the context-sensitive menu that appears.
-
Look at the USD code. Notice that the LOP is building a whole new barrel and then just hiding the lid. This is not terribly efficient.
This lack of efficiency is not very impactful for a simple object, but imagine if the object was instead a more complex asset or if you had multiple assets. In those cases, you would need to make the asset more efficient.
Create a variant using a context option block 
In this step you will make the variant barrel more efficient.
-
Create a variant block by selecting Add Variants to existing Primitive from the ⇥ Tab menu.
A block of LOP nodes containing a connected
 Begin Context Options Block LOP node (
variantblock_begin) and a Add Variant LOP node (variantblock_end) appear in your Network Editor. -
Inside the block you just added, select the variantblock_end node.
Note
You may be wondering what the expression
`opinput(“.”, $IIDX)`means in the Variant Block End LOP node. If you MMB-click on the label, normally you would see what the expression resolves to. But in this case, it cannot resolve as it is looping over all the inputs. As a result, you won’t see anything as it can’t show more than one result at a time. Theopinputexpression queries the current input index($IIDX), which in turn resolves to the name of the LOP corresponding to that index. If you want to test this, temporarily replace($IIDX)with0(the first thing plugged into this input), MMB-click on the label, and you will then see it resolve toBarrel_w_Lid(the first node connected this LOP). -
LMB-drag
BarrelGeofrom the Scene Graph Tree to the Primitive Path parameter field in the Parameter Editor.Tips
-
If you don’t want the Scene Graph Tree to change focus, select the
Barrel_W_Lidnode and then pin the Scene Graph Tree.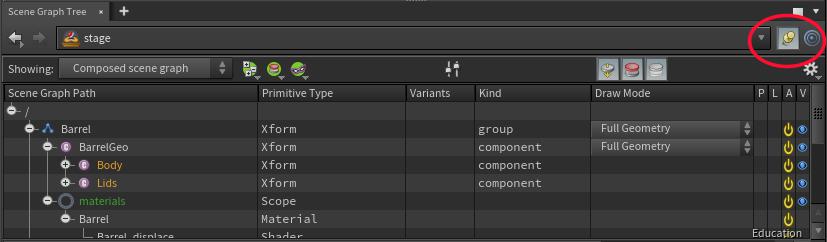
-
If you don’t want the hassle of pinning the pane and dragging and dropping, then go to the Scene Graph Tree, select the path you want, RMB-click ▸ Copy Path, and then paste the path in the Primitive Path parameter field.
For more information on targeting primitive patterns, please see the Primitive Matching Patterns help page.
-
-
Create a
Null LOP node, add it to the block, and then rename it to Lid. -
Create a
Null LOP node, add it to the block, and then rename it to No_Lid. -
Create a
Prune LOP node and add it to the block. -
Select the Prune LOP node, and then LMB-drag
Lidsfrom the Scene Graph Tree to the Primitive Path parameter field in the Parameter Editor. -
Connect your nodes:
-
Connect the output of the variantblock_begin node to the both the input of the Lid node and the input of the Prune LOP node.
-
Connect the output of the Prune LOP node to the input on the No_Lid node.
-
Connect the output of the Lid node to the second input on the variantblock_end node.
-
Connect the output of the No_Lid node to second input on the variantblock_end node.
-
Connect the output of the Barrel_w_Lid node to the input on the variantblock_begin node.
-
Connect the output of the Barrel_w_Lid node to the first input on the variantblock_end node.
Your
/stagenetwork should now look like the image below.
The first input for the variantblock_end node comes in unmodified. This is the
Barrel_w_Lid. This is the asset you want to modify. The other inputs are the variants.The second input for the variantblock_end node uses the Prune LOP to prune the lid from the barrel by making it inactive.
-
-
Look at the active layer.
-
RMB-click on the variantblock_end node and select LOP Actions ▸ Inspect Active Layer from the context-sensitive menu that appears.
-
Compare this USD code to the USD code you created in prior steps. Notice how much more compact the USD code is.
All you are doing here is adding a few lines to hide the lids to create the variant instead of adding the whole barrel again and then just hiding the lids.
-
Step 6 - Choose the default variant and save your USD 
In this step you will choose the default variant for the barrel asset and then save out as a USD.
Note
In LOP nodes and with USD ROPs, you can specify paths to files on disk that do not yet exist and any missing directories are automatically created when the ROP is executed.
-
Create a
 Set Variant LOP node.
 -
Connect the output of the variantblock_end node to the input on the new Set Variant LOP node.
-
Select the Set Variant LOP node, and in the Parameter Editor set the following:
-
In the Variant Set parameter drop-down list, select
model. -
In the Variant Name parameter drop-down list, select
LidorNo_Lid.This will be the default variant.
-
-
Create a
Null LOP node and rename it to BarrelSets. -
Connect the output of the Set Variant LOP node to the input of the BarrelSets node.
-
Create a
Configure Layer LOP node. -
Connect the output of the
BarrelSetsnode to the input on the Configure Layer LOP node. -
Select the Configure Layer LOP node and specify the USD file to which this set of barrels will be written by doing the following:
-
Turn on the Default Primitive parameter and then select
/Barrelfrom the parameter’s drop-down list. -
Turn on the Save Path parameter and then type the following in its parameter field:
$HIP/tutorial1/Geo/Barrels.usd
-
-
Create a
USD ROP LOP node. -
Connect the output of the Configure Layer LOP node to the input of the USD ROP LOP node.
Your
/stagenetwork should now look like the image below.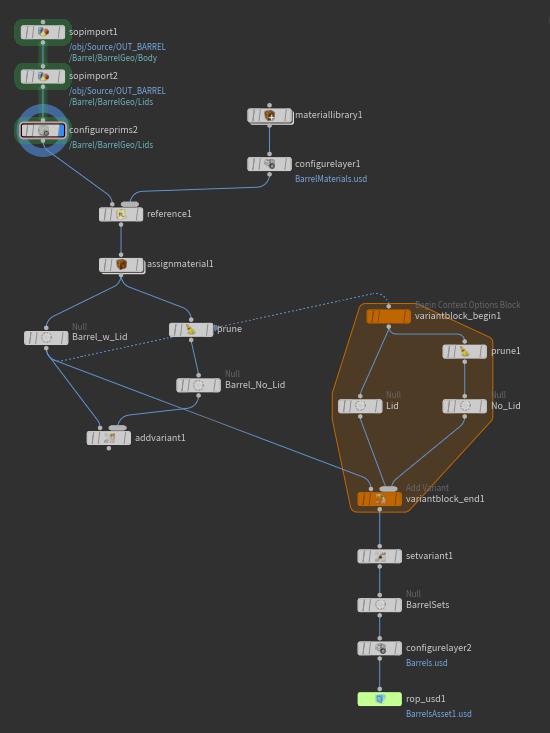
-
Select the USD ROP LOP node and then in the Parameter Editor, type the output path for the USD file in the Output File parameter field. For example,
$HIP/tutorial1/BarrelsAsset.usd. -
Look in the Output Processing section of the parameters and make sure that the Use Relative Paths parameter is turned on.
This is what allows you to use
$HIPeverywhere in this LOP network. The USD ROP LOP node examines your network for references to$HIPand replaces them with relative references when it writes out the USD file.This is actually a very complex part of USD (also known as relative paths) and a real cause of confusion for many new users. This control allows you to work with a file structure you are familiar with, while letting LOPs create USD-friendly paths under the hood.
-
Look in the Extra Files section of the parameters and notice the option for Error Saving Layers with Implicit Paths.
This makes the ROP Output LOP node issue an error when any of your layers are not configured as LOPs will not know where to save your data.
To test this, bypass the Configure Layer LOP node just above the ROP Output LOP node. If you try to save out the file, the output node will error.
-
At the top of the USD ROP LOP node’s parameters list, click Save to Disk to save your USD file to disk.
Step 7 - Verify your changes 
In this step you will make sure that everything you have set up works by checking the USD file you just saved out.
Load the USD back into Houdini 
-
Load the USD file you just saved out.
-
Create a
Reference LOP node and do not connect this LOP to anything -
In the Parameter Editor, set the following:
-
In the Primitive Path parameter field, type:
/Barrel
-
In the Composition section, use the Reference File parameter to browse to your USD file and load it:
$HIP/tutorial1/BarrelsAsset.usd
It should look exactly like the last ROP in your LOP network.
-
-
Create a
Set Variant LOP node and set the following in the Parameter Editor: -
LMB-drag
BarrelGeofrom the Scene Graph Tree to the Primitives parameter field. -
In the Variant Set parameter field, type
model. -
Select a variant from the Variant Name parameter’s drop-down list.
-
Inspect your USD file structure 
In a file browser window, navigate to the network location to which you saved your USD files.
You should see five files there
├── BarrelsAsset1.usd
├── Geo
│   ├── BarrelBase.usd
│   ├── BarrelLids.usd
│   └── Barrels.usd
└── Materials
    └── BarrelMaterials.usd
Troubleshooting 
When I load my USD back into Houdini with the reference LOP, it does not look the same as the final node in my LOP chain
Verify that that there are five files in the file structure (as seen above). If not, you may have put the same file path in more than one LOP node. This will cause these files to clobber each other.
I don’t see any materials on my barrels
Verify that you used the proper UDIM syntax in the file parameters in the shader. Please review the section on the Material Library, especially the warning.
Congratulations! You have built your first USD asset and are now ready to move on to the next tutorial.