| On this page |
Introduction 
If you have not done so already, download the necessary support files.
In this tutorial, we are once again going to be acting as the “assets” department. In this case we are assembling an asset: a bookshelf full of pots. Whether something like this would be done by the assets department or the layout department depends on the studio, but for the sake of this tutorial, we will say it happens in “assets”.
We will have a brief introduction to the ![]() Stage Manager node in this lesson. More details on the Stage Manager will follow in the next lesson.
Stage Manager node in this lesson. More details on the Stage Manager will follow in the next lesson.
Please also see the glossary entries on Point Instancers and Instancing.
Remember to save your file often as you work, for example as lops_tutorial_2.1.hip

Tip
Remember to save your scene file frequently as you work. For example, save your file as something like lopsintro_tutorial_2.hip.
Assembly 
-
Start a fresh Houdini.
-
Switch to the Solaris desktop.
Make sure you can see the Scene Graph Tree in one of your panels.
-
Jump to
/stage.Note
You can create a LOP network at any level in Houdini, but for the sake of clarity, let’s keep our work in
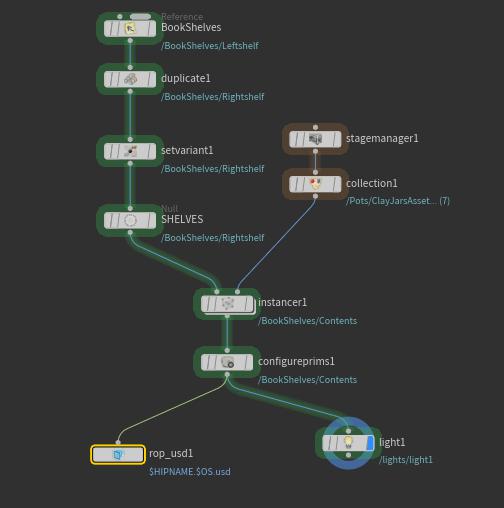
/stage.Now we are going to use some of Houdini’s native SOP-based tools to do the instancing. There are a lot of nodes to wire up, so please refer to the image below to see how the network is created.
-
Create a
 Reference LOP. Rename it
 BookShelves. -
Append a
 Duplicate LOP to the reference LOP. (Note that the node might error until it is completely filled in as below.)Separate Source and Destination Primitives
OnDestination Primitives/BookShelves/Duplicate NameRightShelfModify Source PrimitiveSource Primitives are First DuplicatesTranslate1.5,0,0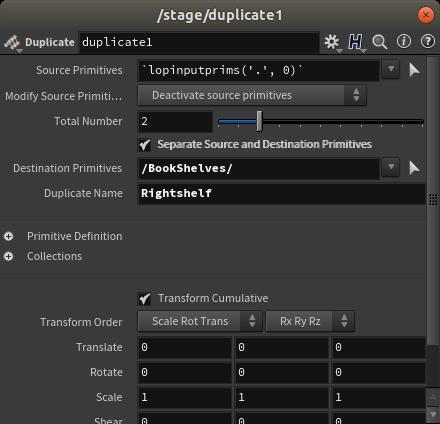
-
Append a
 Set Variant LOP to the duplicate LOP.Primitives
/BookShelves/RightShelfVariant SetmodelVariant NameBookShelf2Note
Note that we are using CamelCase for the name “
BookShelves”. Be sure to be consistent with your cases, in Houdini (and Linux in general), the words “bookshelves” and “BookShelves” are not the same word. -
Append a Null LOP to the Set Variant LOP and call it “SHELVES”. You may want to look at the last image on this page to see if it’s all wired up correctly so far.
Now we’ll use the Stage Manager to bring some things in to instance on the shelf.
-
Create a Stage Manager LOP. Don’t wire anything to it yet.
-
In the Stage Manager’s parameters, click on the green “+” symbol to add a folder. Call this
Pots -
Open the file browser in the Stage Manager and dive down into
LOPS_DEMO_FILES/Library/Assets/ClayJars(andHerbs) folders, then dragHerbJarsAsset.usdandClaysJarsAsset.usdinto the Stage Manager under thePotsfolder.
-
-
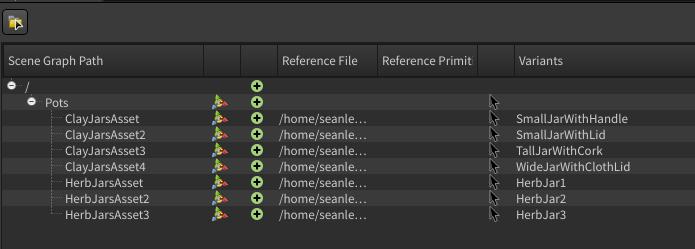
Now we will duplicate these objects and choose a unique variation for each. You will end up with seven unique jars.
-
The easiest way to duplicate is to RMB ▸ Duplicate on the prim in the Stage Manager.
-
Once you have duplicated a prim, choose a unique variant for each one. The easiest way to do this is to LMB choose a variant from the variant column in the Stage Manager.
Your Stage Manager should look like this when you are finished:
Now that you have the things you want to instance to your shelves, let’s create a collection.
-
-
Append a
 Collection LOP to the stage manager LOP.Collection Name
StuffToBeInstancedPrimitive Pattern/Pots/* -
Append an
 Instancer LOP to the collection LOP. Wire it up as seen in the last image on this page.Primitive Path
/BookShelves/ContentsPrototype SourceSecond InputsPrimitive KindGroupPrototype Primitives%StuffToBeInstanced-
Select the Instancer LOP and hit ENTER to dive inside.
Note
The Instancer LOP may error until you have performed the next step.
-
Inside the Instancer LOP 
We now want to create a point cloud onto which we are going to instance our pots. There are many ways to do this, but here is one. There are a lot of nodes to wire up. You can scroll to the end of this tutorial to see how the final node network is wired.

-
Create a
 LOP Import LOP.LOP Path
/stage/SHELVESPrimitives* -
Append an
 Unpack USD to the LOP import node.Geometry Type
PolygonsNow we want to save just the area we would like to instance pots to so we can scatter some points on it. We need to create a group, and here is one way of doing it.
-
In the viewport, press Space + 2 to move to Top view. Press W to toggle wireframe mode.
-
Press ⇥ Tab to open the tab menu. Type
groupand press Enter to start the Group tool.-
Press 4 key to enter primitive picking mode.
-
Drag a box around the primitives.
If you don’t get all the primitives in one go, you can hold ⇧ Shift and drag again to select more primitives.
-
RMB ▸ Accept Selection to finish.
-
-
Append a
 Blast SOP to the group SOP and blast away all but the group you just created.
You can see that you have both the top and the bottom of the shelves. Let’s get rid of the bottom.
-
Append a
 Delete SOP to the Blast SOP. We will delete by normals.Tab ▸ Normal
EnableDirection0,-1,0Spread50 -
Append a
 Scatter SOP to the delete SOP.Force Total Count
300Relax Iterations100Scale Radii by2Max Relax Radius14
Create primvars 
Now we are going to create random values to override the base color, specular roughness and albedo of our pots to give them further random characteristics. In Houdini-speak, we are giving them geometry attributes, in USD-speak, these are primvars.
-
Append a
 Attribute Randomize SOP to the scatter SOP. Rename it
 basecolor.Attribute Name$OSThis makes an attribute called “basecolor” with a random value between 0 and 1 in the X,Y,and Z components. What this means is that if there is a shader attached to these prims, and that shader has a parameter called “basecolor,” it will be over-ridden with this value. Using
$OSin the node name makes it so that we can now copy/paste our SOPs and just rename the SOPs to get new, correctly named attributes created. -
Copy and paste the
basecolorSOP (or Alt-drag the node) to create a copy. Append the new copy tobasecolor. Rename the copyrough.Min Value.5Dimensions1 -
Make another copy of
basecolor, append it torough. Rename the new copyalbedomult.Min Value.2Dimensions1The
Dimensionsparameter value of1makes these values into floats. If you left this at the default (3), it would make these into vectors. In this case it would do no harm, but the shader expects floats forroughandalbedomult, (and converts vectors to floats for you if they are not already floats). -
Append an
 Output SOP to
 albedomult. Rename the output nodeOUT.Tip
You can find out the names of the above shader attributes by hovering over the paramater’s labels in the shader.
-
Press MMB on your output node. You should see that the point attributes
basecolor,rough, andalbedomult. If you RMB on the last SOP in your chain and choose Spreadsheet, you should see random values (in the range you chose above) forbasecolor,roughandalbedomult. -
Press U to jump back up to
/stageagain.
Finish up and save your USD 
We should now see some jars on the shelf. Play with the Seed parameter in the Instancer LOP to get a pleasing distribution.
-
Set the following in the Instancer SOP:
Point Attributes to Copybasecolor albedomult roughPrototype SourceSecond InputNote
In USD, each model instanced across the points is called a prototype.
Tip
Currently all jars and pots are oriented in the same direction. You could modify the
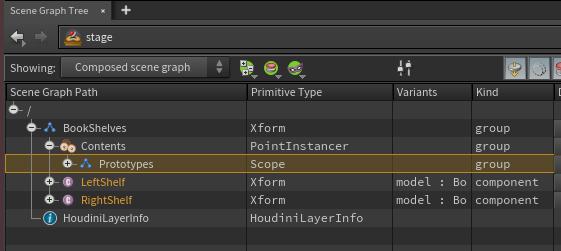
Nattribute and theupattribute (or just theorientattribute) to change this.We have one more thing to do before we save this out as an asset. If you look at the Scene Graph Tree, you will see that in the group “Contents” you have “Prototypes” with an undefined kind. It’s not good practice to do this, so let’s fix it.
-
Append a
 Configure Primitive LOPPrimitives
/BookShelves/Contents/Prototypes /BookShelves/Contents/Prototypes/*KindGroupYou should now see that “Prototypes” are a group.
-
Append a
 USD ROP LOP.Layer Metadata ▸ Default Primitive
/BookShelvesOutput File$HIP/tutorials/PackedShelves.usd-
Click
Save to Diskto save
-
Note you can also append some lights to your LOP chain to preview how this will look rendered. To see a Karma render, choose “Karma” from the viewport dropdown, (the menu that defaults to “Persp”).
You are now ready to move on to the next tutorial! If you want to check the results of your shelf build, use a reference LOP to load in your saved USD, ($HIP/tutorials/PackedShelves.usd) and the one from the demo files, ($HIP/LOPS_DEMO_FILES/Library/Assets/InstancedShelves/PackedShelves.usd).
You can also look at LOPS_DEMO_FILES/BookShelfInstancing.hip to see the finished node network as explained in this tutorial.
Congratulations! You have assembled some assets into a bigger asset and are now ready to move on to the next tutorial!
Troubleshooting 
When I go to save the USD file from the USD ROP, I get this error (or similar): Warning: Upgrading crate file </path/to/file/PackedShelves.usd> from version 0.7.0 to 0.8.0: A SdfPayloadListOp value was detected which requires crate version 0.8.0.
You can (most likely) ignore this warning. “Crate” is the name of the USD binary file format. It has been through a number of versions. By default, new files are written in a certain version (at the time of this writing, the “0.7” format). But certain USD constructs can’t be expressed in “0.7” format, so that warning is telling you that it is in fact going to write that particular file in “0.8” format, which means that applications that use an older version of USD that only understands the “0.7” format won’t be able to read this file. This would not be applicable to someone who is using only Houdini.