| On this page |
Introduction 
If you have not done so already, download the necessary support files.
In this tutorial, we are going to be acting as the “layout” department. Most modern pipelines include a layout department where assets are marshalled and placed in the scene, either for initial blocking (usually in the case of animated characters or props) or for final and exact placement, (often for sets or environments).
We will be using the barrel asset you created in the first tutorial and the bookshelf you created in the second, as well as other assets that you will have downloaded. Don’t worry if you did not do the first two tutorials, you can do this tutorial without having done the previous ones, (but of course you should do them!).
We will create a sequence layout in two ways. We will do a small bit of the sequence layout manually so you understand how a USD layout stage is structured, and then we will do the sequence layout fully using the Stage Manager, which makes the process much easier. In the next tutorial, we will branch off this sequence layout to create variations for individual shots, (shot layouts). Of course, a project might handle this differently, (project layouts, sequence layouts, shot layouts, etc). We will include some default lights so that submissions to dailies or other processes (automated or otherwise) have some lighting.
In these examples, there are no published cameras, but of course in a real production environment the cameras would have been published by the matchmove department and be included in each shot layout.
Let’s begin, and remember to save your file often as you work, for example as lops_tutorial_3.1.hip
Manual layout 
-
Start a fresh Houdini.
-
In the main menus, choose Desktop ▸ Solaris.
Make sure the Scene Graph Tree is one of your panels.
-
In the network editor, go to
/stage.Note
You can create a LOP network at any level in Houdini, but for the sake of clarity, let’s keep our work in
/stage.-
Create a
 Reference LOP. Rename it
 Barrels.Look at the Primitive Path parameter in the reference LOP. The expression
$OSmeans, “the name of this node.” Press MMB on the label to see that this resolves to be “Barrels”. This saves you from having to enter the same info in two places.Reference FIleLOPS_DEMO_FILES/Library/Assets/Barrels/BarrelsAsset.usdA reference is one of the most common ways to load prims into a LOP network.
-
-
Append a
 Set Variant LOP to the reference LOP.
-
Choose
modelfrom the menu next to the Variant Set parameter. -
Choose
BarrelWithLidfrom the menu next to the Variant Name parameter.
We use the setvariant LOP to choose one of the variants of the barrel that had previously been saved with the barrel asset.
-
-
Append a
 Null LOP, rename it
 BarrelWithLid. -
Select the Set Variant and Null nodes you just created and in the parameter editor menus choose Edit ▸ Copy. Then choose Edit ▸ Paste twice to create two new copies of each.
-
In the new Set Variant copies, choose
BarrelNoLidV2in one andBarrelNoLidin the other. Rename the nulls to match. (Scroll down to see what the node network should look like if you are confused.)
If you look at the Scene Graph Tree, you will see that these barrels just live at
/Barrels. We want to “graft” them into the scene in some sensible way. Let’s create a “shop front” to store these (and other) props.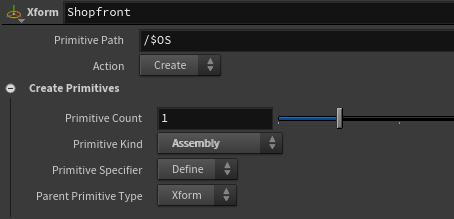
-
Create a
 Xform LOP (not a
  Transform LOP). Rename it
 Shopfront. Do not wire anything into it.As before, the expression in the Primitive Path takes care of naming the primitive path properly.
In the Create Xform parameters, open the Create Primitives section.
Primitive KindAssemblyWe add the Xform LOP to create a top-level transform and a root folder for the USD file structure. In this case we call it “Shopfront.” We make the primitive kind “Assembly” as it is a good way to organize a group of smaller models. Please see the glossary for more notes on these organizational structures, (Assemblies, groups, components and sub-components).
-
-
Create a
 Graft Stages LOP.
-
Wire the output of the Xform node into the Graft Stages node’s first input.
-
Wire all three nulls into the Graft Stages node’s second input.
Primitive PathLeave this at its default:
`lopinputprim('.', 0)`. Middle click on the label to see that it resolves asShopfront.Primitive KindGroupDestination Path Default/Barrels/`opinput('.', $IIDX)`
The Graft Stages node literally grafts prims into a USD hierarchy. See the glossary for more information on the graft operation. Basically, the Graft Stages node is for inserting other LOP trees into your LOP network (and properly constructing the resulting USD file).
-
-
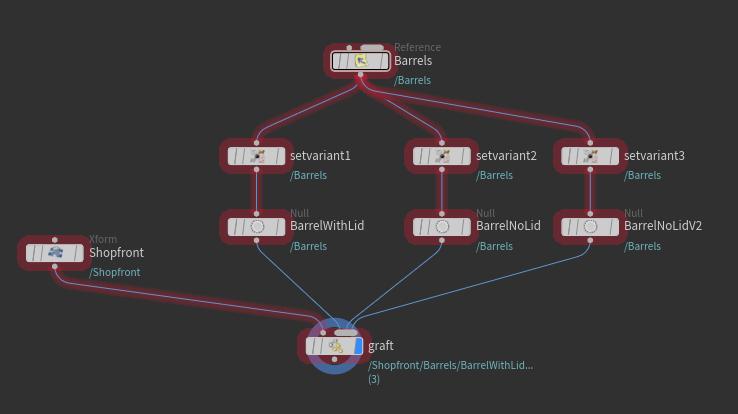
Your node network should now look like this:
Note
You might be wondering what the expression
`opinput(“.”, $IIDX)`means. If you MMB on the label, normally you would see what that expression resolves to. In this case, it cannot resolve as it is looping over the inputs, so you will see nothing, (it can’t show more than one result at a time). The “opinput” expression takes care of naming the subfolder by querying the “input index”($IIDX)of the current input in input2, which resolves to the name of the LOP corresponding to that index. -
If you look at the Scene Graph Tree, you should see this:

So why do we only see one barrel in the viewport and not three? They are on top of each other. Let’s move them into position.
-
In the viewport, press the S key (to select) . If you look at the top of the viewport, you will see a row of icons that allows you to “Select All,” “Select Geometry” etc.

In this case, simply leaving it at “Select All” will work.
-
Once you have selected a barrel, press T to put down an
 Edit LOP. (If you can’t select a barrel or change your selection, see the next NOTE on this page.)
 -
Now press Enter in the viewport to switch to the Handles tool.
-
You can switch between transform, rotate and scale handles with the T, R, and E keys. Press T to switch to the transform (move) handles.
-
Move the barrels so they don’t overlap.
Why use “edit” and not “transform?” For manual layout, edit is the way to go. Transform is there to let you manipulate transforms procedurally.
-
-
Now let’s try something fun.
-
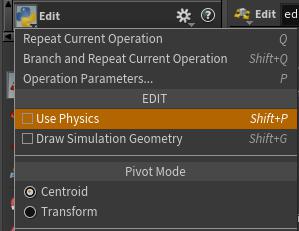
Select the checkbox for “Use Physics” in the top left of the stage viewport. You are now in physics mode.
(If you left the edit node state, you can get back to it by selecting the Edit node in the network editor, then moving the mouse into the viewport and pressing Enter.)
-
Select all of the barrels. Click "Add Physics' on the toolbar in the viewport. This makes the barrels eligible to collide with one another.
-
Select a barrel, and press T for the transform handles. Now drag a barrel above another barrel and then move it down. The barrel you are transforming should collide with the other barrel.
Note
If you cannot select a barrel or change selections, make sure “Secure Selection” icon is ticked off in the left side of the viewport.

-
We are ready to move on, so to continue, save the current file (if you wish). If you want to see this whole manual layout completed, open FullSceneSetup.hip. Otherwise, choose File ▸ New to start a new Houdini session.
About the Stage Manager 
We have laid out three barrels, but you can see how tedious it would be to repeat this for a complicated set. Luckily, there is a better way to do this using the Stage Manager. The Stage Manager is designed to be a one-stop location for referencing assets from disk, transforming them in 3d space, and adjusting your scene hierarchy. The Stage Manager will flatten layers on its input into a single layer so that it can perform these operations on any input. However using this facility will combine all the layers in the layer stack, which is not something to be done lightly.
What does it mean to “flatten layers on its input into a single layer”? If you “flatten” a layer, you have effectively removed the “sublayering” abilities of USD. There is no longer a “layout” and “animation” layer, there is only one layer. So if you, as an FX artist, come along and use the Stage Manager to replace some part of the scene, you have effectively blocked any up-stream changes from coming through. If layout were to move assets around, then lighting, who pick up layout + anim + fx, would never see those changes because FX’s flattened layer would override everything. Not only that, there is no way to “mute” the FX layer and see the same prims before FX did its thing. If you mute the FX layer, the prims would simply disappear, there would be no “layout layer” or “anim layer” to “shine through.”
Remember that you cannot delete anything in USD, (mainly because anything may be referenced by something else anywhere), which is why muting, visibility and activiation are supported. However, by flattening a layer, you have effectively destroyed the weaker layers.
Having said all that, you will probably end up in the Stage Manager quite a lot of the time. As mentioned, it is a huge time-saver in laying out a scene, organizing your scene, and selecting variants.
We will explore the concept of layers and overriding layers in a later tutorial.
Layout using the Stage Manager 
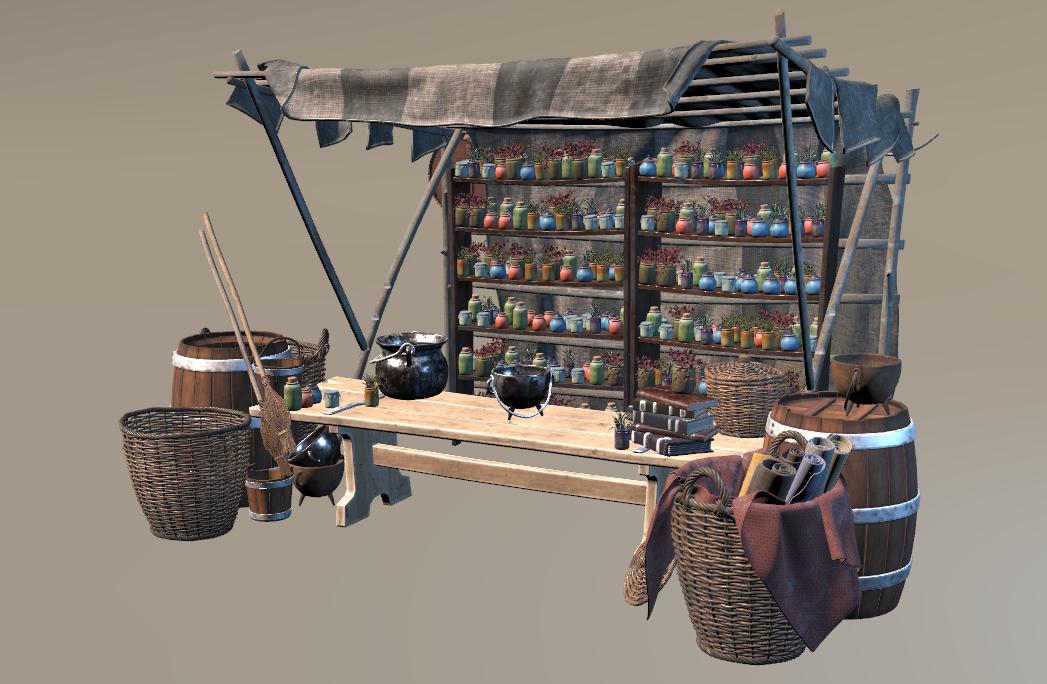
Here is the layout we are going to reproduce. We are going to start by building the front part of the set.
-
Turn on the display of the construction plane. Houdini will snap to this plane if it is displayed.
-
Create a
 Stage Manager LOP. Rename it
 front.-
In the Stage Manager, navigate to the files you downloaded previously. We are only going to be loading USD files that end with “Asset.usd”. These USD files include all the materials and usually variants. For example, we are going to start with
BarrelsAsset.usd.

-
-
Drag the
BarrelsAsset.usdfile out of the browser into the viewport. Hit ENTER to position it at the origin, or click in the scene view to place it in the scene.You will see the default variant for this asset. If you want to choose another variant, there are two ways:
-
With the asset selected, RMB ▸ Edit Variants (or CTRL + E ) and choose a variant from the chooser.
or
-
In the field next to “Variants” in the Scene Graph Path, click and choose a variant.
-
-
Continue building the scene until you have the front part of the set built, choosing variants as necessary to match the reference, (remember, we are building the front part of the set first). `
Tip
You can duplicate prims using CTRL + D in the viewport, and then choose an appropriate variant.
-
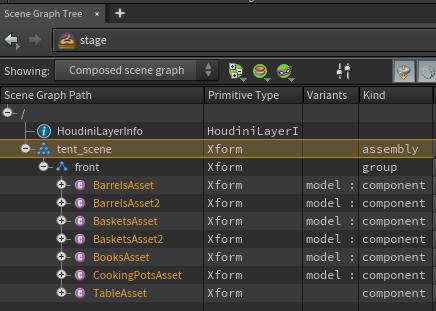
Now look at the Scene Graph Tree. You should see something like this.
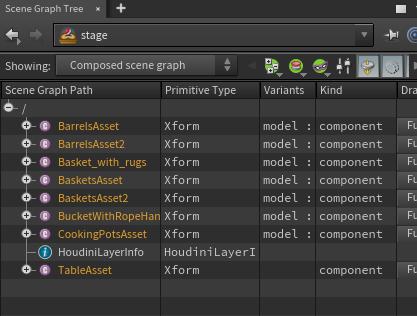
Note that all of your assets are just floating at the root of the USD tree. Not cool. In the previous tutorial, you organized the bookshelf in the Stage Manager itself by clicking on the green “+” buttons. You could do that here too, but we are going to show you another way of doing it so you gain a deeper understanding of LOPs and USD. If you don’t remember what the Graft Stages LOP does, please review this again.
-
Create a
Xform LOP.Create PrimitivesAssembly -
Create a
Graft Stages LOP.Primitive KindGroup
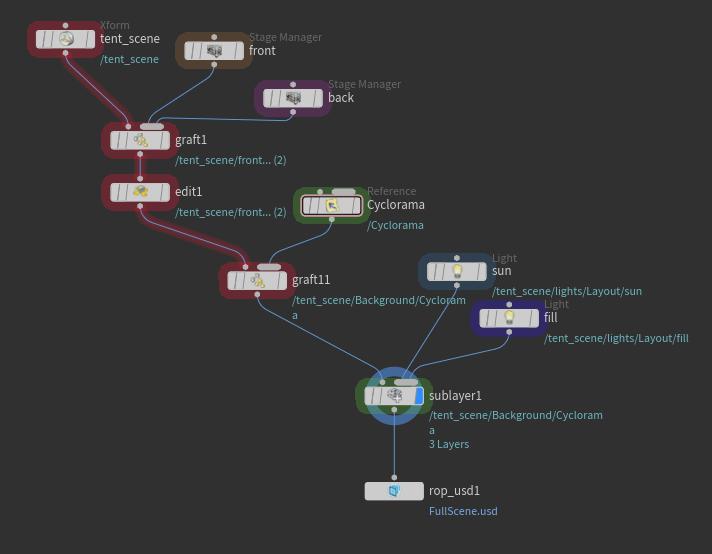
Wire up the nodes and rename as per the image below.

-
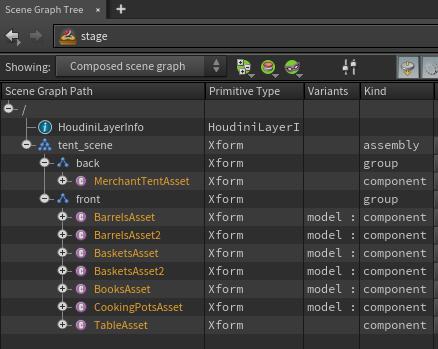
Now look at the Scene Graph Tree pane. The USD file structure is much more organized, with the group “tent_scene” and the components underneath.
-
Create another Stage Manager
-
Rename it
backand wire up as below.

-
-
Using the techniqes described previously, add some assets to the “back” of the scene.
Physically based layout 
Now let’s put some books on the table. Traditionally, this kind of thing (stacking objects in CG) has been very tedious. We're going to use physically-based layout to make this easier. Physics-based layout is not yet supported in the Stage Manager, so we will use an Edit node to tweak our layout.
-
With the
frontStage Manager selected, drag a book onto the floor of your scene. -
Let’s duplicate the book and use a different variant. Select the
BooksAssetin the Stage Manager, right-click it and choose Duplicate.-
In the duplicated prim, use one of the techniques described previously to change to a different variant.
-
Repeat for the number of books you'd like to stack up.
Now let’s stack the books on the table.
-
-
Set the display flag on the Graft Stages node.
-
In the viewport, press S to enter selection mode. Select a book, then press ENTER to finish selecting.
-
In the viewport, press ⇥ Tab to open the tab menu, then type
editand press Enter to choose the Edit tool. (This appends anEdit LOP to the network.) -
Press ⇧ Shift + P, or right-click empty space in the viewport and turn on Use Physics.
-
Now move your book down towards the table, and it should collide with the table.
-
Repeat to stack your books.
Finish up and add lighting 
We will now add a cyclorama for the background.
-
Create a
Reference LOP, but don’t connect it to anything.-
Rename it
Cyclorama -
IMPORTANT: If you do not rename the LOP, a few other settings below would have to change to get the desired results.
Reference File$HIP/LOPS_DEMO_FILES/Library/Assets/Cyclorama/CycloramaAsset.usd -
-
Append a Graft Stages LOP to your LOP chain.
Primitive Path/tent_scene/BackgroundPrimitive KindGroupNow we are going to add the default sequence lights.
-
Append a sublayer LOP to the Graft Stages LOP. (We will learn more about layers in the next tutorial.)
Sublayer TypeSublayer Inputs -
In the viewport, tumble around to the view you would like to see through the first light.
-
Click the Lights and Cameras shelf tab, then ⌃ Ctrl-click the kind of light you would like to place. For the purpose of this exercise, let’s add one Distant Light and one Area Light.
(If you hold ⌃ Ctrl while clicking a light tool on the shelf, it creates the light “looking through” the current view.)
-
For each light you just created:
Primitive Path/tent_scene/lights/Layout/$OS-
Rename the node to indicate the type of light it is, (for example,
sun, orfill, orrim).
-
-
Adjust light intensities if necessary.
-
The lights are probably not wired up correctly. Wire them up as per the image below.
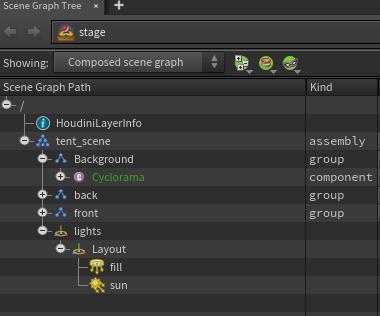
Your stage hierarchy should look something like this. The “tent_scene” is an assembly, the “back” and “front” are groups, and the rest are components.
Save your USD 
-
Append a
 USD ROP LOP.Layer Metadata ▸ Default Primitive
/tent_sceneOutput File$HIP/tutorials/TentScene.usd-
Click
Save to Diskto save the USD generated from this LOP network.
-
If you want to compare your layout, load LOPS_DEMO_FILES/Libaray/Layout/FullScene.usd.