| On this page |
Introduction 
In this tutorial, we are going to be acting as the “lighting” department. We are going to load the layout USD file and the FX USD file, and light the scene. Of course, in a production pipeline, it is likely there would be more departments and more layers to use.
One thing to take careful note of is that there is not necessarily just one FX layer, or just one layout layer. For example, there may (and likely will be) multiple FX layers represented by individual USD files on disc. In this tutorial, it is up to you to find these USD files, but in a production pipeline, this would likely be automated in some way.
Let’s begin, and remember to save your file often as you work, for example as lops_tutorial_6.1.hip
Begin 
-
Start a fresh Houdini.
-
Switch to the Solaris desktop.
Make sure you can see the Scene Graph Tree in one of your panels.
-
Jump to
/stage.Note
You could create a LOP stage operator at any level in Houdini, but for the sake of clarity, let’s keep our work in
/stage.
Load layout and FX USD files 
The first thing we have to do is load the USD files from layout and FX.
-
Create a
 Sublayer LOP.
-
Load the layout USD file you saved out in a previous tutorial (the same one you used in the last tutorial). EX:
$HIP/tutorials/shot004_layout_v001.usda-
Rename to “layout”
-
-
ALT drag the layout node you just created to copy it.
-
Rename this node to “fx,” and wire it to the layout node.
-
In this renamed node, load the fx USD file you saved out in the previous tutorial. Note that you are loading the fx-only USD, not the one with the Layout and FX combined. EX:
$HIP/tutorials/shot004/fx/fx_v001.usda
-
-
If you scrub you should now see the entire scene with the FX layer. If you bypass the fx node, the fx animation should disappear and be replaced by the layout.
Mute the FX layer 
Open a Scene Graph Layers panel. You should see the layers in your scene and a “Mute in Viewer” column. You can use this to temporarily disable the contribution of a layer, (for example, if it was too heavy to work with interactively.)

Of course, in this tutorial the FX layer is not heavy, so unmute the layer and let’s continue.
Lighting 
Mute default lighting 
First, let’s mute the layout lighting.
-
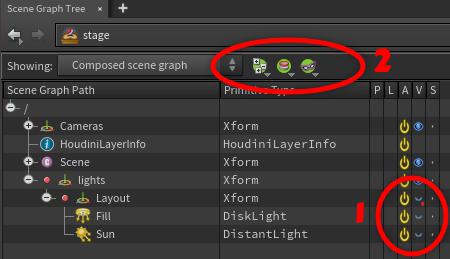
Go to the Scene Graph Tree and toggle the “v” icon(s) of the light(s) you would like to mute. (See #1 below).
-
Note that in the Scene Graph Tree you can also save out some presets. (See #2 below).
-
Tree expansion (the way the current tree is shown in the viewer).
-
Viewport overrides (the way the columns are toggled).
-
Load Masks (for example, the muting of the FX layer we were experimenting with is a “load mask”).
-
Tip
The above muting of the FX layer is local to this Houdini session only. If you wanted to save these state out as a USD file, a fast way to do this is to go to the Load Masks dropdown, and choose, “Create Configure Stage Node from Load Mask” and it will create a ![]() Configure Stage LOP for you with everything properly filled out.
Configure Stage LOP for you with everything properly filled out.
Layer break 
Before we create our own lighting, we have to tell LOPs that we want break the layer. We only want to write out our new lights to the lighting USD file. The concept of layer breaking is very important, so please be sure to review the documentation on this topic if you are not clear on it.
-
Append a
 Layer Break LOP.
Prune sequence lighting 
You may have changed the light’s visibility in the Scene Graph Tree. This is local to the current Houdini session only, so we have to prune out the sequence lighting so that it will not contribute to lighting the scene if the scene is built from published USD files.
-
Append a
 Prune LOP.Primitive Pattern
/lights/Layout/*
We leave the “Method” at the default “Make Invisible,” because for lights in USD, making them invisible is the same as deactivating them. Note that this is not the case in the Houdini, where turning off the display of a light will not affect its ability to contribute light to a scene.
Create shot lighting 
Now let’s add our own lighting.
-
Tumble your viewport until you see the scene you would like to see through the first light.
-
Go the the Cameras and Lighting shelf and CTRL LMB on one of the lights. This will place a light in your scene with the same approximate view as that of your viewport.
-
In the light, change the Primitive Path. You want your lights to live in the “lighting” folder, not just float at the top of the USD tree.
/lights/lighting/$OS
-
Repeat for the number of lights you would like.
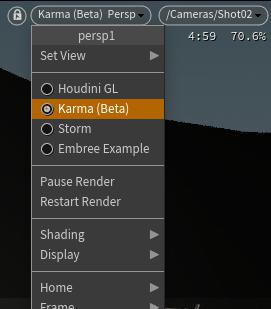
Test render 
From the viewport dropdown, choose “Karma.”
Use Light Mixer 
We are going to use the Light Mixer to give us quick and easy access to all (or some) of our lights.
-
Append a
 Light Mixer LOP LOP to the last light in your chain.
 -
Drag the lights you would like to be able to control into the panel on the right.
-
Adjust lighting as desired.

Write out the USD files 
We are now ready to write out our lighting USD file. Note that if you were the last stop in the pipeline, this may not be necessary, but some pipelines may rebuild the scene from scratch at render time to ensure a clean and up-to-date scene. In this case you would be required to write out your lighting to disc as a USD file.
-
Append a
 USD ROP LOP to the last LOP in your change.Output File
$HIP/tutorials/shot002_lighting_v001.usd -
Press “
Save to Disc” to save the lighting layer to disc. Note that there is no need to save out a frame range unless you animated your lights.
Your node tree should look something like this:
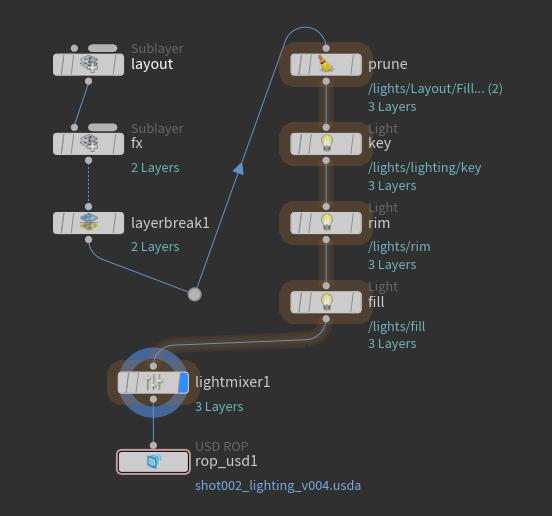
-
Save your Houdini scene and move on.
Read back the lighting layer 
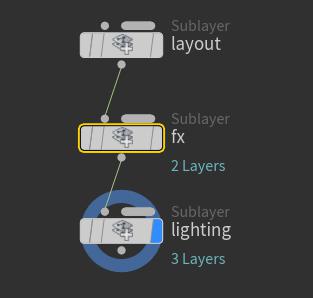
Let’s bring back the lighting USD layer to make sure everything works.
-
In a new Houdini session, wire three sublayer LOPs together and you should see your lighting department lighting.
A note on organization 
As you have seen from these tutorials, the way you organize your USD stage is quite important. Here are some rules of thumb to keep in mind:
-
If you intend to reference in a file, you should build the primitives in that file under a single root primitive EX: “
/scene/geo”, “/scene/cameras”, “/scene/lights”. -
If a file is written to be sublayered, then it be better to have multiple root prims. EX: “
/lights”, “/cameras”, “/geo”.-
You can think of “lighting” as being a department, and each department gets their own layer (“lights”), that is sublayered into the overall scene.
-
This makes it very easy to only bring in the department you want via a sublayer LOP.
-
-
If you are adding lights to a specific asset (car headlights), then you'd want the lights to be inside the model hierarchy (if only to get the inheritance of transforms right). EX: “
/asset/headlight/geo", ”/asset/headlight/light ", “/asset/headlight/material”.