|
Houdini Engine for Unity
|
|
Houdini Engine for Unity
|
Curves are a very useful tool to control the way your asset behaves in Houdini, as they can be displayed and manipulated easily in the Unity Scene view.
Curves can be created for editing in 2 ways:
When an editable Curve is created, the plug-in will display the Curve Editor if the root asset GameObject is selected.
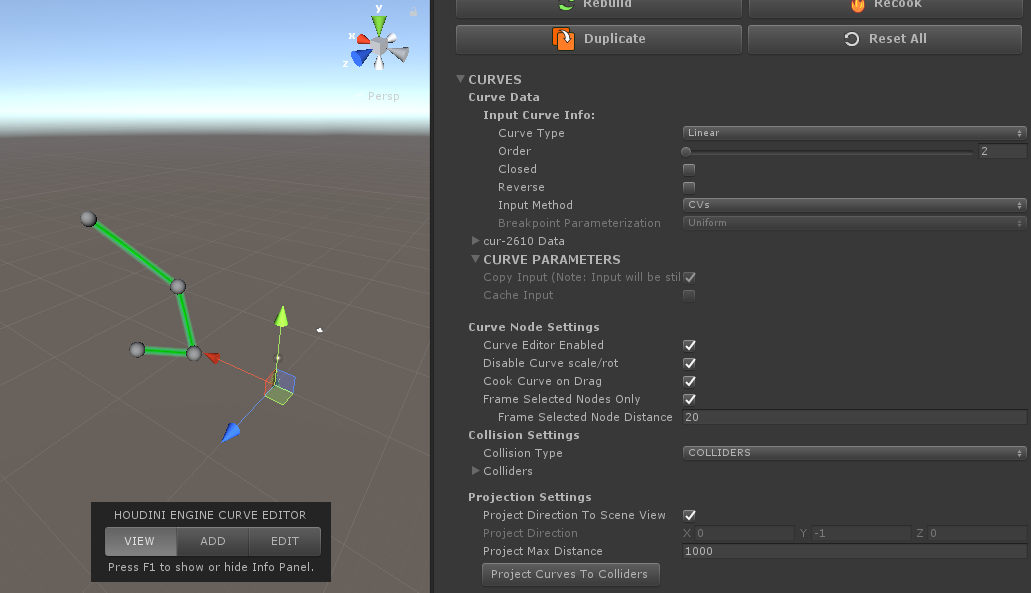
Note the Curve Editor in the Scene view, and the Curves section in the Inspector UI in the above image. The Curve Editor can be toggled via the Curve Editor Enable option in the Curves UI. Also, multiple curves can be manipulated and interacted with by selecting the root asset GameObject.
Note that curves containing the old curve::1.0 SOP should still be able to work, but it is hidden by default. To make it visible in Houdini 19 go to Edit > Preferences > Shelves and Tab menu and select > Show All Operators.
The Curve Editor has 3 modes: View, Add, Edit
View - Displays a better visualization of the Curve, along with its points. This is useful when the Scene has a lot of elements which can occlude the Curve.
Add - Add points to Curve. The new point's position is displayed in purple with a dotted line extending from the existing point that it will connect to. Pressing the left mouse button will confirm and create the new point. The new point is added based on the identity plane by default, but colliders and layermask can be specified in the UI to change this behaviour. See the Curve Editor dialog in Unity for further information about adding points.
Edit - Edit existing points on the Curve. Points can be selected, moved, or deleted individually or in groups. When points are selected, a Transform handle will display at its origin (or group origin if multiple points) which can be moved. While moving points, the Curve display will change to show the linear connections between points. Only after finishing moving (i.e. mouse button released) will the Curve be cooked and updated. This is an optimization to improve the user experience.
This is displayed on the asset's Inspector UI when there is an editable Curve in the node network.
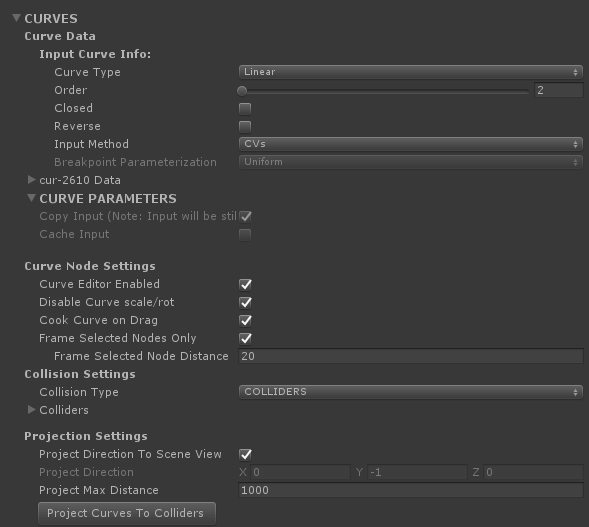
Input Curve Info:
Curve Type - Type of the curve. Can be Linear, NURBs or Bezier. May impose restrictions on the order depending on what you choose.
Order - Order of the curve.
Closed - Toggle to close the curve.
Reverse - Toggle to reverse the curve.
Input Method - How the curve behaves with respect to the provided CVs. Can be either CVs, which influence the curve, or breakpoints, which intersects the curve.
Breakpoint Parameterization - Defines which method is used to refine the curve when using breakpoints.
Curve Parameters:
Curve Editor Enabled - Toggle to display the Curve Editor in the Scene view.
Disable Curve scale/rot - Toggle to disable adding the rot and scale attributes to the curve points.
Cook Curve on Drag - Toggle to cook the curve while you are dragging the curve point. Useful if you need responsiveness over performance. Disable this option to improve performance.
Frame Selected Nodes Only - Toggle to frame only the selected node (instead of the entire curve) when using the Frame Selected (F) command.
Frame Selected Distance - The distance when framing the selected node. (Only valid if frame selected nodes only is enabled)
Collision Type - When adding or projecting points, this specifies the type of collision to use. Colliders will display a list of Unity Colliders. Layermask will display a dropdown with the Layers available in the project. With either choice, a Ray is cast from the mouse cursor when in Add points mode, and either checked against the colliders or items with the Layermask.
Colliders - When Collision Type is set to COLLIDERS, this is displayed. It shows a dynamic list of colliders that will be used when adding, editing, or projecting points.
Layer Mask - When Collision Type is set to LAYERMAKS, this dropdown is displayed, and allows to select the layer to use for collision when adding, editing, or project points.
Project Direction to Scene View - If enabled, project the curve node towards the direction of the scene view camera.
Project Direction - The ray direction to use when projecting the points onto colliders or layer. This is used when Project Curves is pressed.
Project Max Distance - The ray distance to use when projecting the points onto the colliders or layer. This is used when Project Curves is pressed.
Project Curves - This allows to project the current curve points onto selected colliders or layer.
The rest of the UI displays the Curve Parameters that are part of the Curve SOP.
 1.8.6
1.8.6 
