collapse nodes how? do you mean deleting history? you can check lock flag on any SOP node and delete all nodes above, but there is no need to delete them because they will not be evaluated anymore so simply select them and collapse into subnet (Shift+C) just in case you'll need them later (there is also Geometry/Delete History option under Right-Click menu in viewport while in geometry editing mode, if you really need to delete it) you can also export the geometry and bring it back with File SOP, that way keeping your scene file size small (but dependent on external files)
there is a shelf tool in Modify tab called Combine to merge geometry of several objects into one
for selecting geometry by elements right-click on Geometry Selevt Mode and check Select Connected Geometry or use shortcut 0
tamte collapse nodes how? do you mean deleting history? you can check lock flag on any SOP node and delete all nodes above, but there is no need to delete them because they will not be evaluated anymore so simply select them and collapse into subnet (Shift+C) just in case you'll need them later (there is also Geometry/Delete History option under Right-Click menu in viewport while in geometry editing mode, if you really need to delete it) you can also export the geometry and bring it back with File SOP, that way keeping your scene file size small (but dependent on external files)
there is a shelf tool in Modify tab called Combine to merge geometry of several objects into one
for selecting geometry by elements right-click on Geometry Selevt Mode and check Select Connected Geometry or use shortcut 0
Thanks im doing this as i have created a model in parts.
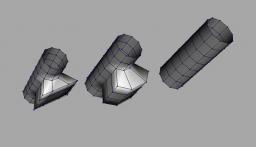
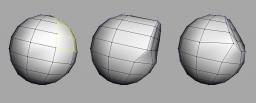
Also is there a way to level a group of primitives, so that they are the same height. I.E Using a sphere selecting the bottom half of points and making them all the same level to turn it into a hemisphere?
I am also wondering what are the benefits, of using HDRI Photos on 3d geometry? I can understand that if you use the photos to light a scene, your objects will be lit with real world lighting. As at the moment I am trying to create a realistic scene with only a guitar in it, using a 3point light setup.
Hemisphere can be done by selecting the points and scaling them in the ty direction. Alternativley delete those primatives, select an edge and apply a polycap sop.
HDRI is used for real world lighting, yeah. Gives nice subtle shadows and nice reflections. However using a standard lighting rig with HDRI is better. HDRI id good but its not a magic “use me for uber realism.”
ragupasta Hemisphere can be done by selecting the points and scaling them in the ty direction. Alternativley delete those primatives, select an edge and apply a polycap sop.
HDRI is used for real world lighting, yeah. Gives nice subtle shadows and nice reflections. However using a standard lighting rig with HDRI is better. HDRI id good but its not a magic “use me for uber realism.”
The reason i was wanting to level points was to flatten part of a model. I have tried selecting them and using a smooth which works but they seem to scale outwards aswell and i dont want that.
What tutorials or books would you reccommend for professional lighting to get a realistic look?
Look here. This is Jeremy Birn. Works for Pixar as a lighting TD. His DVD is Maya specific, but dont let that put you off. It translates across to Houdini very well indeed. http://www.3drender.com/ [3drender.com]
Lyonz The reason i was wanting to level points was to flatten part of a model. I have tried selecting them and using a smooth which works but they seem to scale outwards as well and i dont want that.
There are several ways to flatten a point selection. Quickest way is to select the points in the viewport and tab-append a point SOP to inherit the point selection. In the Translation ty parameter of the Point SOP, first RMB on the parm to delete the existing channel then type in your value or use the MMB XCF Ladder handle on the parm to tweak it.
Another method involves the Edit SOP and the construction plane. Tab-type the construction plane tool in the viewport. Select a point that you want to flatten the points to and hit enter. That will move the construction plane to the point. Or simply drag the construction plane up with it's handles.
Next press the select arrow, type 2 for points and select your points. Press the translate icon to drop down an Edit SOP. RMB anywhere in the viewport and from the menu choose the option “Flatten slection to c-plane”.
Lyonz The reason i was wanting to level points was to flatten part of a model. I have tried selecting them and using a smooth which works but they seem to scale outwards as well and i dont want that.
Atm i am currently texturing my models but have run into a couple of problem.
Im wondering if its possible to apply an alpha texture over the top of the preset gold shader that ive applied to a model ? And how could this be done? I have tried using a vex super material and applying the texture in the diffmap slot, which shows the alpha texture but want the gold underneath this ??
Not sure yet about the rendering problem but your approach is terribly complicated. Take a look at this procedural approach to constructing the thread. It renders fine.
probbins Not sure yet about the rendering problem but your approach is terribly complicated. Take a look at this procedural approach to constructing the thread. It renders fine.
Thanks for replying, it was my first go at trying to create a screw. Using the creep tool seems a more efficient way of doing this but im still get the same error if i extrude the line instead of using another curve node and skin. Does this normally make errors extruding a line?
Also im wondering is it possible to put an alpha texture ontop of the gold shader ? And how can this be done ?
Regarding the alpha texture, use a Vex Layered Surface instead of the Supermaterial. The layered surface allows for “compositing” textures. So you can have the gold as the Base then the #2 layer is perhaps Multiplied.
“gravity is not a force, it is a boundary layer” “everything is coincident” “Love; the state of suspended anticipation.”
probbins Regarding the alpha texture, use a Vex Layered Surface instead of the Supermaterial. The layered surface allows for “compositing” textures. So you can have the gold as the Base then the #2 layer is perhaps Multiplied.
How do you wire the gold shader to the Vex Layered surface? As i understand how to build up texture layers in this shader but not how to apply a different shader as the base.
I hacked this together really quickly. You choose a point on your geo and it finds connected ones and allows you to slide the point towards your selected one.
It might be a bit slow though on large meshes because it's not super efficient and finding neighbors and because of a problem with HOM it has to do it twice. Once for building the menu, once for cooking.