How to uv a high poly model

   7925   10   1
User Avatar
Member
295 posts
Joined: Oct. 2008
Offline
Once again I'm stuck with UVs. I'll explain what I'd like to do, and how I'm approaching it, and maybe someone will be able to explain what idiocy I'm committing here.


I want to paint/texture this:
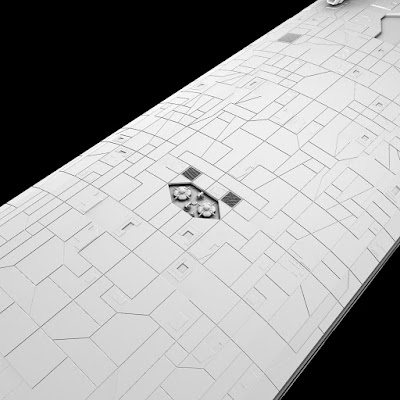

I'd like an effect similar to this, with the metal hull paneling:


So, I figured I could do something like this (this just tackles the top facing hull plates)

create a group that is made by specifying a bounding box, and normals, with normals of 0,1,0 (positive y direction), and a 45 degree spread. The scene view shows all the faces I'd expect to get.

Create a UV map with UVTexture, and the group from above.

This gets me something like this:


The idea is that this is roughly similar to the actual ship's size, and what I want to is fill in the various “panels” with subtly different shaded of gray, plus maybe even break up some of the panels as well into smaller shapes. I'm not using UVUnwrap because it spreads stuff all over the place so it's hard to know what relates to what.

The first problem is that what shows up selected in the scene viewport, and what shows up in the UV view are NOT the same. There appear to be all sorts of missing faces. Here's what the scene view shows:


The effect this has is that when I hook a texture map, it doesn't look right, it looks like it's flipped on the x axis, and its got random parts where it's showing the whole texture image across a small set of faces.

I don't know how to resolve this. Assuming this is just some idiotic error on my part, the next problem is this how to keep the texture images crisp? When I rendered something the edges of the colored panels look fuzzy. I'm using a the default “Reflective Displacement” material from the Material Palette. I can see that there's a number of different options for the Color Map Filter, but I have no idea what they do, they don't appear to be documented (at least I couldn't find anything) and playing around, they didn't seem to have much effect.

If my idea in approaching this is completely off base, is there another approach to take? I was really hoping to get somewhere tonight and I'm completely stumped as to what's going on.

I've uploaded the HIP file, modified so that it's just the hull.

Attachments:
UVTexProblemHull.zip (1.4 MB)

Houdini Models [learning3dfromscratch.blogspot.com]
User Avatar
Member
1145 posts
Joined: July 2005
Offline
Wow, that's quite the model. You certainly have great patience and a hell of a lot of ram Your file filled up my 4gb and then some.

I would however rely, for the details on the hull, almost exclusively on displacement maps. They work really well in houdini.

The file I've attached is just a simple start. I created the texture map by doing a screen capture of a top view of your hull. It's used as the displacement as well. You can layer displacements and textures so you could achieve a very sophisticated and refines hull surface.

I would do your hull penetrations very early as well with cookies that just do the general shape. Again using displacements for the details.

And I wouldn't do any work on surfaces that won't be seen, like the inside surfaces of the hulls.

Attachments:
UVTexProblemHull_PR.zip (1.3 MB)

“gravity is not a force, it is a boundary layer”
“everything is coincident”
“Love; the state of suspended anticipation.”
User Avatar
Member
295 posts
Joined: Oct. 2008
Offline
Thanks for looking at it. I futzed around with it some more - I should be doing other things, but this really pissed me off that I couldn't let it go.
Could you include your displacement rat? In the Displacement tab, it's looking for a different file. Is that the same one that the color map is using?
Houdini Models [learning3dfromscratch.blogspot.com]
User Avatar
Member
295 posts
Joined: Oct. 2008
Offline
Another question. Using your example, with 32bit Houdini, it takes almost 3 minutes after you start the render before anything even shows up in mplay, and it's *incredibly* slow. It's been almost 6 minutes since the start and it's only 4% done. Is that to be expected? I used the displacement.rat file you included in the “textures” directory.
Houdini Models [learning3dfromscratch.blogspot.com]
User Avatar
Member
295 posts
Joined: Oct. 2008
Offline
Never mind - I figured it out, it was all the lighting I used for the clay renders. Get rid of that, and renders in a jiffy.
Houdini Models [learning3dfromscratch.blogspot.com]
User Avatar
Staff
1072 posts
Joined: July 2005
Offline
jimc
The first problem is that what shows up selected in the scene viewport, and what shows up in the UV view are NOT the same. There appear to be all sorts of missing faces.

Check your visibility SOPs. The MMB (middle mouse button) info on the display SOP says that a good chunk of the primitives are hidden in the 2D (UV) viewport.
User Avatar
Member
295 posts
Joined: Oct. 2008
Offline
Ondrej, thanks. I found that out earlier, that if I cleared out the groups, it worked OK. I traced up the network, and I can't quite figure out where the 2d_visible_primitives is created. Is that something auto generated by Houdini? Anyhow, thanks for looking at an atrociously large SOP network.
Houdini Models [learning3dfromscratch.blogspot.com]
User Avatar
Member
295 posts
Joined: Oct. 2008
Offline
probbins
You can layer displacements and textures so you could achieve a very sophisticated and refines hull surface.

If you were to go this route, how would create the images? My problem with this approach is that it seems like it would be awfully hard to edit or visualize how things are going to look? I was under the impression that this was used only for models that weren't going be the primary focus in a shot.

For example, my understanding was that the Battlestar Galactica model was around 3 million polys.

Could you bake an ambient occlusion map of the high poly model, and then use that as a starting point for the displacement map?
Houdini Models [learning3dfromscratch.blogspot.com]
User Avatar
Member
1145 posts
Joined: July 2005
Offline
There's a Vex Layered Surface vop you could take advantage of, it does a composite of multiple textures.
Likely for the displacements you'd use limit maps.

My opinion is that the BattleStar G. ship was overdone. Remember it was for television, and even if it was HD the screens it was being viewed on didn't warrant that level of detail.
“gravity is not a force, it is a boundary layer”
“everything is coincident”
“Love; the state of suspended anticipation.”
User Avatar
Staff
1072 posts
Joined: July 2005
Offline
jimc
OI traced up the network, and I can't quite figure out where the 2d_visible_primitives is created. Is that something auto generated by Houdini?

This group is created only by the visibility SOP. To the best of my knowledge, nothing should create it automatically.
User Avatar
Member
295 posts
Joined: Oct. 2008
Offline
OK, thanks. I did have some visibility sops in the network, I should probably take them out, since they were only for temporary use. Getting rid of that one group fixed the whole thing.
Houdini Models [learning3dfromscratch.blogspot.com]
  • Quick Links