Hi,
I save usd file first and then use husk to render.
For example:
Current folder: C:/
Usd file path: C:/tmp/a.usd
Image path in a.usd file: ./render/a.exr
Command: husk C:/tmp/a.usd
The image will be saved in C:/render/a.exr, not C:/tmp/render/a.exr
How to save image relative the usd file path?
Found 13266 posts.
Search results Show results as topic list.
Solaris and Karma » How to render image with relative folder?
-

- jerry7

- 620 posts
- Offline
Houdini Engine API » Create HDAs from tif files
-
- chrisKNDS

- 1 posts
- Offline

Hello all,
I'm quite new at Houdini so I've to learn a lot.
Is it possible to create HDAs as an output? My vision is to create an automated pipeline to import a bunch of geoTiff files, create terrainchunks in Houdini and do other terrain stuff on it like roads, forests and so on. The chunks should be saved as HDA (one HDA per chunk).
I've written a python script which reads the tiffilesname from a folder and saves it as a list in the global parameters in Houdini.
Now in theorie I want to do some processing stuff on each tif file and save it as a HDA to import the chunk in Unreal.
Any ideas to archice this behaviour?
Houdini Indie and Apprentice » Primitives are wireframes and don't show assigned texture
-
- ElayShostak
- 3 posts
- Offline

I am trying to render my particles and I created a trail which is made with a Sphere and a Sweep node. When I view them individually they show their material, but after merged with the particles they show as wireframed.
Merged (the issue): https://gyazo.com/22a4dfae8033f8bfa0aa393daf0c454e [gyazo.com]
Sphere seperate: https://gyazo.com/b0f3ae09801e15f84127811238c54e71 [gyazo.com]
Sweep seperate: https://gyazo.com/fa4a68868b9ef62deafc337687fd337c [gyazo.com]
Node setup: https://gyazo.com/77d3d5d28c6dd602bc624a0955e61425 [gyazo.com]
I am a complete newbie to Houdini, it's probably something simple. Thanks!
Edited by ElayShostak - 2024年4月7日 13:19:44
Technical Discussion » Light Mixer with Python
-
- ShuaybM
- 1 posts
- Offline

I'm writing a Python script and I want to auto-link a light mixer to multiple lights.
The manual process for this is just to click and drag a light from left to right (light list > attributes) and it links everything automatically. . In the parameters, everything has been filled out.
However, if you have a fresh light mixer without any existing links, the settings > layout section in the parameters doesn't exist
I'm not sure how to access these parameters, to then link. Can someone let me know how I can do this, or if there is an easier way to go about doing this?
Thanks
The manual process for this is just to click and drag a light from left to right (light list > attributes) and it links everything automatically.
However, if you have a fresh light mixer without any existing links, the settings > layout section in the parameters doesn't exist
I'm not sure how to access these parameters, to then link. Can someone let me know how I can do this, or if there is an easier way to go about doing this?
Thanks
PDG/TOPs » ImageMagick mosaic from different length videos
-
- alexmajewski
- 2 posts
- Offline

When you plug two image sequences of different lengths into ImageMagick it will produce an expected nice looking mosaic, but once the shorter sequence ends, it instantly stretches the remaining sequence to fill the screen.
My guess is that we probably need to somehow generate the missing frames for the shorter video (either by creating black images, or freezing the last frame).
But I'm clueless on how that could be done. I will appreciate any tips to solving this puzzle.
I extract image sequences from mp4 files.
My guess is that we probably need to somehow generate the missing frames for the shorter video (either by creating black images, or freezing the last frame).
But I'm clueless on how that could be done. I will appreciate any tips to solving this puzzle.
I extract image sequences from mp4 files.
Houdini Indie and Apprentice » Scaling an ocean source / ocean spectrum
-
- morrisb28
- 1 posts
- Offline

Hello! I am working on a shot where an ocean has been created via an ocean spectrum. We want to have specific areas of the ocean interact with the environment, so I am cutting out areas of the ocean spectrum with an ocean source, then feeding that into my flip sim. It works well, however everything in the scene is twice as big as it should be, resulting in a very heavy and slow looking flip sim.
My initial thought was to obviously scale everything by half, then scale it back up post sim. However, scaling the ocean spectrum results in a very different looking ocean, and the ocean source is what is setting my bounds/limits and initial state of the sim, so scaling that results in my sim popping back to its original scale.
Any ideas of how I can go about getting a scaled version of the ocean into a sim?
Houdini for Realtime » VDB to Unreal HeterogeneousVolume placement
-

- Petfactory

- 16 posts
- Offline
Hi!
In Houdini I have simulated and exported a VDB sequence that I am importing into Unreal as an animated SVT.
I am having some issues with aligning the Heterogeneous Volume actor so that it matches the transform in Houdini.
What I have done so far to get the placement of a Static SVT to align is the following:
Location x = Houdini center x * 100 (The center of the Houdini sim)
Location y = Houdini center z * 100
Location z = Houdini center y * 100
rotation x = 90
rotation Y = 0
rotation Z = 0
scale x = 100 * Houdini sim division size (if the sim div size is 0.01 that would be a scale of 1.0)
scale Y = - 100 * Houdini sim division size
scale Z = 100 * Houdini sim division size
If the SVT is animating I can not get the Location to align. I have tried using the first frame center, the last frame center, the "combined center" of all frames of the sim... but I have not been able to align it yet.
Does any one know the correct way to align an animated SVT in UE?
Thanks!
Technical Discussion » Transform Pieces from Dopnet issues {POPkill}
-

- Vivimagic
- 10 posts
- Offline
I am having an issue with adding a POPkill from an RBD sim I am working on. It works perfectly without the POPkill. Not to sure what is causing the Transform Pieces node to break and act differently as before adding POPkill?
Edited by Vivimagic - 2024年4月6日 05:43:00
PDG/TOPs » Work item state wrong when ropfetch->fetch->rop
-
- dominikh
- 5 posts
- Offline

I am running into an issue where work items inaccurate display their state under specific circumstances. I am in h19.5 and my PDG `ropfetch` is set to run all frames in a single batch (for a simulation). That `ropfetch` references a `merge` node in `out` context, which bundles some other nodes (screenshot attached).
When I cook the range from 1-100, I get 100 work items but only the first one shows that its evaluating. The others are waiting. As I am running a per frame cache, I can see and load the frames that are done and PDG actually does render these work items, but it does not update the state in Houdini until all of them are done. This is in contrast to the labs `filecache` node for example. I verified that when my `ropfetch` looks at a `rop_alembic` or `rop_geometry` (like the `filecache` does), it displays the items accurately.
My question is, am I missing some parms on the intermediate ROP nodes to propagate the progress? Or is this a bug?
Any insights are appreciated!
Thanks,
Dom
Technical Discussion » Can pop fluid exhibit high viscosity like honey ?
-
- 910297565
- 11 posts
- Offline

Hi guys, I was wondering if POP fluid can exhibit very high viscosity? I want to make a small honey ball (0.3*0.3) with POP (I know FLIP would be better, but I was just wondering if the POP solver can do so). So, I've set the constraint iterations in the POP fluid node to 100 and constraint stiffness to 500, and the particle separation is 0.01. but when viscosity is set to 3 or larger, the particles exploded. So, can POP fluid exhibit high viscosity? BTW, which parameters are used to set surface tension? Thanks for any replies.
Houdini Indie and Apprentice » how could I import Cd attributes into shop net ?
-
- Asche915

- 30 posts
- Offline

I made a simple scene and want to put the Cd attribute into shop net and rendering right.but,it was not working .i want to know what is going on? thx


Image Not Found
Technical Discussion » Can't Increase HDA version on Houdini 20.590 py 3.9
-
- edlgm
- 11 posts
- Offline

Whenever a I make a new HDA from a subnet, and then go ahead and right click -> Digital Asset -> Increase Major version I get the following error:
WinError 87 The Parameter is Incorrect:
This happens with new HDAs, old HDAs, and also when right click -> Digital Asset -> Save Copy As.
WinError 87 The Parameter is Incorrect:
Traceback (most recent call last):
  File "<stdin>", line 4, in <module>
  File "C:\PROGRA~1/SIDEEF~1/HOUDIN~1.590/houdini/python3.9libs\assettools.py", line 2977, in increaseMajorVersion
    dialog = VHDASaveDialog(node, method=Method.IncreaseMajor)
  File "C:\PROGRA~1/SIDEEF~1/HOUDIN~1.590/houdini/python3.9libs\assettools.py", line 1674, in __init__
    self._setupUI()
  File "C:\PROGRA~1/SIDEEF~1/HOUDIN~1.590/houdini/python3.9libs\assettools.py", line 2060, in _setupUI
    self._initValues()
  File "C:\PROGRA~1/SIDEEF~1/HOUDIN~1.590/houdini/python3.9libs\assettools.py", line 2166, in _initValues
    filepath = pathlib.Path(filepathstr).resolve()
  File "C:\PROGRA~1\SIDEEF~1\HOUDIN~1.590\python39\lib\pathlib.py", line 1215, in resolve
    s = self._flavour.resolve(self, strict=strict)
  File "C:\PROGRA~1\SIDEEF~1\HOUDIN~1.590\python39\lib\pathlib.py", line 215, in resolve
    s = self._ext_to_normal(_getfinalpathname(s))
OSError: [WinError 87] The parameter is incorrect: 'A:\\Houdini\\HOUDINI_PACKAGES\\hdas\\F48_TEST'
This happens with new HDAs, old HDAs, and also when right click -> Digital Asset -> Save Copy As.
Solaris and Karma » Component Builder not exporting all textures
-
- tshead2
- 29 posts
- Offline

Gang:
I'm using the Component Builder workflow to create a complex asset that combines multiple geometry and material variants. As you can see from the screenshot, some geometry variants have multiple material variants, while others have just one.
Some variants assign a single material, others assign multiple materials. All materials use the Karma Material Builder, live in a single library, and incorporate a typical set of UDIM PBR textures.
Using Explore Variants and Set Variant on the Component Builder network produces expected results. However, when I save the asset using Component Output and load it with Asset Reference, the materials no longer work, and appear to be using the wrong textures. "Localize External Non-USD Files" is enabled in the Component Output, but when I examine the asset on disk, the number of textures copied to the asset directory is wrong. Anyone run into this? Are there naming conventions that are required for asset textures?
Thanks in advance,
Tim
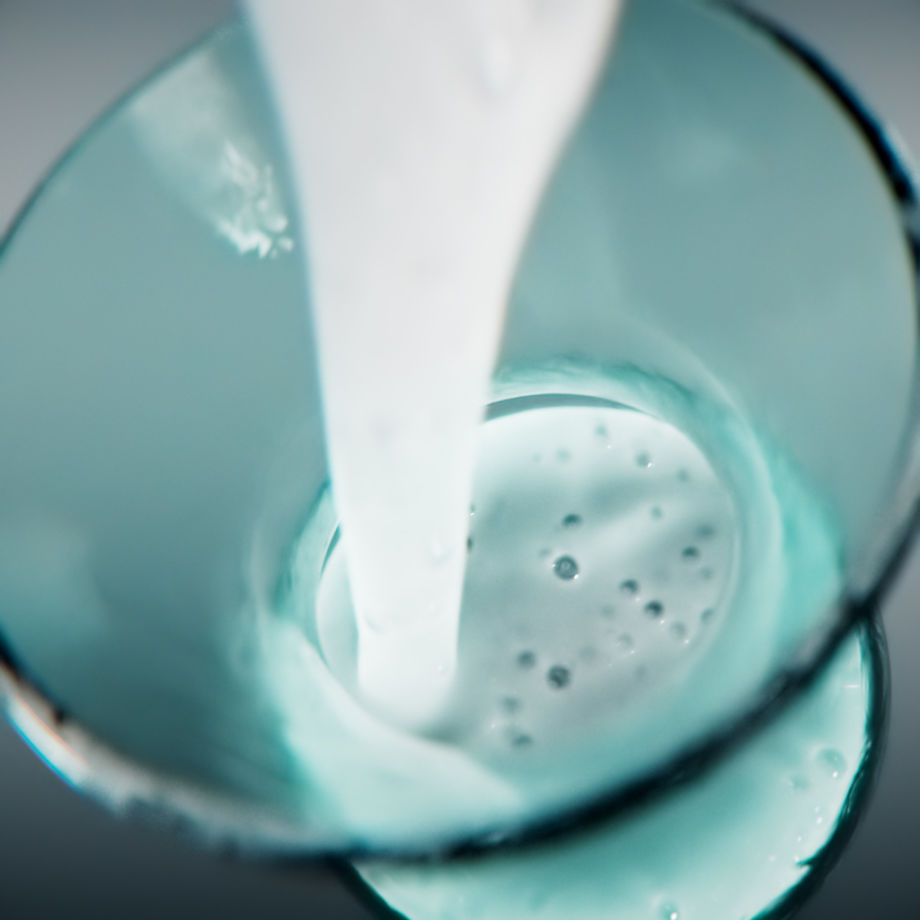
Technical Discussion » exploding fluid sim inside animated geo issue
-
- wrow
- 1 posts
- Offline

hello!
im working on a simulation where I have an animated milk carton is being filled with liquid until the point the packaging closes.
Just after that the liquid that is inside explodes.
Can someone point me to a possible solution to this issue? I tried bringing substeps up, and CFL condition down but that didn't change anything. thanks!
Image Not Found
Image Not Found
Solaris and Karma » How to add extra displacement to karma ocean procedural
-
- petkoe9ead5d0f2e542e7
- 1 posts
- Offline

Hello wizards, I have a question regarding karma ocean procedural. Is it possible to add displacement on top of what the ocean procedural does in term of materials and how. I have a default workflow ocean spectra data and I've baked ripples as a displacement map on the side. My idea was to just add the displacement map to the displacement that the ocean procedural sets up, but so far no luck. It kinda looks like the ocean procedural is not reading my ocean geo's uvs, and I can't get the map to work. I tried to create a diffuse shader and have the displacement in the color slot, just to check if it's mapped properly on the geo, but it just defaults to black color. Any ideas?
Technical Discussion » In the Solaris camera view, the "Spacebar+G" doesn't work!
-

- Masoud

- 407 posts
- Offline
Hi guys,
In the Solaris viewport, when I use hotkeys like "Spacebar + G", "Spacebar + F" or "Spacebar + A", it should be home all (or Home selected) but each time it zooms out the scene, one more step!
Is this a bug?
Thanks for helping.
In the Solaris viewport, when I use hotkeys like "Spacebar + G", "Spacebar + F" or "Spacebar + A", it should be home all (or Home selected) but each time it zooms out the scene, one more step!
Is this a bug?
Thanks for helping.
Edited by Masoud - 2024年4月4日 01:17:28
PDG/TOPs » Using TOP fetch with HQueue
-
- PatW
- 18 posts
- Offline

Hi I have a setup that receives a bunch of geometry and separate them into work items which are then fed into different simulation setup in other hip files using TOP fetch. I use hqueue scheduler here to send all simulation to farm.
Things work well so far until there are a lot of work items to process. I notice that sometimes TOP fetch node generate too many TOP fetch jobs on the farm at once that quickly consume all available slots preventing the actual PDG cook jobs (sim job) to be processed.
The outcome is that all jobs are waiting for resource and never get done.
Is there anything I miss that cause this issue and how can I fix it?
Houdini Indie and Apprentice » Particle Fluid Surface (remove vdb collision object)
-
- jamination
- 1 posts
- Offline

I am working on a flip simulation customized from a tutorial, and I am at the point where I am using the particlefluidsurface node to mesh the particles. It is also meshing the vdb collision object as well, obviously I just wish to mesh the particles. How would I go about that.
thanks
Phil
thanks
Phil
Technical Discussion » Ben Watts Style Foam Sim
-

- Jaervi
- 8 posts
- Offline
I came across this [80.lv] article on lvl80 regarding Ben Watts' foam simulation. I tried to piece together his approach from what little Information is provided by the article.
I have no trouble setting up a decent flip-sim, but I'm a little stuck creating the bubbles.
I use a group expression node to select about 5% of all particles and randomize their pscale. Doing this however leads to the issue of bubbles intersecting the collision geo.
Watts writes: "The foam bubbles are just a subset of the original particles. I had to make sure the bubbles didn’t protrude too far out of the foam, or else they’d end up inside the collider walls, so some compression parameters were added based on the main fluid’s gradient."
Does this maybe mean, he only selects particles to be possible bubbles, that are far enough from the collision geo, so as not to intersect the collision geo?
The phrase "...some compression parameters were added based on the main fluid’s gradient.", confuses me, and I'm not sure what he means.
Has anyone suggestions on how this might be achieved or has anyone recreated this kind of setup before?
I'd appreciate any help.
Cheers!
Solaris and Karma » Separating BSDFs, of the same type, to different AOV
-
- Slogbogicus
- 2 posts
- Offline

Hey all, wondering if this is possible in Karma:
I have a shader comprised of two dielectric BSDFs. The results of each are appearing in the combinedglossyreflections AOV.
I would LOVE if I could make each of the BSDF contributions pipe in to separate custom AOVs.
Reading the docs, and looking at the premade rendervar for SSS, I see there is some support for "BSDF Labels". Admitedly this is a mantra page but I was just trying to get my head around LPE syntax https://www.sidefx.com/docs/houdini/render/lpe.html [www.sidefx.com] and it does say "This can be used to separate contributions from BSDFs that fall under the same broad event category, but have different labels." Which sounds like exactly what I wanted, but I havent been able to successfully stumble into any syntax that does what I want right now.
Do we have any control over what a BSDF label is? or any ability to inspect which BSDFs have which label? Am I down the wrong track entirely?
Appreciate any help!
-
- Quick Links