Barry Bacon は、当コースで Houdini を使ってグルーミングとレンダリングを行うキャラクタの名前です。
これは二部構成の短いコースです。パート 1 ではシーンの準備、ガイドのコームや分け目の足し方を解説します。
パート 2 ではヘアの生成とまとめ方、バリエーションの追加と Mantra でのレンダリングを解説します。
また、これとは別に初心者向けのイントロダクションシリーズもあり、そちらでは Houdini を使ったグルーミングの基礎を解説しています。
チャプター 1: シーン準備
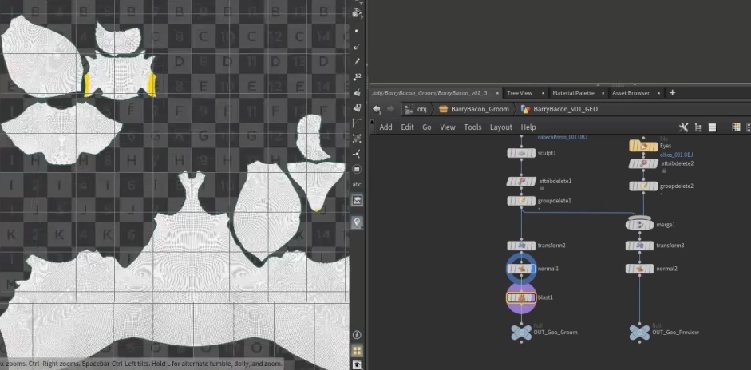 グルーミング用のシーンの準備方法を見ていきます。シーン UI レイアウトや効率化のコツ、問題が起きにくいジオメトリの準備、リファレンスを使ったグルーミングの方法を全体的に見ていきます。
Chapter 2: VDBs
 Guide Groom を使い、ガイドの生成とコームを行います。パフォーマンスを上げるための設定や、 VDB 変換に向けたジオメトリの効率化も行います。
チャプター 3: 代わりの Guide Groom
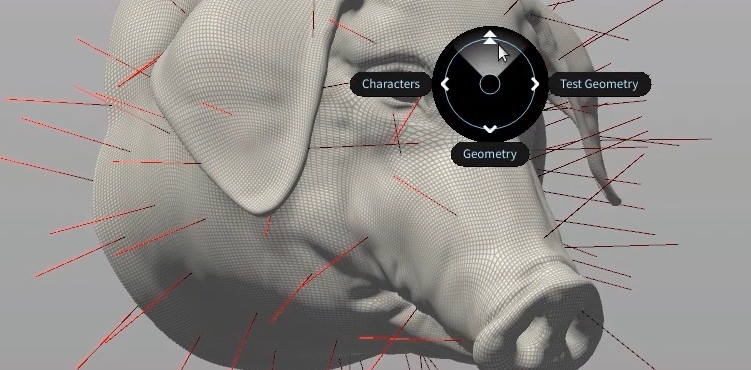
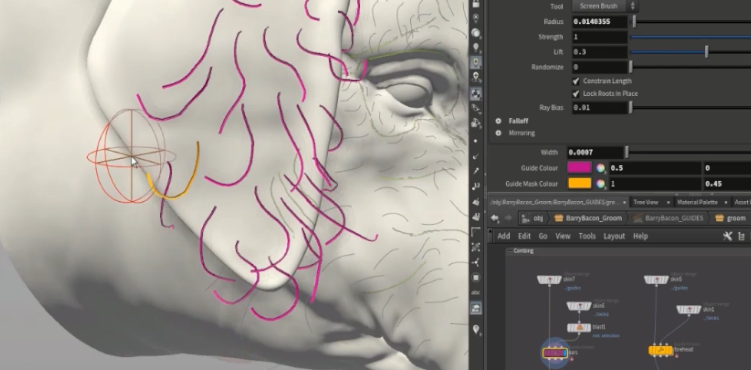
 Barry Bacon のガイドをコームする準備が整いました。ここではカスタム Guide Groom ノードを使い、ガイドのマスク範囲を分かり易く表示する方法を紹介します。ガイドの太さも、ビューポート上で見易く、作業し易いように調整できます。カスタム Guide Groom は当ページ下部からダウンロード可能です。
チャプター 4: 毛の流れ
 グルームを始める前に、リファレンスを分析し、グルーミングの要素を分解をすることが大切です。Barry Bacon の毛には様々な特徴があるので、それを描いていきます。
チャプター 5: 毛の流れのスケッチ
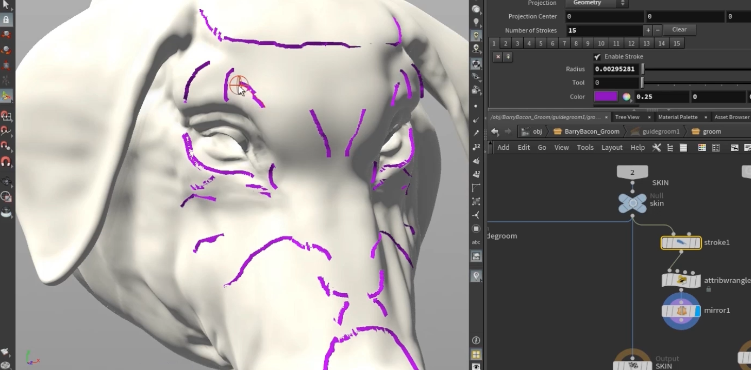 先程のスケッチを隣に置き、 Bary Bacon のジオメトリで 3D に起こしていきます。Stroke ノードを使い、各種の毛の範囲を描いていきます。
チャプター 6: 顔のコーム
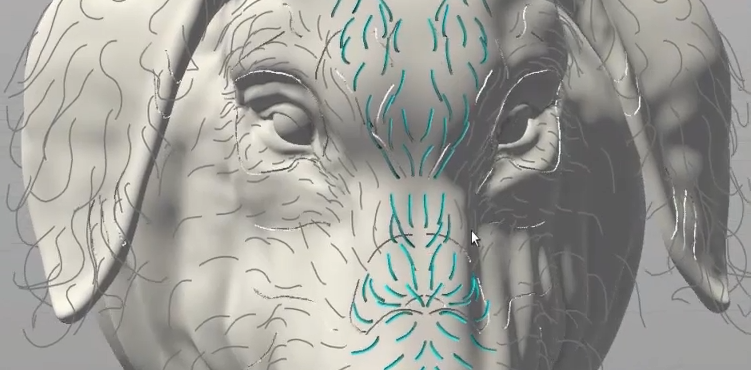
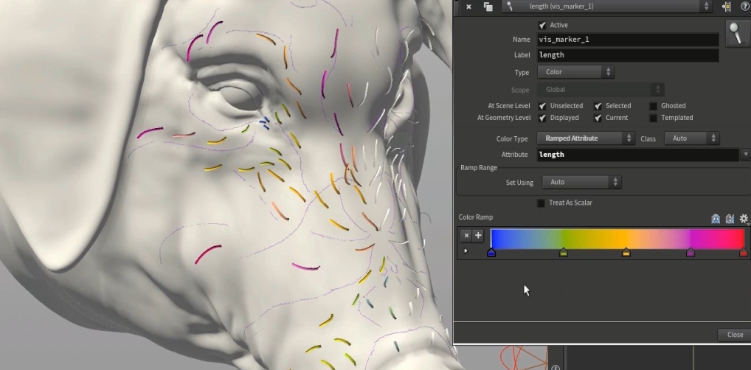 前のビデオ (イントロダクション パート 3) で紹介したショートカットキーを使い、リファレンスの毛に沿ってガイドの生成とコームを行います。
手動的なプロセスですが、より細かい調整が可能です。
更に Mirror で毛を反転し、顔全体にガイドを配置します。
ビジュアライザを使い、ガイドの長さを瞬時に把握するコツもお伝えします。
これはとても便利で、ガイドの本数は多くなりますし、より正確なグルームを行う判断材料にもなります。
前のビデオ (イントロダクション パート 3) で紹介したショートカットキーを使い、リファレンスの毛に沿ってガイドの生成とコームを行います。
手動的なプロセスですが、より細かい調整が可能です。
更に Mirror で毛を反転し、顔全体にガイドを配置します。
ビジュアライザを使い、ガイドの長さを瞬時に把握するコツもお伝えします。
これはとても便利で、ガイドの本数は多くなりますし、より正確なグルームを行う判断材料にもなります。
チャプター 7: 長い毛のコーム
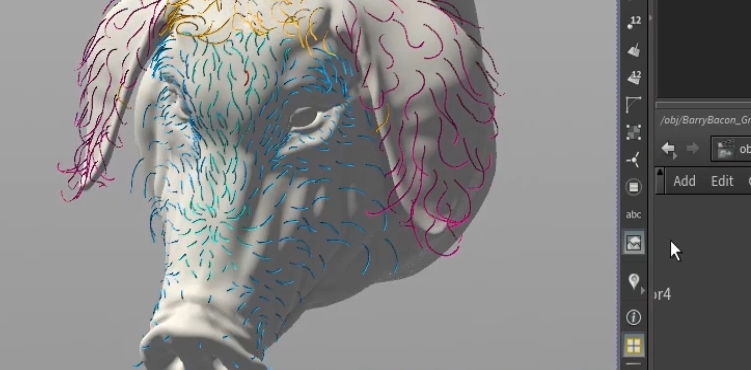
 次に、新たな Guide Groom ノードで額と耳のガイドを調整します。この方法ならシーンファイルが整理され、必要に応じて遡って調整することも簡単です。またそれぞれの Guide Groom を色分けすることで、視覚的にも整理されます。
これは、より複雑な生き物の場合は特に役立ちます。
次に、新たな Guide Groom ノードで額と耳のガイドを調整します。この方法ならシーンファイルが整理され、必要に応じて遡って調整することも簡単です。またそれぞれの Guide Groom を色分けすることで、視覚的にも整理されます。
これは、より複雑な生き物の場合は特に役立ちます。
チャプター 8: 左右の非対称化
 次に左右を非対称にしていきます。
自然な結果を得るためにとても大切な事で、これを行わないと中央に明らかな分け目ができてしまいます。
作業はほとんど終わっているので、ガイドを少しだけ取り除き、被せるように新しいガイドを足すことで、目立つ線を隠します。
また、分け目も活用して作業します。
次に左右を非対称にしていきます。
自然な結果を得るためにとても大切な事で、これを行わないと中央に明らかな分け目ができてしまいます。
作業はほとんど終わっているので、ガイドを少しだけ取り除き、被せるように新しいガイドを足すことで、目立つ線を隠します。
また、分け目も活用して作業します。
チャプター 9: Guide Process のコーム
 Guide Process を使ってガイドを調整します。
ここでは額のガイドが耳や顔のガイドと揃っていないので、額の部分を調整していきます。
Guide Process を使ってガイドを調整します。
ここでは額のガイドが耳や顔のガイドと揃っていないので、額の部分を調整していきます。
作業ファイルには Barry Bacon の形状 .hip ファイルと参照画像が含まれています。
CREATED BY

コメント
Julian Williams 3 年, 10 ヶ月 前 |
very helpful, thanks :)
Igor Velichko 3 年, 10 ヶ月 前 |
cool !
nborel 3 年, 10 ヶ月 前 |
Thank you. Very detailed instructions.
mrhalaby 3 年, 10 ヶ月 前 |
thanks!! I learned a lot of Yeti from Gabriela's website, now some Houdini as well : )
eoyilmaz 3 年, 10 ヶ月 前 |
great tutorial, thanks.
ifree 3 年, 10 ヶ月 前 |
Precious material.
Thanks a lot!
fcovrebr 3 年, 9 ヶ月 前 |
Really nice tutorial. Thank you!
Harold1007 3 年, 9 ヶ月 前 |
Thank you so much for sharing this! I really like your work.
Y_San 3 年, 9 ヶ月 前 |
I have completed the tutorial for part 1. Great Tutorial!
When will part 2 be available? I'm looking forward to material part!
wolskikrzys 3 年, 9 ヶ月 前 |
Hey guys! any clue how to use these parting guides in hair generation process?
Cannot wit the second part and started tinkering with hair, but cannot find out how to use these partitions.
Prashanth GV 3 年, 9 ヶ月 前 |
Hey Gabriela,
Im just wondering how did you get to swap between planting guides and screenbrush. Is there a shortcut. I have been struggling to find that out.
FJSam 3 年, 5 ヶ月 前 |
Watch the introduction videos for the shortcuts she made.
tommmaso 3 年, 9 ヶ月 前 |
These resources you've been uploading are great - its really cool to see some of the techniques you use when tackling the groom.
Thanks so much for your time and making these free! Hope to see more
MoltenCrazy 3 年, 8 ヶ月 前 |
Are the project files not compatible with v18.0.499? I get a huge string of load warnings and the GEO nodes are all nerfed into broken Merge nodes...
13freyr 3 年, 4 ヶ月 前 |
awesome!
KostyaSobakov 3 年 前 |
Gabriela, you the coolest person on the planet
Athokeb 5 ヶ月, 2 週間 前 |
I am having some struggles to follow it in houdini 19.5. Really sad would love to follow the tutorials
lars korb 5 ヶ月 前 |
super awesome grooming tutorial.
Thank you so much for taking the time to create this!
I'm wondering if it's still possible to assign keyboard shortcuts to the various tools in the guidegroom node?
(In Houdini 20, the shelf tools for switching brushes no longer exist)
Though they look super slick, I also really don't like radial menus.
Please log in to leave a comment.