| On this page |
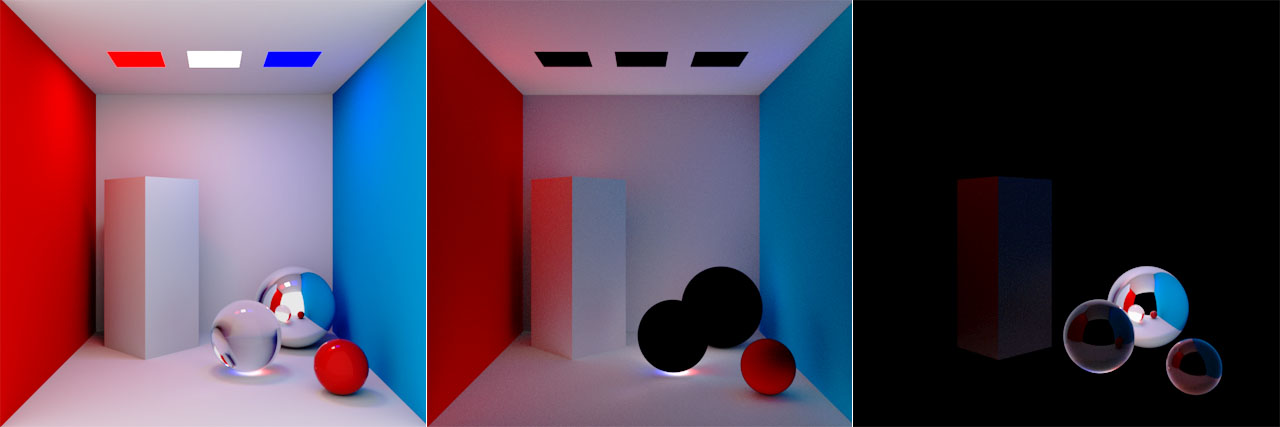
When you render a scene, you get an image that contains the full illumination. Light Path Expressions, or just LPEs, are a method to describe the contribution of light sources to a scene and store this information in a separate channel - an AOV (“arbitrary output variable”). LPEs are a way of describing which light path contributes to which AOV. With appropriate LPEs, you can describe any kind of interaction, but you need a fundamental understanding of how light interacts with different surfaces.
The LPE language 
LPEs use a certain notation that is very similar to regular expressions . Regular expressions are a powerful method for finding patterns in text.
An LPE itself is a string of events that defines a pattern of interactions. An event, on the other hand, describes how rays interact with the surfaces of the scene’s elements. Each part of a light path is an event and represented as an uppercase letter. Here’s a typical example for a light path:
-
A ray is sent out from the camera
Cand enters the scene -
The ray hits a diffuse surface
Dand is sent back to scene -
The ray finally reaches a light source
Land ends there

Events 
The table below contains a list with all available LPE events in Karma’s CPU and XPU render engines. “Terminating event” means that the event is expected to be at the end of a Light Path Expression. Here’s a common definition for a fully described event - the individual components are discussed in the following chapters of this guide:
<event_type scatter_type['tag'['bsdf_label']]>
Note
Maybe you've already gathered experience with LPEs in other applications and you're missing the S and s scattering events? In Karma CPU and XPU, all specular scatter types are defined as G (glossy scatter).
| Symbol | Event | Type | Description |
|---|---|---|---|
C
|
Camera | Ray interaction | The camera represents the observer’s point of view. All rays originate from the camera and are traced through the scene until they reach the light source. LPEs must always start with a camera event. |
R
|
Surface reflection | Ray interaction | Examples for objects with reflective surfaces are metals (glossy) and wood (diffuse). |
T
|
Surface transmission | Ray interaction | Examples for transmissive objects are water (glossy) and skin (diffuse). |
V
|
Volume | Ray interaction | Fog, smoke and haze are examples for volumetric phenomena. |
L
|
Light | Terminating event | Accumulates contribution from light sources. |
O
|
Emission | Terminating event | Accumulates contribution from light-emitting objects. |
B
|
Background | Terminating event | Contribution from a ray that didn’t interact with anything in the scene. Used to generate a custom alpha plane. |
A
|
Albedo | Terminating event | The ratio of total outgoing energy over total incoming energy. |
D
|
Diffuse scatter | Scattering | On rough surfaces, rays are scattered in all directions. |
G
|
Glossy scatter | Scattering | Glossy surface with or without roughness. Roughness creates a blurred or milky look. |
Brackets, wildcards, quantifiers 
Brackets are used to combine events and there’s a difference between angle brackets, squared brackets and events without brackets.
-
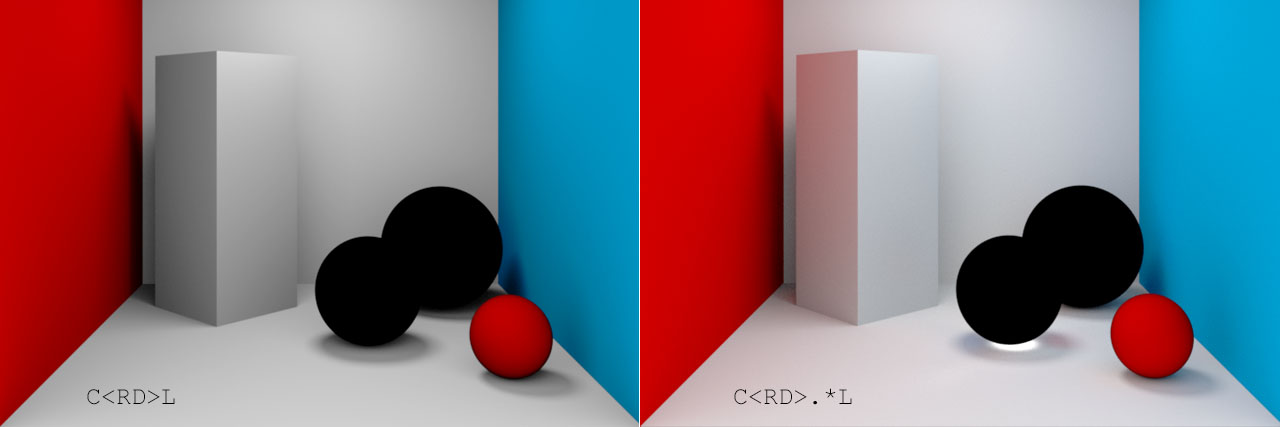
Angle brackets are used for fully describing an event. Even if the brackets contain multiple tokens, they're considered a single event. For example,
<RD>matches only diffuse reflection. -
Symbols without angle brackets are shorthand tokens. For example
Dincludes diffuse scatter events meaning[<RD><TD>]. -
Square brackets match any event within the brackets. For example,
[LO]matches either light or emission. -
[^DG]would match anything except diffuse or glossy scattering. -
Expressions without brackets require all events in the given order. For example,
RDmeans thatDmust followR.
The image below shows the difference of an LPE with angle brackets (C<RD>.*[LO]) and without brackets (CRD.*[LO]).
Wildcards and quantifiers let you define repetitions or you can limit the result to certain events. Wildcards are perhaps the most abstract part in conjunction with LPEs, because it’s often not obvious how to use them. When you read about wildcards, you typically get descriptions like “matches zero or more repetitions of an event”. Since LPEs are about the interaction of light rays with surfaces, you can translate the above term into “hits zero or more surfaces”.
The ! operator negates the LPE’s output and must appear in front of the entire expression. You can find an example below.
The following table shows all relevant symbols in the overview.
| Expression | Description |
|---|---|
<RD>
|
All events inside the angle brackets are treated as a single event. |
[AB]
|
Event A or event B.
|
[^D]
|
Any event except D.
|
.
|
Wildcard that matches any event, but only one time. |
*
|
Quantifier that matches zero or more repetitions of the preceding event. |
+
|
Quantifier that matches one or more repetitions of the preceding event. |
!
|
Inverts the result. |
Prefixes 
A prefix must appear in front of an expression and is delimited by a semicolon, for example shadow;C.*[LO]. There are three supported prefixes in Karma CPU and XPU:
-
unoccludedreturns the effect of lighting before shadows are applied -
holdoutoutputs lighting on holdout elements instead of accumulated contribution from non-holdouts -
shadowreturns the scene’s shadow pass of the given expression
Tip
You can find several examples for the usage of prefixes in the Standard LPEs list at the end of this page.
BSDF labels 
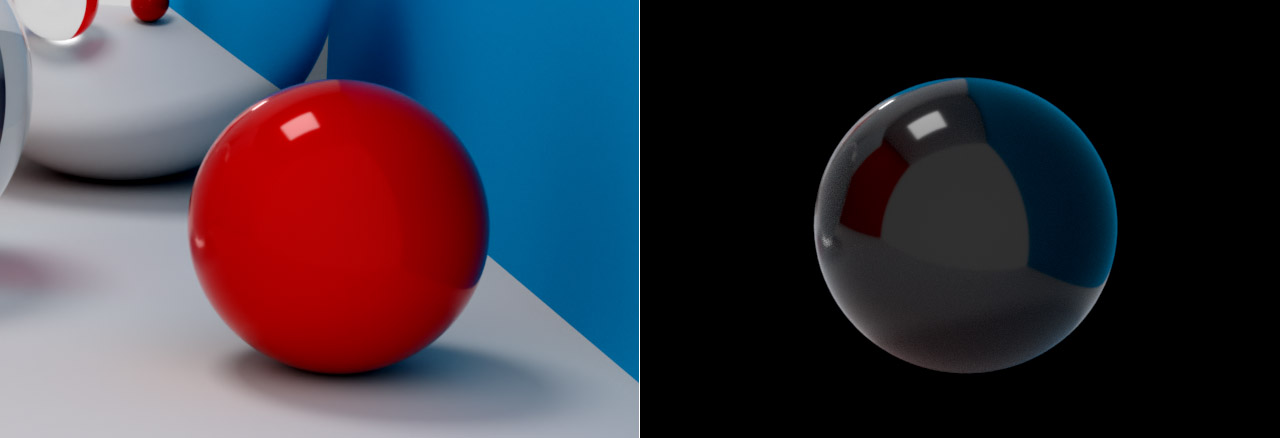
You can output BSDF lobes through labels to separate AOVs. Note that custom BSDF labels only work in conjunction with VEX-based shaders and MaterialX is not supported. You also need a certain notation for BSDF labels, for example <...coat>. A complete LPE for the coat BSDF would be C<...'coat'>.*[LO]. Please keep in mind that coat is the only BSDF label that is supported by Karma XPU.
The red sphere is coated and the right image shows the result of the LPE above.
LPE tags 
Applying LPEs 
In many cases you won’t have to create LPEs manually, because the most important expressions are predefined. On the ![]() Karma Render Settings LOP, open Image Output ▸ AOVs (Render Vars) ▸ Component Level Output. There you can find a long list of sections, for example Beauty, Diffuse, or Reflections and Refractions. When you expand a section, let’s say Diffuse, and hover the mouse over a checkbox to display its associated tooltip, you can see the LPE that is used to create the AOV.
Karma Render Settings LOP, open Image Output ▸ AOVs (Render Vars) ▸ Component Level Output. There you can find a long list of sections, for example Beauty, Diffuse, or Reflections and Refractions. When you expand a section, let’s say Diffuse, and hover the mouse over a checkbox to display its associated tooltip, you can see the LPE that is used to create the AOV.
Tip
A complete compilation of all predefined LPE-based AOVs is available at the bottom of this page.
This means that you don’t have to create the most common LPEs again and again to write out an AOV, but they’ll be applied automatically when you turn on a checkbox.
Custom LPEs 
However, even the longest list can be incomplete. For custom LPEs, open the Extra Render Vars section and increase Render Vars. You’ll then see a set of parameters where you can define a new AOV. Only when Source Type is set to LPE, you can add a custom LPE to the Source Name input field.
Tip
-
Please note that the Name parameter’s associated dropdown menu also contains several predefined LPEs, for example Transmitted Diffuse Albedo. The LPE for this AOV is
C<TG>*DA. -
From the Format dropdown, choose one of the color types, because the default float doesn’t work with LPEs.
Developing LPEs 
You now have the building blocks of LPEs, and the task is to translate an abstract concept into something working. Depending on what you want to achieve, LPEs can become quite complex.
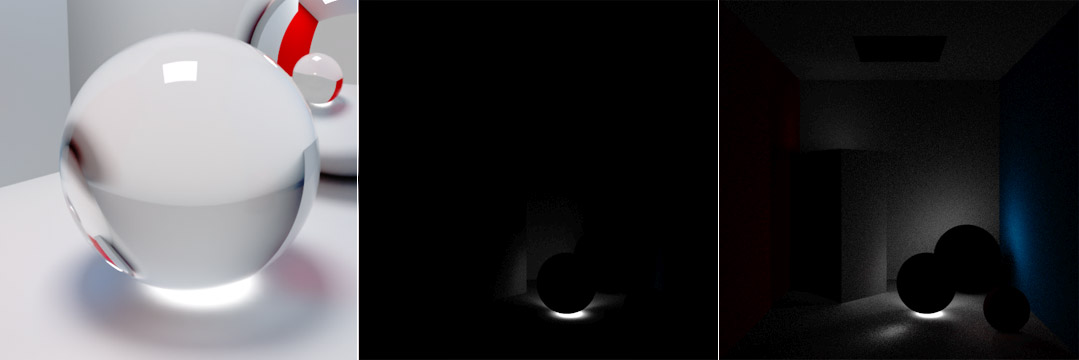
Transmission 
Here you’ll extract the transmissive part of a glass object. When you look at the first table above, the expression should be straightforward, because the path is camera → glass transmission → light source. According to the table, the LPE is CTL and this is already a valid expression, but not very specific.
Let’s try a more sophisticated example. Imagine a glass sphere that occludes several objects and your LPE should detect only scene elements behind the sphere. The CTL expression will fail here, because the light path has to go through the glass surface at least twice to reach a light source. The current expression only has a single transmission event before reaching a light, which matches none of the existing light paths. To include paths that have arbitrary number of events, you need wildcards and quantifiers. The most obvious LPE is therefore C<TG>.*L. This will match any path that initially goes through glossy transmission, then goes through any number of events, and eventually reaches a light.
Now you can also include emissive objects. LPE are always evaluated from the camera in direction of a light source - the end point. The path can end at a “traditional” light source or an emissive object, so both sources are considered. You need square brackets for this kind of differentiation: C<TG>.*[LO].
![]()
Alpha transmission 
Alpha transmission is a good example for the negate operator. The following expression creates an alpha plane from transmissive objects. The syntax for this LPE is exactly the same as with the Transmission example in the previous chapter. The only difference is that the terminating event is not a light source, but the background B. So, you can write C<TG>*B.
For compositing, it’s necessary to invert the result and you can do that with the ! operator. Remember that ! must always stand in front of the entire expression. The final LPE is therefore!C<TG>*B.
![]()
Direct diffuse reflection 
In this example we want to catch light that’s reflected from diffuse surfaces: direct diffuse reflection. When you look at the first table, the required events are C, D and L. The most obvious first solution is therefore CDL. The D event, however, includes both diffuse reflection and diffuse transmission. So, you’ll end up including even SSS which might not be desired.
The LPE has to be more specific and to consider diffuse reflection, replace D with <RD>. The correct expression is then C<RD>L.
If you change you change the LPE to C<RD>.*L, you’ll get one or more events followed by diffuse reflection before reaching the light, and therefore the indirect diffuse reflection.
Caustics 
Caustics are any paths that interact with a rough (or diffuse) surface followed by a glossy surface before hitting a light source. Let’s try to extract the refractive caustics from the glass sphere. Note that the expression only works with caustics that are directly visible by the camera. Caustics behind a glass pane, for example, won’t be detected.
-
Everything starts with a camera
C. -
The first part here is the diffuse scatter event
Dwhen a ray hits the floor. -
The key event is that such a diffuse hit has gone through a transmissive object
Tone or more times (+). -
The light source
Lis the end point.
The complete LPE for caustics from the glass sphere is therefore CDT+L. This expression will strictly detect rays from transmissive objects. If you want to consider all types of caustics (reflective or refractive), you need a more robust expression like CDG+L.
A volume → glossy → light path is also considered a caustic path. If you want to capture diffuse surfaces or volumes, change the expression to C[DV]T+L.
Displaying AOVs 
Many AOVs in Karma are LPE-based and you can evaluate them directly in the viewport. This also includes tagged lights or geometry. To see the entire range of active AOVs, start an interactive preview render.
-
In the upper left corner of the viewport, open the first dropdown menu. The default entry is Persp. From the menu, choose one of the Karma delegates.
-
On the icon bar that is attached to the viewport’s right side, click the
 Render Outputs button to see all active AOVs. When you choose one from list, the render will be updated and you can see the channel.
If you render to MPlay, you can use the dropdown to choose from all available AOVs. The menu’s default entry is C.
Writing AOVs 
Of course you want to export your AOVs. You can see the entire list of AOVs meant to be exported in the Scene Graph Tree under /Render/Products/Vars. You can change this path, on the Karma Render Settings LOP’s Existing Render Vars parameter. If you also want to change the output path for the resulting image, go to the render settings node’s Output Picture parameter.
To finally write out the AOVs you need the ![]() USD Render ROP. There, adjust the Valid Frame Range and click the Render to Disk or Render to Disk in Background button. The active AOVs will be saved in a multi-channel EXR file.
USD Render ROP. There, adjust the Valid Frame Range and click the Render to Disk or Render to Disk in Background button. The active AOVs will be saved in a multi-channel EXR file.
Standard LPEs 
As mentioned earlier, Houdini uses predefined LPEs to write out a wide range of standard AOVs. The following list contains all available LPEs from the AOVs (Render Vars) tab. You can use them as a basis for your own, more complex LPEs.
| AOV | LPE | Description |
|---|---|---|
beauty
|
C.*[LO]
|
The accumulation of all possible light paths. |
beautyunshadowed
|
unoccluded;C.*[LO]
|
The unoccluded beauty pass.
|
shadow
|
shadow;C.*[LO]
|
Ratio of occluded over unoccluded from the beauty pass which represent all shadows.
|
combineddiffuse
|
C<RD>.*L
|
The combined (any number of bounces) diffuse surface reflection component. |
directdiffuse
|
C<RD>L
|
The direct (no bounces) diffuse surface reflection component. |
indirectdiffuse
|
C<RD>.+L
|
The indirect (one or more bounces) diffuse surface reflection component. |
combineddiffuseunshadowed
|
unoccluded;C<RD>.*[LO]
|
The combined (any number of bounces) unoccluded diffuse surface reflection component. |
directdiffuseunshadowed
|
unoccluded;C<RD>L
|
The combined (no bounces) unoccluded diffuse surface reflection component. |
indirectdiffuseunshadowed
|
unoccluded;C<RD>.+L
|
The indirect (one or more bounces) unoccluded diffuse surface reflection component. |
combinedglossyreflection
|
C<RG>.*[LO]
|
The combined (any number of bounces) glossy surface reflection component. |
directglossyreflection
|
C<RG>L
|
The direct (no bounces) glossy surface reflection component. |
indirectglossyreflection
|
C<RG>.+L
|
The indirect (one or more bounces) glossy reflection component. |
glossytransmission
|
C<TG>.*[LO]
|
The glossy transmission component. |
coat
|
C<...'coat'>.*[LO]
|
Combined contribution (any number of bounces) from BSDF with 'coat' label. |
combinedemission
|
C.*O
|
The combined (any number of bounces) emission component. |
directemission
|
CO
|
The direct (no bounces) emission component. |
indirectemission
|
C.+O
|
The indirect (one or more bounces) emission component. |
visiblelights
|
CL
|
The visible lights component. |
combinedvolume
|
CV.*L
|
The combined (any number of bounces) volume component. |
directvolume
|
CVL
|
The direct (no bounces) volume component. |
indirectvolume
|
CV.+L
|
The indirect (one or more bounces) volume component. |
sss
|
C<TD>.*L
|
The combined (any number of bounces) diffuse surface transmission component, otherwise known as SSS. |
albedo/diffusealbedo
|
CDA
|
The albedo of a diffuse event. |
holdout
|
holdout;C.*[LO]
|
The beauty pass of holdout object(s). |
albedoglossyreflection
|
C<RD>A
|
The albedo of a glossy reflection event. |
albedoglossytransmission
|
C<TG>A
|
The albedo of a glossy transmission event. |
albedotransmitteddiffuse
|
C<TG>*DA
|
The albedo of a diffuse event through glossy transmission. |