| On this page |
This tutorial covers a few functionalities of the Public API by:
-
building a script to intantiate an HDA
-
configure a curve input and geometry input
-
then iterate the outputs once the node has cooked.
For a list of commands available, see Public API Documentation.
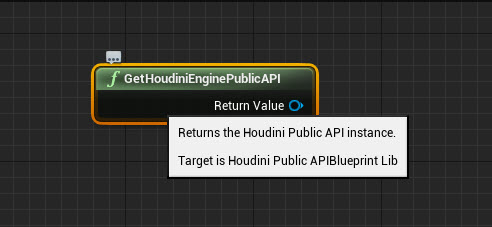
Houdini Public API Instance 
To get the UHoudiniPublicAPI instance, fetch it via its associated blueprint function library: UHoudiniPublicAPIBlueprintLib.
The Public API in the plugin is in an Editor module so it can only be accessed from Blueprints that are editor-only. When you create the Blueprint you must choose an editor-only base class such as EditorUtilityActor or EditorUtilityWidget (for UI widgets) for the Blueprint to be editor-only.
Warning
Existing Blueprint can be re-parented to an editor-only Blueprint when editing the Blueprint. However, re-parenting can lead to problems or data loss if the new parent class isn’t compatible with the old parent class.
See Unreal’s Blueprint scripting documentation for more information
In C++:
#include "HoudiniPublicAPIBlueprintLib.h"
#include "HoudiniPublicAPI.h"

UHoudiniPublicAPI* const API = UHoudiniPublicAPIBlueprintLib::GetAPI();
In Blueprints:
In Python:
import unreal

api = unreal.HoudiniPublicAPIBlueprintLib.get_api()
Start Session 
With the API instance setup, check the status of the Houdini Engine session and start the session (if required).
In C++:
if (!API->IsSessionValid())
    API->CreateSession();
In Blueprints:

In Python:
if not api.is_session_valid():
    api.create_session()
Instantiating HDAs 
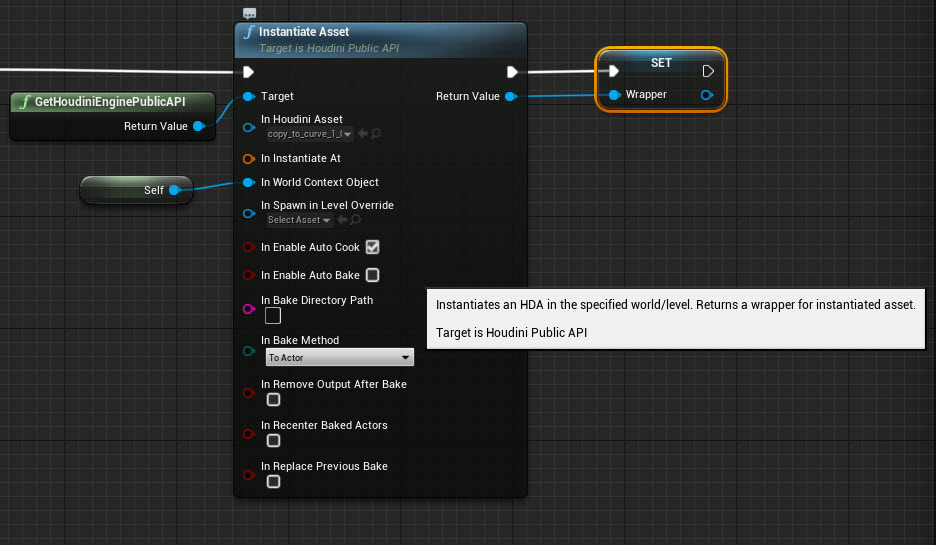
You can instantiaate an HDA in the world. This uses one of the example HDAs included with the plugin: copy_to_curve_1_0.
In C++:
// Load our HDA uasset
UHoudiniAsset* const ExampleHDA = Cast<UHoudiniAsset>(StaticLoadObject(UHoudiniAsset::StaticClass(), nullptr, TEXT("/HoudiniEngine/Examples/hda/copy_to_curve_1_0.copy_to_curve_1_0")));
// Create an API wrapper instance for instantiating the HDA and interacting with it
UHoudiniPublicAPIAssetWrapper* const Wrapper = API->InstantiateAsset(ExampleHDA, FTransform::Identity)
In Blueprints:
In Python:
# Load our HDA uasset
example_hda = unreal.load_object(None, '/HoudiniEngine/Examples/hda/copy_to_curve_1_0.copy_to_curve_1_0')
# Create an API wrapper instance for instantiating the HDA and interacting with it
wrapper = api.instantiate_asset(example_hda, instantiate_at=unreal.Transform())
The InstantiateAsset function returns an API wrapper class (UHoudiniPublicAPIAssetWrapper) to interact with the instantiated HDA. An example is to set parameter values or assign inputs.
Asset Wrapper - Delegates 
In many instances, the plugin interacts with Houdini Engine asynchrounsly. This means you need to bind to a delegate to receive a callback after an operation has completed.
Once the parameter interface is ready but before the first cook, bind OnPreInstantiationDelegate to set parameters.
Note
This is the earliest time to set parameters but not necessary. You can also instantiate the HDA, cook, set the parameters, and have it recook. If the HDA takes a long time to cook, it might be better to use a few delegates efficiently to avoid expensive recooks.
Using the class ACurveInputExample, you can then bind some of its functions to the delegates to set parameters and/or inputs.
In C++:
void ACurveInputExample::RunCurveInputExample_Implementation()
{
    // Get the API instance
    UHoudiniPublicAPI* const API = UHoudiniPublicAPIBlueprintLib::GetAPI();
    // Ensure we have a running session
    if (!API->IsSessionValid())
        API->CreateSession();
    // Load our HDA uasset
    UHoudiniAsset* const ExampleHDA = Cast<UHoudiniAsset>(StaticLoadObject(UHoudiniAsset::StaticClass(), nullptr, TEXT("/HoudiniEngine/Examples/hda/copy_to_curve_1_0.copy_to_curve_1_0")));
    // Create an API wrapper instance for instantiating the HDA and interacting with it
    AssetWrapper = API->InstantiateAsset(ExampleHDA, FTransform::Identity);
    if (IsValid(AssetWrapper))
    {
        // Pre-instantiation is the earliest point where we can set parameter values
        AssetWrapper->GetOnPreInstantiationDelegate().AddUniqueDynamic(this, &ACurveInputExample::SetInitialParameterValues);
        // Jumping ahead a bit: we also want to configure inputs, but inputs are only available after instantiation
        AssetWrapper->GetOnPostInstantiationDelegate().AddUniqueDynamic(this, &ACurveInputExample::SetInputs);
        // Jumping ahead a bit: we also want to print the outputs after the node has cook and the plug-in has processed the output
        AssetWrapper->GetOnPostProcessingDelegate().AddUniqueDynamic(this, &ACurveInputExample::PrintOutputs);
    }
}
Note
This example sets prameters on pre-instantiation and inputs on post-intiations. You can also set both parameters and inputs on post-instantiation.
In Blueprints:

In Python:
def run_curve_input_example(self):
    # Get the API instance
    api = unreal.HoudiniPublicAPIBlueprintLib.get_api()
    # Ensure we have a running session
    if not api.is_session_valid():
        api.create_session()
    # Load our HDA uasset
    example_hda = unreal.load_object(None, '/HoudiniEngine/Examples/hda/copy_to_curve_1_0.copy_to_curve_1_0')
    # Create an API wrapper instance for instantiating the HDA and interacting with it
    self._asset_wrapper = api.instantiate_asset(example_hda, instantiate_at=unreal.Transform())
    if self._asset_wrapper:
        # Pre-instantiation is the earliest point where we can set parameter values
        self._asset_wrapper.on_pre_instantiation_delegate.add_callable(self._set_initial_parameter_values)
        # Jumping ahead a bit: we also want to configure inputs, but inputs are only available after instantiation
        self._asset_wrapper.on_post_instantiation_delegate.add_callable(self._set_inputs)
        # Jumping ahead a bit: we also want to print the outputs after the node has cook and the plug-in has processed the output
        self._asset_wrapper.on_post_processing_delegate.add_callable(self._print_outputs)
Set Parameters 
Set two parameters during the HDA’s pre-instantiation phase:
-
upvectoratstartto false -
scaleto 0.2
In delegates, you bound the SetInitialParameterValues() function to the pre-instantation delegate. You can now implement the function to set the parameter values.
In C++:
#pragma once
#include "CoreMinimal.h"
#include "EditorUtilityActor.h"
#include "CurveInputExample.generated.h"
class UHoudiniPublicAPIAssetWrapper;
UCLASS()
class HOUDINIENGINEEDITOR_API ACurveInputExample : public AEditorUtilityActor
{
    GENERATED_BODY()
public:
    ACurveInputExample();

    UFUNCTION(BlueprintNativeEvent, BlueprintCallable, CallInEditor)
    void RunCurveInputExample();
protected:
    // Set our initial parameter values: disable upvectorstart and set the scale to 0.2.
    UFUNCTION(BlueprintNativeEvent, BlueprintCallable, CallInEditor)
    void SetInitialParameterValues(UHoudiniPublicAPIAssetWrapper* InWrapper);
    // Configure our inputs: input 0 is a cube and input 1 a helix.
    UFUNCTION(BlueprintNativeEvent, BlueprintCallable, CallInEditor)
    void SetInputs(UHoudiniPublicAPIAssetWrapper* InWrapper);
    // Print the outputs that were generated by the HDA (after a cook)
    UFUNCTION(BlueprintNativeEvent, BlueprintCallable, CallInEditor)
    void PrintOutputs(UHoudiniPublicAPIAssetWrapper* InWrapper);
    UPROPERTY(BlueprintReadWrite)
    UHoudiniPublicAPIAssetWrapper* AssetWrapper;
};
void ACurveInputExample::SetInitialParameterValues_Implementation(UHoudiniPublicAPIAssetWrapper* InWrapper)
{
    // Uncheck the upvectoratstart parameter
    InWrapper->SetBoolParameterValue(TEXT("upvectoratstart"), false);
    // Set the scale to 0.2
    InWrapper->SetFloatParameterValue(TEXT("scale"), 0.2f);
    // Since we are done with setting the initial values, we can unbind from the delegate
    InWrapper->GetOnPreInstantiationDelegate().RemoveDynamic(this, &ACurveInputExample::SetInitialParameterValues);
}
In Blueprints:

In Python:
import math
import unreal
@unreal.uclass()
class CurveInputExample(unreal.PlacedEditorUtilityBase):
    def __init__(self, *args, **kwargs):
        self._asset_wrapper = None
    def run_curve_input_example(self):
        ...
    def _set_initial_parameter_values(self, in_wrapper):
        """ Set our initial parameter values: disable upvectorstart and set the scale to 0.2. """
        # Uncheck the upvectoratstart parameter
        in_wrapper.set_bool_parameter_value('upvectoratstart', False)
        # Set the scale to 0.2
        in_wrapper.set_float_parameter_value('scale', 0.2)
        # Since we are done with setting the initial values, we can unbind from the delegate
        in_wrapper.on_pre_instantiation_delegate.remove_callable(self._set_initial_parameter_values)
    def _set_inputs(self, in_wrapper):
        """ Configure our inputs: input 0 is a cube and input 1 a helix. """
        raise NotImplementedError
    def _print_outputs(self, in_wrapper):
        """  Print the outputs that were generated by the HDA (after a cook) """
        raise NotImplementedError
Once the plugin begins process of instantiating the HDA, the parameters are set and ready for the first cook.
Create Inputs 
To set an input on a wrapped instantiated HDA, you have to instantiate the appropriate input class and then set input objects and settings on the input. W
Instantiate inputs with the UHoudiniPublicAPIAssetWrapper::CreateEmptyInput() function. The function takes the class of the input as its only argument. This example creates a geometry and curve input.
To create the geometry input:
-
Enter
CreateEmptyInput()to instantiate the new input. -
Set the cube asset as its input object.
-
Set the input on the instantiated HDA.
In C++:
void ACurveInputExample::SetInputs_Implementation(UHoudiniPublicAPIAssetWrapper* InWrapper)
{
    // Create an empty geometry input
    UHoudiniPublicAPIGeoInput* const GeoInput = Cast<UHoudiniPublicAPIGeoInput>(InWrapper->CreateEmptyInput(UHoudiniPublicAPIGeoInput::StaticClass()));
    // Load the cube static mesh asset
    UStaticMesh* const Cube = Cast<UStaticMesh>(StaticLoadObject(UStaticMesh::StaticClass(), nullptr, TEXT("/Engine/BasicShapes/Cube.Cube")));
    // Set the input object array for our geometry input, in this case containing only the cube
    GeoInput->SetInputObjects({Cube});
    // Set the input on the instantiated HDA via the wrapper
    InWrapper->SetInputAtIndex(0, GeoInput);
    // TODO: Create curve input
    // Since we are done with setting the initial values, we can unbind from the delegate
    InWrapper->GetOnPostInstantiationDelegate().RemoveDynamic(this, &ACurveInputExample::SetInputs);
}
In Blueprints:

In Python:
class CurveInputExample(unreal.PlacedEditorUtilityBase):
    ...
    def _set_inputs(self, in_wrapper):
        """ Configure our inputs: input 0 is a cube and input 1 a helix. """
        # Create an empty geometry input
        geo_input = in_wrapper.create_empty_input(unreal.HoudiniPublicAPIGeoInput)
        # Load the cube static mesh asset
        cube = unreal.load_object(None, '/Engine/BasicShapes/Cube.Cube')
        # Set the input object array for our geometry input, in this case containing only the cube
        geo_input.set_input_objects((cube, ))
        # Set the input on the instantiated HDA via the wrapper
        in_wrapper.set_input_at_index(0, geo_input)
        # TODO: Create curve input
        # unbind from the delegate, since we are done with setting inputs
        in_wrapper.on_post_instantiation_delegate.remove_callable(self._set_inputs)
Curve Inputs 
To create the curve input:
-
Enter
CreateEmptyInput()to instantiate the new input. -
create a
UHoudiniPublicAPICurveInputObject. -
Add the curve points to
UHoudiniPublicAPICurveInputObject. -
Set the curve object as an input object on the curve input.
-
Set the input on the instantiated HDA.
Note
API curve inputs are not restricted to UHoudiniPublicAPICurveInputObject instances as input objects. It also supports UHoudiniSplineComponent instances as input objects.
In C++:
void ACurveInputExample::SetInputs_Implementation(UHoudiniPublicAPIAssetWrapper* InWrapper)
{
    // Create an empty geometry input
    ...
    // Create an empty curve input
    UHoudiniPublicAPICurveInput* const CurveInput = InWrapper->CreateEmptyInput(UHoudiniPublicAPICurveInput::StaticClass());
    // Create the curve input object
    UHoudiniPublicAPICurveInputObject* const CurveObject = Cast<UHoudiniPublicAPICurveInput>(NewObject<UHoudiniPublicAPICurveInputObject>(CurveInput));
    // Make it a Nurbs curve
    CurveObject->SetCurveType(EHoudiniPublicAPICurveType::Nurbs)
    // Set the points of the curve, for this example we create a helix consisting of 100 points
    TArray<FTransform> CurvePoints;
    CurvePoints.Reserve(100);
    for (int32 i = 0; i < 100; ++i)
    {
        const float t = i / 20.0f * PI * 2.0f;
        const float x = 100.0f * cos(t);
        const float y = 100.0f * sin(t);
        const float z = i;
        CurvePoints.Emplace(FTransform(FVector(x, y, z)));
    }
    CurveObject->SetCurvePoints(CurvePoints);
    // Set the curve wrapper as an input object
    CurveInput->SetInputObjects({CurveObject});
    // Copy the input data to the HDA as node input 1
    InWrapper->SetInputAtIndex(1, CurveInput);
    // Since we are done with setting the initial values, we can unbind from the delegate
    InWrapper->GetOnPostInstantiationDelegate().RemoveDynamic(this, &ACurveInputExample::SetInputs);
}
In Blueprints:

In Python:
class CurveInputExample(unreal.PlacedEditorUtilityBase):
    ...
    def _set_inputs(self, in_wrapper):
        """ Configure our inputs: input 0 is a cube and input 1 a helix. """
        # Create an empty geometry input
        ...

        # Create a curve input
        curve_input = in_wrapper.create_empty_input(unreal.HoudiniPublicAPICurveInput)
        # Create a curve wrapper/helper
        curve_object = unreal.HoudiniPublicAPICurveInputObject(curve_input)
        # Make it a Nurbs curve
        curve_object.set_curve_type(unreal.HoudiniPublicAPICurveType.NURBS)
        # Set the points of the curve, for this example we create a helix
        # consisting of 100 points
        curve_points = []
        for i in range(100):
            t = i / 20.0 * math.pi * 2.0
            x = 100.0 * math.cos(t)
            y = 100.0 * math.sin(t)
            z = i
            curve_points.append(unreal.Transform([x, y, z], [0, 0, 0], [1, 1, 1]))
        curve_object.set_curve_points(curve_points)
        # Set the curve wrapper as an input object
        curve_input.set_input_objects((curve_object, ))
        # Copy the input data to the HDA as node input 1
        in_wrapper.set_input_at_index(1, curve_input)

        # unbind from the delegate, since we are done with setting inputs
        in_wrapper.on_post_instantiation_delegate.remove_callable(self._set_inputs)
To fetch the existing inputs of a wrapped asset, you can use the GetInputAtIndex() and GetInputParameter() functions for node inputs and parameter-based inputs.
Recap 
A recap of the example:
-
In the The Houdini Public API Instance, you make sure to have a running Houdini Engine session and start the instantiation process of an HDA
-
In Delegates, you use delegates to bind custom functions into the HDAs pre-instantiation and post-instantiation phases
-
In Parameters, you set the parameters of the HDA during the pre-instantiation
-
In Inputs, you built and set inputs for the HDA during post-instantiation.
At this point the plugin will continue processing the HDA asynchronously, sending parameters and inputs to Houdini. Once Houdini has cooked the node, you receive the resulting output and then build any outputs (meshes, materials).
The result of the example in the Unreal viewport:

The details panel (notice the inputs and modified parameter values):

Outputs 
This section covers how to access the outputs of the HDA after it has cooked and processed output object and assets.
-
Bind to the OnPostProcessingDelegate (already done in Delegates),
-
Iterate all the outputs and print the output object and component names,
-
Print if the output object is a proxy or not.
In C++:
void ACurveInputExample::PrintOutputs_Implementation(UHoudiniPublicAPIAssetWrapper* InWrapper)
{
    // Print out all outputs generated by the HDA
    const int32 NumOutputs = InWrapper->GetNumOutputs();
    UE_LOG(LogTemp, Log, TEXT("NumOutputs: %d"), NumOutputs);
    if (NumOutputs > 0)
    {
        for (int32 OutputIndex = 0; OutputIndex < NumOutputs; ++OutputIndex)
        {
            TArray<FHoudiniPublicAPIOutputObjectIdentifier> Identifiers;
            InWrapper->GetOutputIdentifiersAt(OutputIndex, Identifiers);
            UE_LOG(LogTemp, Log, TEXT("\toutput index: %d"), OutputIndex);
            UE_LOG(LogTemp, Log, TEXT("\toutput type: %d"), InWrapper->GetOutputTypeAt(OutputIndex));
            UE_LOG(LogTemp, Log, TEXT("\tnum_output_objects: %d"), Identifiers.Num());
            if (Identifiers.Num() > 0)
            {
                for (const FHoudiniPublicAPIOutputObjectIdentifier& Identifier : Identifiers)
                {
                    UObject* const OutputObject = InWrapper->GetOutputObjectAt(OutputIndex, Identifier);
                    UObject* const OutputComponent = InWrapper->GetOutputComponentAt(OutputIndex, Identifier);
                    const bool bIsProxy = InWrapper->IsOutputCurrentProxyAt(OutputIndex, Identifier);
                    UE_LOG(LogTemp, Log, TEXT("\t\tidentifier: %s_%s"), *(Identifier.PartName), *(Identifier.SplitIdentifier));
                    UE_LOG(LogTemp, Log, TEXT("\t\toutput_object: %s"), IsValid(OutputObject) ? *(OutputObject->GetFName().ToString()) : TEXT("None"))
                    UE_LOG(LogTemp, Log, TEXT("\t\toutput_component: %s"), IsValid(OutputComponent) ? *(OutputComponent->GetFName().ToString()) : TEXT("None"))
                    UE_LOG(LogTemp, Log, TEXT("\t\tis_proxy: %d"), bIsProxy)
                    UE_LOG(LogTemp, Log, TEXT(""))
                }
            }
        }
    }
}
In Blueprints:

In Python:
class CurveInputExample(unreal.PlacedEditorUtilityBase):
    ...
    def _print_outputs(self, in_wrapper):
        """  Print the outputs that were generated by the HDA (after a cook) """
        num_outputs = in_wrapper.get_num_outputs()
        print('num_outputs: {}'.format(num_outputs))
        if num_outputs > 0:
            for output_idx in range(num_outputs):
                identifiers = in_wrapper.get_output_identifiers_at(output_idx)
                print('\toutput index: {}'.format(output_idx))
                print('\toutput type: {}'.format(in_wrapper.get_output_type_at(output_idx)))
                print('\tnum_output_objects: {}'.format(len(identifiers)))
                if identifiers:
                    for identifier in identifiers:
                        output_object = in_wrapper.get_output_object_at(output_idx, identifier)
                        output_component = in_wrapper.get_output_component_at(output_idx, identifier)
                        is_proxy = in_wrapper.is_output_current_proxy_at(output_idx, identifier)
                        print('\t\tidentifier: {}'.format(identifier))
                        print('\t\toutput_object: {}'.format(output_object.get_name() if output_object else 'None'))
                        print('\t\toutput_component: {}'.format(output_component.get_name() if output_component else 'None'))
                        print('\t\tis_proxy: {}'.format(is_proxy))
                        print('')
Baking Outputs 
The UHoudiniPublicAPIAssetWrapper class also supports baking outputs.
There are three ways approach baking:
-
Enable auto-bake which automatically bakes the output after a book and uses the bake settings configured on the instantiated HDA.
-
Manually bake all outputs on an HDA
-
Bake a specific output object only identified by its output index and identifier.
See Baking Outputs for more information.
Next Steps 
For more information on blueprint/python versions for the async process, content examples, and a list of commands for the Public API, see Public API Documentation.