|
Houdini Engine for Unity
|
|
Houdini Engine for Unity
|
Houdini height fields can be used to generate Unity terrain. Conversely, Unity terrain can be used as input to generate height fields in Houdini through input nodes (see Terrain Input).
Due to the differences between Houdini height fields and Unity terrain, please follow the instructions below to setup the height field size and layers in an HDA to properly generate Unity terrain.

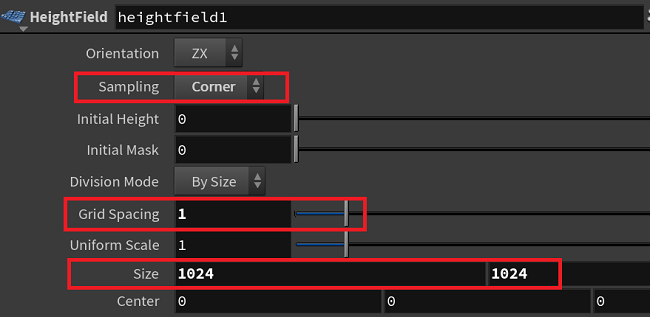
Unity requires the heightmap resolution to be a power of 2 + 1. In order to achieve the best results given this constraint, you'll need to understand how the height field node parms marked in red boxes above work together and should be used.
For Sampling use Corner type to match Unity's terrain generation, as well as the power of 2 size requirement. Houdini uses Center sampling by default but this results in floating point calculation errors when converting to Unity terrain. Therefore Corner sampling is recommended.
For Grid Spacing, use 1 or use a power of 2 (e.g. 2, 4, 8, etc.) to control height map resolution.
For Size use power of 2 starting at 64 (e.g. 64, 128, 256, 512, 1024, 2048, 4096, etc.).
For the resulting Unity terrain:
Example settings using Corner sampling:
| Houdini Height Field Size | Houdini Grid Spacing | Unity Terrain Size | Unity Heightmap Resolution |
|---|---|---|---|
| 512x512 | 1 | 513x513 | 513x513 |
| 512x512 | 2 | 514x514 | 257x257 |
| 512x512 | 4 | 516x516 | 129x129 |
| 1024x1024 | 1 | 1025x1025 | 1025x1025 |
| 1024x1024 | 2 | 1026x1026 | 513x513 |
| 1024x1024 | 4 | 1028x1028 | 257x257 |
| 2048x2048 | 2 | 2050x2050 | 1025x1025 |
| 4096x4096 | 2 | 4098x4098 | 2049x2049 |
In all cases, Unity's heightmap resolution must be power of 2 + 1. These would be:
When using other heightmap resolution sizes, Unity will automatically change to the next lowest power of 2 size, which means the height values will not be properly applied. Therefore stick to power of 2 values for the height field size and grid spacing.
The plugin ships with an example HDA (Assets/Plugins/HoudiniEngineUnity/HDAs/TerrainGenerator.hda) which shows the various recommended configurations of sizes and grid spacing values.
For using Unity terrain as input to generate Houdini height fields, it is just a matter of reversing the above calculation to figure out the height field size and grid spacing. Note that both the terrain width and length must be the same value (i.e. square sized terrain). Use the following steps:
The simplest method is to first choose a power of 2 value for terrain width and height, then add 1 for both the final terrain width and height, as well as the height map resolution (e.g. 512 + 1 = 513).
A Houdini height field volume consists of height and mask layers, and potentially could have a number of other layers. A Unity terrain consists of a Terrain component, and a TerrainData with height values, any number of TerrainLayers (or SplatPrototypes for Unity versions prior to 2018.3), and corresponding number of splatmaps. A TerrainLayer specifies the material to paint on the terrain. The splatmap specifies the masking or weights of each pixel from the TerrainLayer material at each point on the terrain.
The following describes how Houdini's height field layers are treated by the plugin:
The height layer will be used for the terrain's heightmap values. The range of the heightmap values form the height range for the terrain. The unity_hf_terraindata_file attribute can be specified on this layer (and only on this layer) to reference an existing TerrainData asset file to use (see Houdini Heightfields to Unity Terrain). There will NOT be a corresponding TerrainLayer created for this layer.
The mask layer is NOT used.
For each of the other layers, a corresponding TerrainLayer and a splatmap will be created or loaded, and set on the TerrainData. Therefore a height field volume with, for example, 4 layers (height, mask, ground, cliffs), will have 2 TerrainLayers and 2 splatmaps; a TerrainLayer and splatmap for the ground and the other 2 for the cliffs. The height field layer's name will be used for the TerrainLayer's name. An existing TerrainLayer asset can be specified via the unity_hf_terrainlayer_file attribute. On Recook, existing TerrainLayers will be reused if their name matches with the height field layers' name. If not specified or not found, the TerrainLayer will be created. In order to maintain the reference in the Unity project, the TerrainLayer will be saved to an asset file (see Generation for the saved file path).
The splatmaps are generated from the height field layer's height values. The values should be between 0 and 1 inclusive (i.e. normalized). If there are values outside this range, the plugin will normalize them back to within this range, using the minimum and maximum values (each value is subtracted by the minimum and divided by the range). Also, it is recommended that the splatmap values of each layer at any coordinate sum up to a total of 1. For example, if there are 2 splatmap layers, then for the splat values at (0,0), if the 1st layer has value of 0.7, then 2nd layer should have a value of 0.3. Note that ultimately these values are used by the material and shader used by the Unity terrain, so the recommended range is for the default Unity terrain material.
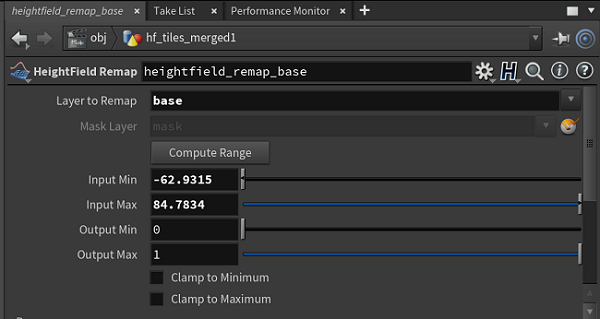
To create values between 0 and 1, a HeightField Remap SOP node could be employed. The following screenshot shows an example of this for height field layer named base:
The plugin provides a Strength control for each splatmap layer, exposed on the HDA's Inspector UI. The Strength value is a multiplier applied to each splatmap value, with a default value of 1. It allows to control the splatmap values generated from Houdini with a single parameter, and is useful for troubleshooting and when additional TerrainLayers have been manually added by the user.

Each of the TerrainLayer properties can be individually set using primitive attributes. The values specified by the attributes will override the existing TerrainLayer properties. See Houdini Heightfields to Unity Terrain.
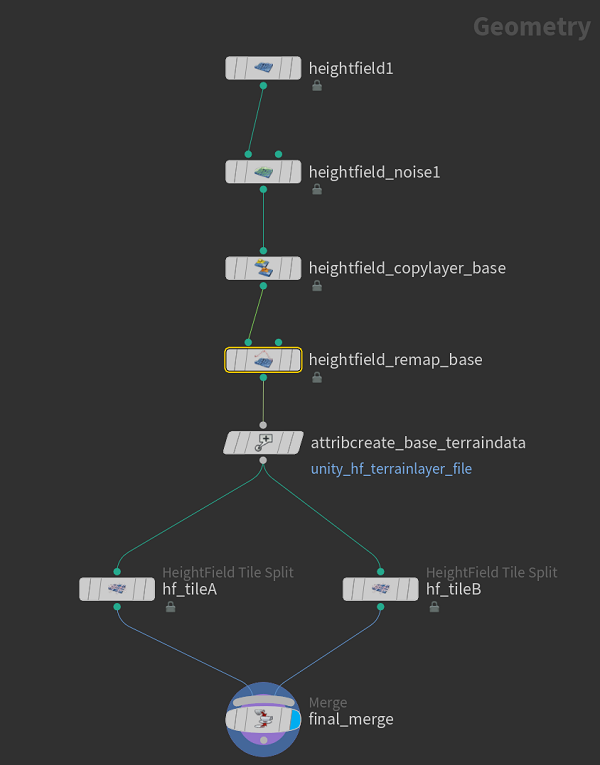
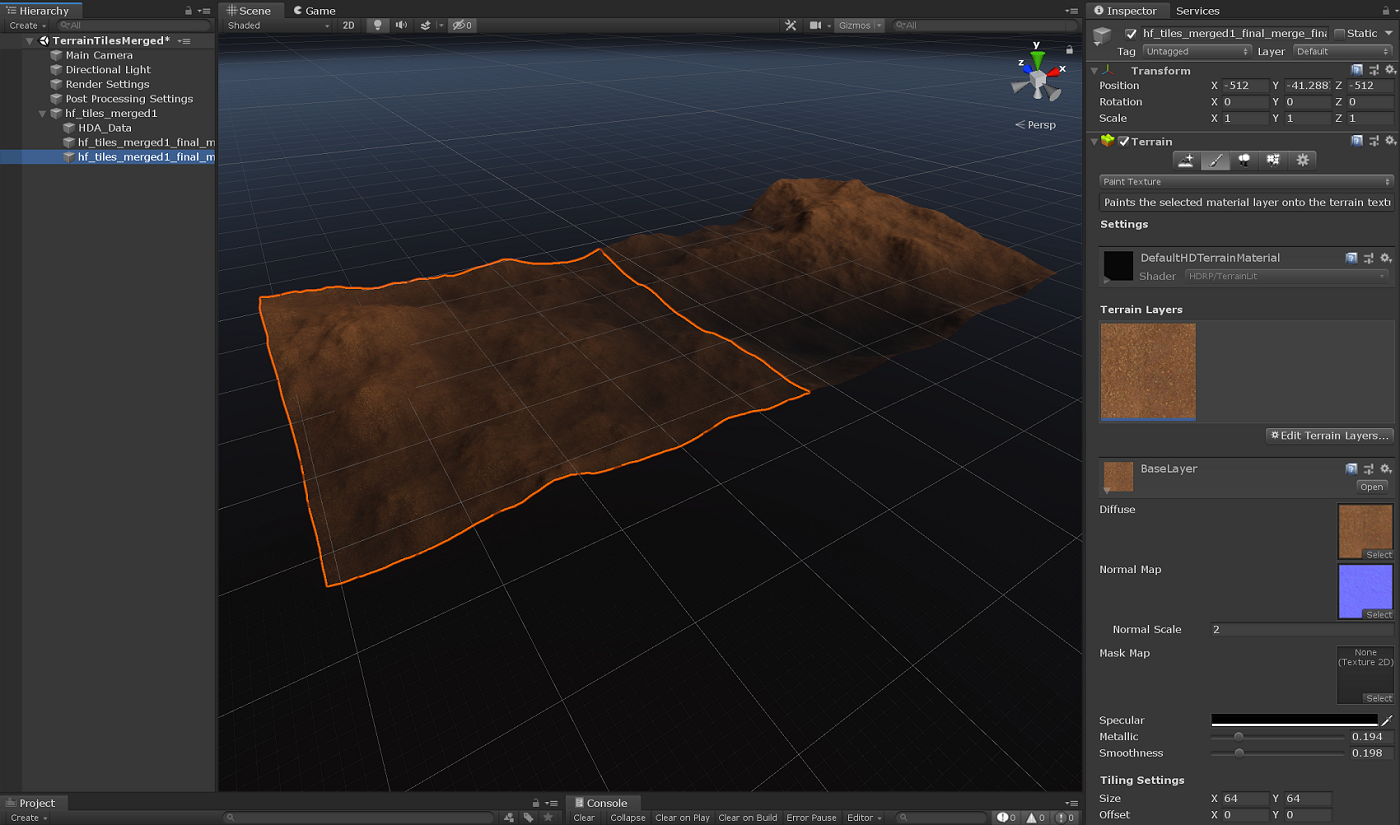
The following HDA contains a height field network that outputs 2 merged terrain tiles, with 3 height field layers (height, mask, and base). The base layer is a copy of the height layer, with values remapped to 0 and 1. An string attribute is created on the base layer to specify the TerrainLayer file to set in Unity for the base layer.
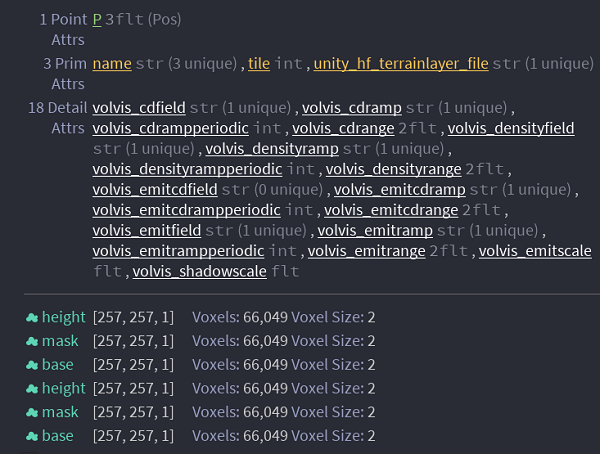
The following image shows the final merge node's info. There are 6 layers in total (3 layers (height, mask, base) for each terrain tile):
Finally, the HDA is loaded in Unity and generates 2 terrains, each having a single TerrainLayer (from the base height field layer):
During generation of a Unity terrain, the plugin does several things depending on the asset settings, existing terrain state, and cooking type:
The TerrainData file is by default saved into the plugin asset cache directory, at the following path:
Assets/HoudiniEngineAssetCache/Working/{asset name}/{geo name}/Terrain/Tile{index}/TerranData.asset
Existing TerrainData asset files are copied into the above directory, if specified via attribute.
But an explicit export path could be set via a string attribute (unity_hf_terraindata_export_file) on the height field (e.g. unity_hf_terraindata_export_file=Assets/Terrain/myterraindata.asset). Note that the path should end with a file name with extension .asset.
TerrainLayers that are modified via attributes or created newly are saved in the plugin asset cache directory, at the following path format:
Assets/HoudiniEngineAssetCache/Working/{asset name}/{geo name}/Terrain/Tile{index}/{layer name}.terrainlayer
Note that if an existing TerrainLayer asset file is specified via attribute, it is used as is, unless other custom attributes are specified to override its properties. In the latter case, a copy of the file is made, overrides are then applied, and the file is stored at the above location. This allows to leave the original TerrainLayer as is.
On Recook, the TerrainData, TerrainLayers, and splatmaps are reused (and settings untouched) unless overridden by the generated height field.
On Rebuild, and Reset Parameters, the TerrainData, TerrainLayers, and splatmaps are created newly (or asset files loaded from original references if specified via attributes).
When a new Terrain and TerrainData are created, the following settings are applied as defaults:
The material used for generated Terrains can be specified through the Plugin Settings window, in the GEOMETRY section:
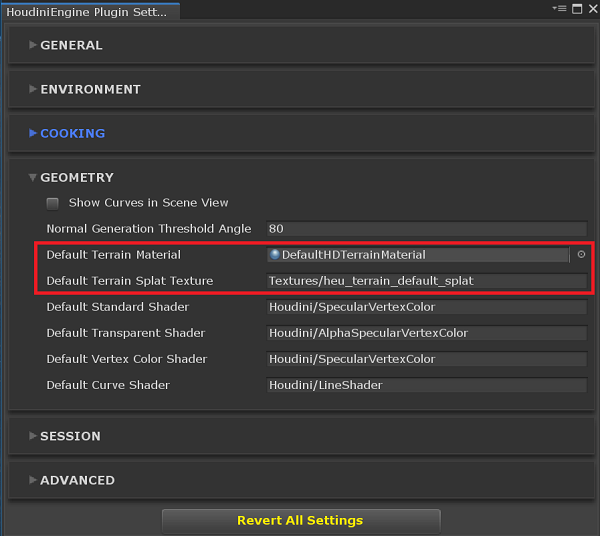
For Unity HDRP projects, it is recommended to set this to the DefaultHDTerrainMaterial that is shipped with the HDRP package. For other render pipelines, use the default Unity terrain material shipped for that pipeline.
Similarly, the default splat texture can be changed in the Plugin Settings to point to another texture file.
There are 2 methods of scattering instances using the HeightField Scatter node within an HDA:
When a HeightField Scatter node is used in a height field network, the output is a point cloud. The unity_instance attribute can be added to these points with paths to existing Unity prefabs in the project. The plugin creates prefab instances for each point, as well as the terrain associated with the height field if Keep Incoming Terrain is enabled on the HeightField Scatter node. Note that this works well for small number of points, but can be inefficient for a larger set.
A more efficient method of scattering is to directly feed in the point cloud into the generated Unity terrain via TreeInstances and TreePrototypes. The TreePrototypes allows to set a list of prefabs, while the TreeInstances allows to set the list of points with instance data per point. Using this method, hundreds of thousands of trees can be scattered efficiently.
TreeProtoypes must be defined with the unity_hf_tree_prototype + index string attribute on the height layer. These should be set to Primitive owner. The value should be the relative path in the Assets folder (e.g. Assets/Trees/tree1.prefab). The index value starts at 0, and increments for each additional prototype. The index corresponds to the index referenced in the TreeInstance definition below. As an example, to define 3 TreePrototypes, the following 3 attributes are defined:
unity_hf_tree_prototype0 = "Assets/Tree/large_tree.prefab"
unity_hf_tree_prototype1 = "Assets/Tree/regular_tree.prefab"
unity_hf_tree_prototype2 = "Assets/Tree/small_tree.prefab"
TreeInstances are defined using the following Point attributes after the HeightField Scatter node in the network:
Automatically setting Terrain tree instances is only available for Unity 2019.1 or newer.
For smaller sized environment details such as grass, shrubs, etc., height field layers can be specified to be converted to Unity terrain's detail layers for efficient drawing.
A Unity terrain detail layer contains a map of integer values that specify the number of instances for the area covered by each value in the height field. These values must be integers between 0 and 16, so the float values from the height field will be simply converted to integers as they are. For a point in the height field, a value of 0 denotes no instances, while values between 1 and 16 denote the number of desired instances for the area covered by the height point. The area covered by each height point is determined by dividing the terrain size by the Detail Resolution, which is inferred from the size of the height field layer. For example, a terrain of size 1024x1024 with the Detail Resolution of 256 means that for each height point in a detail layer, it covers a 4x4 area.
Note that the Detail Resolution cannot be set via attribute. It is inferred from the detail layer's size, which must be a square size between 0 and 4048, as required by Unity. Therefore all specified detail layers must be of the same size.
In order to use detail layers, the height field network requires setting detail properties, as described below.
By setting the GameObject containing the Terrain component in an asset's input field parameter, the plug-in will convert the terrain and its layers into Houdini height fields.
Only square sized terrain are currently supported (i.e. both width and height must be same). If the terrain should be roundtripped (i.e. brought back into Unity), it is recommended to follow the power of 2 + 1 heightmap resolution size rule described in Height Field Size & Grid Spacing.
The input node in Houdini will contain the following:
 1.8.6
1.8.6 
