|
Houdini Engine for Unreal
|
|
Houdini Engine for Unreal
|
Houdini Engine for Unreal supports both inputting and outputting meshes to/from Unreal.
There are multiple ways that you can use to export meshes from Unreal to Houdini. You can use geometry:
Houdini assets contain Objects, Geos and Parts. These will control the way the resulting geometry in Unreal will be split in multiple meshes.
The only thing that might split mesh created from parts in the Unreal plug-in is the use of collision groups.
All the non collidable geometry from a part will be in a mesh, and additional meshes will be created for each complex collision geometry group present in the part.
Other groups used in the asset will not split parts into separate meshes.
All the meshes generated by the asset will be listed with their materials in the Houdini Generated Meshes section.
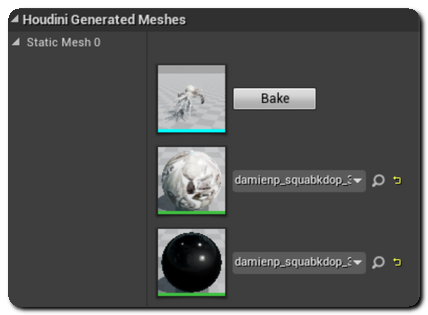
Houdini Engine for Unreal can recognize and convert various attributes to their Unreal equivalent.
You can use the standard normal (N - Point/Vertex - Float3) to set the normals of the mesh.
The plug-in can recompute the normals automatically. This can be controlled by changing the value of the Recompute Normals settings, located in the Static Mesh Build Settings part of the plug-in settings.
If normals are present, you can also have the tangents to be automatically recomputed by changing the Recompute Tangents plug-in settings.
UV sets can be defined with the standard uv attribute (uv - Point/Vertex - Float2).
You can use up to 8 different uv sets by naming them respectively uv, uv2, uv3... uv8.
Vertex colors can be set by using the standard Color Diffuse attribute (Cd - Any - Float3 / Float4).
The lightmap resolution of the mesh can be set by using the unreal_lightmap_resolution Integer attribute.
You can set up the Unreal Material used on the faces of a mesh by using the unreal_material string attribute, either on vertices or points. The value of this attribute must be set to a reference to a Material in the content browser (obtained by right clicking > "Copy Reference").
All the different materials used by a mesh will be listed in the Houdini Generated Meshes section of the details panel. Please see Materials for more information.
The mesh smoothing mask data can be set by adding the unreal_face_smoothing_mask Int attribute on the primitives.
You can set the name used for the mesh generated by the plug-in by using the unreal_generated_mesh_name string attribute.
You can also add sockets and colliders to the mesh by using special Groups.
 1.8.6
1.8.6 
