|
Houdini Engine for Unreal
|
|
Houdini Engine for Unreal
|
Houdini Engine for Unreal supports both the Input and Output of Landscapes.
Landscapes can be exported to Houdini by using a Landscape Inputs. The landscape's data will be available in Houdini either as a heightfield, point cloud or mesh.
If the landscape is exported as a heightfield, all the landscape layers will be available as mask on the heightfield node.
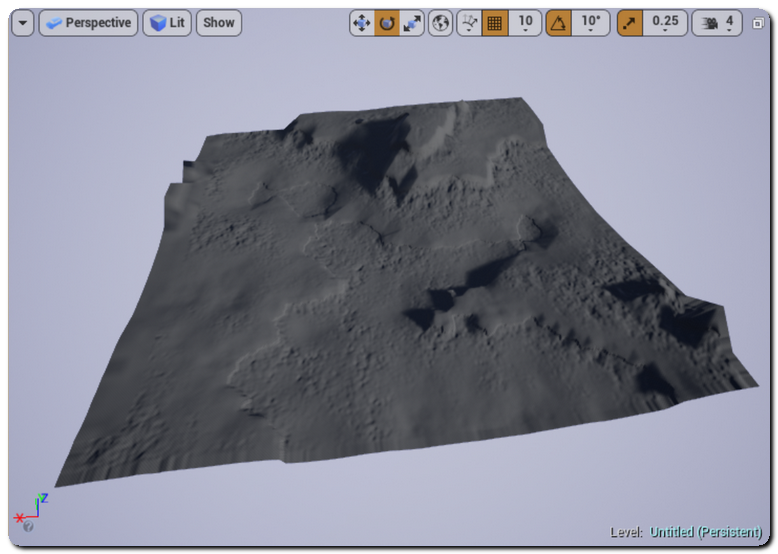
Landscapes can be generated by your Asset if it displays Heightfield data. Heightfield nodes will automatically be picked up and converted to a Landscape by the plug-in. The height buffer will be used to control the landscape geometry, and all the additional buffers generated by heightfield nodes (mask, mesa, cliffs...) will be available on the landscape as Layers.
If your Heightfield has a mask called visibility, then the plug-in will use it for the landscape's visibility layer, used to create landscape holes.
Unreal requires all landscape layer to be saved to a file, by default the generated layers for a landscape will be saved in the HoudiniEngine/Temp folder in the content browser. When saving your level, make sure that these landscape layer asset are saved as well.
As Unreal uses 16-bits integers for Landscapes, the heightfield values needs to be converted from Houdini's 32-bits float, resulting in a small precision loss. By default, Landscape components generated by Houdini Engine will use 3/4 of the available range for conversion. This allows you to sculpt the landscape past its min/max values afterwards in Unreal. If you would rather use maximum precision for the data conversion, simply activate the Marshalling Landscapes Use Full Resolution** setting in the Geometry Marshalling section of the Settings.
As an example, a 4km high landscape will have a precision (on the Z axis) of 8.13 cm by default, or 6.10 cm if the option is activated.
Heightfield masks will be converted from houdini's 32-bits float to Unreal 8-bits unsigned int. The mask's values will be converted from Houdini's [min, max] to [0, 255] in UE.
By default, heightfield masks will be converted to weight-blended landscape layers. If you want some of the heightfield masks to be exported to Unreal as non weight-blended layers, you must add a Primitive String attribute to your heightfield, named unreal_landscape_layer_nonweightblended. Set this attribute values to the names of the masks separated by spaces (ie: "mask water debris").
Unreal Engine requires very specific sizes for its landscapes, as they are broken up in sections and components for LOD / optimisation purposes. The recommanded sizes are:
If your heightfield data doesn't match one of these recommanded size, Houdini Engine will automatically pad the data on the borders of your landscape to the fit the size requirements.
Upon cook, the generated landscape's Transform will be automatically set up so that its dimension, altitude, scale and position in Unreal are the same as in Houdini.
As Landscapes cannot be made component of another Actor, the generated landscape will not be listed in the component list of your Houdini Asset, but will be listed as a child of your Houdini Asset in the World Outliner. It will also appear in the details panel of the asset, under the Houdini Generated Meshes section, along with its landscape material and hole material.
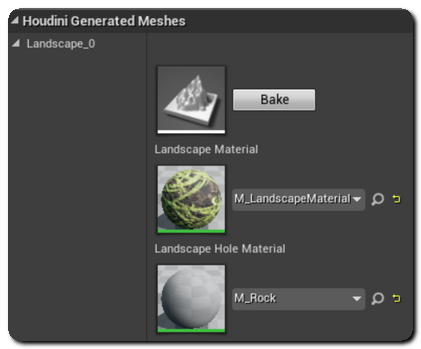
This section will give you the option to override the landscape's main and hole materials. You can automatically assign an existing material to one of these by using the unreal_material and unreal_hole_material attributes. You can also automatically generate material instances for the landscape material and hole material by using the unreal_material_instance and unreal_material_hole_instance attributes. For more details on this, see Material Instances.
Even if it is not listed in the Houdini Asset's components, the Landscape will still remained "linked" to it. Recooking the asset will "overwrite" the generated landscape, and deleting the asset will also delete its landscape as well.
To separate the generated landscape from its Houdini asset, you just need to "bake" it by using the corresponding button in the details panel.
 1.8.6
1.8.6 
