| On this page |
Overview 
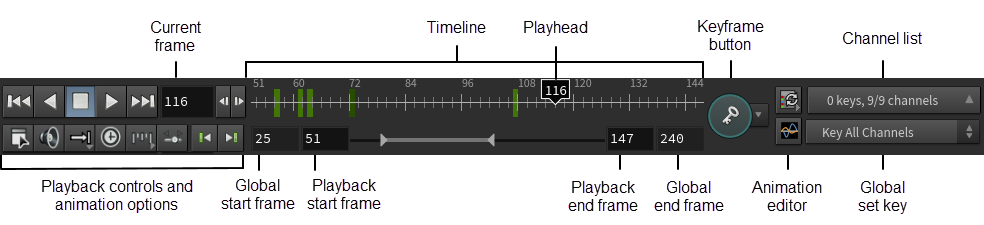
The playbar lives at the bottom of the Houdini interface and controls the playback of animation and simulation, the current time displayed in the viewer, and the playback range. The playbar also displays keys for the parameters in the channel list, and allows editing of keys directly on the timeline.
Tip
The playbar has a compact mode that you can change in Edit ▸ Preferences ▸ General User Interface. In the Playbar UI drop-down box, choose Compact.
Playback controls and animation options 
![]() First Frame
First Frame
Moves the playhead to the start of the current frame range.
![]() Play Backward
Play Backward
Starts playing the animation in the current frame range backward.
![]() Stop Playback
Stop Playback
Stops playing the animation.
![]() Play Forward
Play Forward
Starts playing the animation in the current frame range. The button turns into a pause button while playback is active. Pressing it again stops the playback.
![]() Last Frame
Last Frame
Moves the playhead to the end of the current frame range.
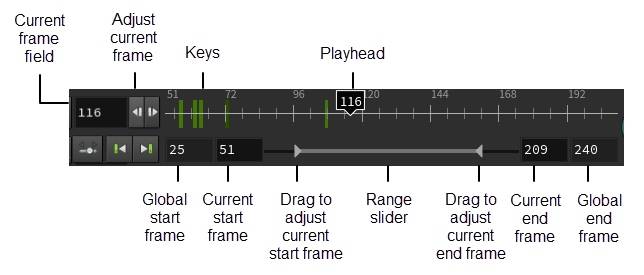
Current Frame
Displays the current frame number. You can type in a frame number or ![]() drag to adjust the value using the value ladder.
drag to adjust the value using the value ladder.
![]() Previous Frame
Previous Frame
Moves the playhead to the previous frame. At the start of the current frame range, this will wrap to the end if you turn on the Loop Backward option on the ![]() Play Looping drop-down menu.
Play Looping drop-down menu.
![]() Next Frame
Next Frame
Moves the playhead to the next frame. At the end of the current frame range, this wraps to the start if you set ![]() Play Looping to Loop.
Play Looping to Loop.
![]() Global Animation Options
Global Animation Options
Opens the Global Animation Options window, which has settings for animation, including the total number of frames in the current scene.
![]() Audio Panel
Audio Panel
Opens a window with settings for audio playback.
![]() Play Looping
Play Looping
This menu lets you choose from several playback looping options - Loop (repeat), Play Once (stop at the end), Zig-Zag (repeat forward then backward), or Forever (will not stop or loop). There is also an option to Loop Backward. Forever will stop at $RFSTART in reverse play.
![]() Real Time Toggle
Real Time Toggle
Toggles real-time mode. When turned on, Houdini will play the animation at the set FPS. When turned off, Houdini will play the animation as fast as it can.
Click ![]() Global Animation Options to select the realtime playback options.
Global Animation Options to select the realtime playback options.
![]() Enable playback at fractional frames
Enable playback at fractional frames
Sets the frame rate for playback to a fractional increment. ![]() clicking the button lets you set the substeps directly from a list of preset options.
clicking the button lets you set the substeps directly from a list of preset options.
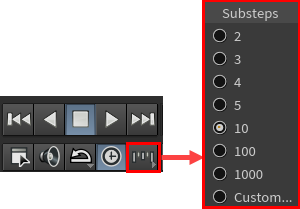
If you want to specify the substeps manually, select Custom to open the Global Animation Options window, and change the Integer Frame Values and Step options.
When this button is pressed:
-
Playing back your animation will play each fractional frame based on the selected step size instead of playing back whole integer frames.
-
The Next Frame / Previous Frame buttons in the playbar will go to the next fractional frame instead of the next whole integer frame.
-
Scrubbing along the playbar will scrub along fractional frames instead of whole frames.
![]() Animation Toolbar
Animation Toolbar
Displays the animation toolbar.
![]() Previous Keyframe
Previous Keyframe
Moves the playhead to the previous keyframe for the selected object.
![]() Next Keyframe
Next Keyframe
Moves the playhead to the next keyframe for the selected object.
Timeline 
The timeline is a graphical representation of the current frame range. Keys set on parameters appear as marks on the timeline. See how key marks are color coded on the timeline.
You can change the global frame range and the current frame range, as well as resize and move the current frame range using the range slider under the timeline.
The inner text boxes immediately surrounding the range slider are the current start and end frames. The outer text boxes with a lighter background color are the global start and end frames. The current frame is highlighted in the playhead, a black box with a down arrow indicator. A thin vertical line is displayed under the mouse cursor to indicate the frame number.
| To... | Do this |
|---|---|
|
Go to a specific frame |
Use any of the following:
|
|
Move to the previous/next frame along the timeline |
← or Alt + , to move to the previous frame. → or Alt + . to move to the next frame. |
|
Set the frame range |
There are two frame ranges - the global frame range and the current (playback) frame range. To set the global frame range, click You can use the range slider on the timeline to play back a subset (current frame range) of the global frame range. This lets you concentrate on subsections of the total animation. |
|
Switch between the current and full playback range |
Use ⇧ Shift + |
Keyframe marker colors 
Houdini color codes the keyframe markers on the playbar timeline according to the current keyframe status. The playbar’s keyframe button uses some of the same color codes to give a quick status of all the keys at the current frame.

Keyframe marker |
State |
|---|---|
Green |
Keyed All of the selected parameters in the channel list are keyed at this frame. |
Faint green |
Partial key One or more of the selected parameters in the channel list are keyed at this frame, but not all. |
Orange |
Pending changes This keyed parameter has been changed, but hasn’t been explicitly keyed. You need to explicitly key a changed parameter if auto-commit is turned off. You can set Houdini to automatically commit changes on keyframes. |
Editing keys on the timeline 
You can edit keys directly on the timeline without opening the animation editor. Editing keys on the timeline is similar to editing in the ![]() dopesheet.
dopesheet.
![]() click the timeline to access a menu of commands for editing the selected keys. For example, you can delete keys on the timeline by selecting the keys,
click the timeline to access a menu of commands for editing the selected keys. For example, you can delete keys on the timeline by selecting the keys, ![]() clicking the timeline, and choosing Delete Keys.
clicking the timeline, and choosing Delete Keys.
| To... | Do this | ||||
|---|---|---|---|---|---|
|
Go to the previous/next keyframe along the timeline |
, or ⇧ Shift + ← to go to the previous keyframe. . or ⇧ Shift + → to go to the next keyframe. |
||||
|
Move a single key along the timeline |
You can |
||||
|
Select a range of frames on the timeline |
Hold ⇧ Shift and drag along the timeline to select a range of frames. Holding ⇧ Shift puts you in “editing” mode instead of moving the playhead along the timeline. |
||||
|
Clear a frame range selection |
⇧ Shift + |
||||
|
Move keys along the timeline using a range selection |
|
||||
|
Move keys forward or backward in time |
|
||||
|
Copy parameter values between frames |
This is a quick way to copy parameter values from one frame to another, such as when you want an object to ping-pong back and forth between two positions.
|
||||
|
Copy and paste keys |
|
||||
|
Paste keys visually |
The visual paste options on the context menu let you interactively position the paste location with the mouse, instead of selecting the location first and then pasting.
|

Bookmarks 
Bookmarks are markers on a single frame or range of frames on the timeline that help to organize and identify the different parts of your animation at a glance. You can create, edit, and view bookmarks on the playbar, in the bookmark editor, and in the animation editor.

| To... | Do this |
|---|---|
|
Show or hide bookmarks on the timeline |
|
|
Create a bookmark |
In the Bookmark pop-up window:
|
|
Create a bookmark using a frame range selection on the timeline |
|
|
Move to the previous/next bookmark on the timeline |
⌃ Ctrl + ← to move to the start frame of the previous bookmark. ⌃ Ctrl + → to move to the start frame of the next bookmark. |
|
Move and resize bookmarks on the timeline |
⌃ Ctrl + ⌃ Ctrl + |
|
Duplicate a bookmark |
⌃ Ctrl + Alt + |
|
Double-click a bookmark to set the playback range to the frame range of the bookmark. Double-click the bookmark again to jump back out to the previous frame range. If you have navigated into the bookmark frame range, doing ⌃ Ctrl + ← and ⌃ Ctrl + → will move you to the previous/next bookmark frame range. |
|
|
Display bookmark comments |
Hover over a bookmark on the timeline and a tooltip will display the comment you entered when creating the bookmark. |
|
Edit Brings up the Bookmark pop-up window that is used when creating a bookmark. Delete Deletes the bookmark. Send to Back Sends the bookmark to the back of the timeline so as not to obscure the user from interacting with other bookmarks at the same frame range. Set Frame Range from Bookmark This is equivalent to double-clicking the bookmark. Create Selection from Bookmark Creates a frame range selection from the bookmark frame range. Show Bookmarks Turn off this option to hide all the bookmarks from the timeline. Bookmark Editor Brings up the Bookmark Editor window. |
Keyframing controls 
The right side of the playbar focuses on keyframing controls. It features a ![]() keyframe button with a drop-down menu for quick access to keyframing preferences, a
keyframe button with a drop-down menu for quick access to keyframing preferences, a ![]() channel list refresh button, a quick access button for the
channel list refresh button, a quick access button for the ![]() animation editor, a Channel List button that shows an overview of the channel list, and a drop-box menu for the Global Set Key preference.
animation editor, a Channel List button that shows an overview of the channel list, and a drop-box menu for the Global Set Key preference.
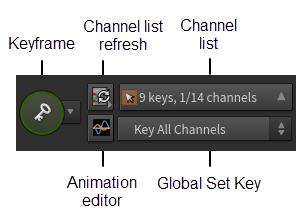
Pressing the ![]() keyframe button will set a key at the current frame for the parameters in the channel list. This does the same thing as pressing K. The Global Set Key preference determines the parameters in the channel list that are keyed when the keyframe button is pressed.
keyframe button will set a key at the current frame for the parameters in the channel list. This does the same thing as pressing K. The Global Set Key preference determines the parameters in the channel list that are keyed when the keyframe button is pressed.
Keyframe Button Colors
The keyframe button’s color changes if the parameters in the channel list have a keyframe at the current frame.
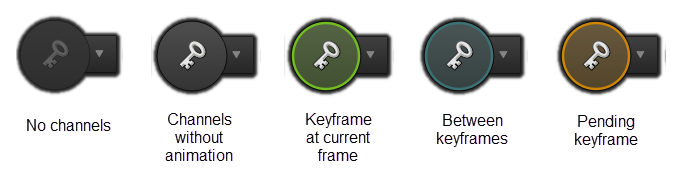
Keyframe button |
State |
|---|---|
Greyed out |
No Channels (Disabled) The channel list is empty. The keyframe button is rendered in a disabled state. Clicking it has no effect. |
Black |
Channels Without Animation The channel list has one or more parameters, but the parameters don’t have animation. The keyframe button is rendered in an active state but isn’t colored. |
Green |
Keyframe at Current Frame The channel list has one or more parameters, and at least one of the parameters has a keyframe at the current time. |
Blue |
Between Keyframes The channel list has one or more parameters, and the parameters have animation, but there is no keyframe at the current time. |
Orange |
Pending Keyframe The channel list has one or more parameters, and one of the keyed parameters (parameters with animation) has changed, but has not been explicitly keyed. You need to explicitly key a changed parameter if auto-commit is turned off. See the next section for more information. If you choose Key Pending in the Global Set Key drop-down menu, only the changed (pending) parameters will be keyed at the current frame when the keyframe button is pressed. Otherwise, the parameters based on the Global Set Key preference are keyed. |
Keyframing Modes
The keyframe button also shows the state of some of the animation preferences (Edit ▸ Preferences ▸ Animation) by displaying a different icon. Click the drop-down menu next to the ![]() keyframe button to change the auto-key (Auto-key changes) and auto-commit (Auto-commit changes) animation preferences.
keyframe button to change the auto-key (Auto-key changes) and auto-commit (Auto-commit changes) animation preferences.
When auto-key is turned on, any parameter change is immediately keyed (whether the parameter was previously keyed or not yet keyed), and the changes are reflected in the geometry displayed in the viewport.
When auto-commit is turned on and you change parameters that have already been keyed at the current frame, the new values are automatically saved as the new keyed values. You do not need to explicitly key the values.
By default, auto-key is off and auto-commit is on. In this state, the keyframe button is rendered without any additional icon.
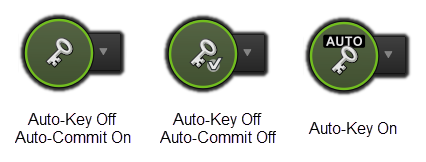
If you turn auto-commit off, the keyframe button will be rendered with a little check mark icon. This tells you that you need to explicitly key the changed parameter before moving to a different place along the timeline. In this state, the keyframe button will turn orange every time you change a keyed parameter, indicating that the current keyframe has a pending change that needs to be explicitly keyed.
If you turn auto-key on, the keyframe button will be rendered with ![]() AUTO. In this mode, auto-commit has no effect, since auto-key sets the keyframe as soon as you change a parameter value.
AUTO. In this mode, auto-commit has no effect, since auto-key sets the keyframe as soon as you change a parameter value.
Channel List Refresh
Clicking on the ![]() channel list refresh button updates the channel list from the selected nodes.
channel list refresh button updates the channel list from the selected nodes. ![]() click the button to open a drop-down menu to change the Auto-Update Channel List and Keep Channel List Selections animation preferences.
click the button to open a drop-down menu to change the Auto-Update Channel List and Keep Channel List Selections animation preferences.
You can also open several panes from the ![]() menu, including the Animation Editor, Channel List, Channel Groups, and Animation Layers panes.
menu, including the Animation Editor, Channel List, Channel Groups, and Animation Layers panes.
Channel List Button
Clicking on the Channel List button opens a small Channel List pop-up window on top of the playbar that displays the total list of parameters, the selected parameters, the parameters with keys at the current frame, and the option to filter the list of parameters displayed.
The Channel List button also shows the state of the Auto-Update Channel List and Keep Channel List Selections preferences that can be selected from the ![]() channel list refresh button:
channel list refresh button:

Tip
Both the Channel List button and Channel List pop-up window support drag and drop. You can drag and drop from a parameter label on to the button/window to add parameters to the channel list. You can also drag from the Channel List button/window onto a Python Shell pane to get a list of hou.Parm parameters in a python array.
Animation Editor
Opens an animation editor floating window.
Global Set Key
Controls the behavior of the ![]() keyframe button and the K key. You can choose from the following options:
keyframe button and the K key. You can choose from the following options:
-
Key Pending - Key only the parameters that have changed but have not been explicitly keyed. (You need to explicitly key a changed parameter if auto-commit is turned off.)
-
Key All Channels - Key all the parameters in the channel list.
-
Key Selected - Key the parameters that are selected in the channel list.