| On this page |
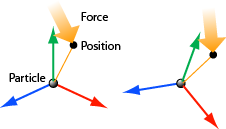
Instance geometry on particles 
| To... | Do this |
|---|---|
|
Instance geometry on particles |
For specific parameter help see the |
|
Rotate the instanced geometry using torque |
|
|
Make the instanced geometry look at an object |
|
|
Make the instanced geometry look at a plane |
|

Rendering Instanced Geometry 
When you create a particle system, Houdini also creates a renderable object at obj level. For example, if you create a particle system with the ![]()
![]() Location Particle Emitter shelf tool, your renderable object will be called
Location Particle Emitter shelf tool, your renderable object will be called location_particles.
-
In order to render instanced geometry, append an
 Instance SOP after the
  DOP Import Fields SOP node inside the renderable object.
 -
On obj level, turn on the
location_particlesnode’s blue Display/Render flag. If necessary, turn off other Display/Render flags to render only the instances.
Motion blur 
When calculating motion blur, Mantra by default assumes the geometry of an object is unchanging, and blurs it as a whole. For a particle system obviously the points are moving, so you need to turn on velocity blur to use the velocity (v) attribute of the points to blur them individually.
To enable motion blur on particles you must enable it on the object as well the render node.
| To... | Do this |
|---|---|
|
Enable velocity blur on an object |
|
|
Enable motion blur on a render node |
|