To bind surfaces to bones, you specify a 3D volume around the bone,
inside which the bone will “capture” surfaces. You will control the
capture regions using manipulators that define the volume in which the
capturing will occur.
Tip
The skeleton and skin surfaces should overlap in 3D. Switch to the
capture pose if you need to use a specific pose
for capturing geometry.
| To... | Do this |
|
Bind geometry to bones
|
-
Click the  Capture
Geometry tool on the Characters shelf. Capture
Geometry tool on the Characters shelf.
-
Select the surfaces you want to capture and press Enter.
-
Select the root object of the character/bone chain you want to
bind the geometry to and press Enter.
In shaded mode, the geometry changes to the color of its
capturing bone. Geometry that is not captured is white.
-
If part of a surface is mistakenly captured or not captured,
edit the capture region of the bones (see below).
-
Once the surfaces are successfully captured, you can use the
 Pose tool to pose the skeleton and the
surfaces should deform to follow the skeleton. Pose tool to pose the skeleton and the
surfaces should deform to follow the skeleton.
|
|
Edit the capture region of bones
|
-
Click the  Edit Capture
Regions tool on the Characters shelf. Edit Capture
Regions tool on the Characters shelf.
-
Select the bones you want to capture geometry for, then press
Enter to confirm the selection.
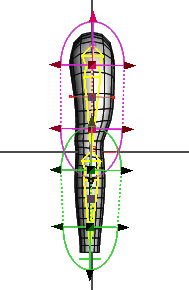
-
Manipulators appear on the bones showing each bone’s capture
region (the volume around the bone which inside which geometry
will be bound to the bone). Drag the handles to change the
size of the capture region. Hold ⇧ Shift and drag a capture
region handle to edit all the handles on a bone at once.
|
Behind the scenes
If you go into the Geometry object containing the
captured surfaces, you will see Houdini has added a Capture node and
a Deform node to the existing chain. These nodes use the bone
movements to deform the geometry.