Full Version: Fur Lookdev making mask for materialX
Im follow the Fur Lookdev tutorial and want to know the method to make masking for Brown/White/Black fur
I don't know how the original textures were created, it is possible that they were created in a third party app.
However, if you wanted to create them in Houdini for your own characters, there are two options, depending on if you have UDIMs or not.
1) No UDIMs, H22 only. Use a Paint 3D COP. You can paint different layers and then use a Cable Unpack and Channel Join with the signature set to RGB to combine the different layers into the R,G,and B components of an image the way it is in the Fur Lookdev tutorial. You can also just write out each layer as a separate map if you prefer.
2) With UDIMs - easiest in H22, but also doable in H21. Use an Attribute Paint SOP to paint your maps. Subdivide your geometry first if you need to paint more detail than the resolution allows (this is only used for baking the maps, not for your actual groom). Ensure you also create a UDIM List SOP on your geometry before importing it into COPs. On your COP Network, under the UDIM dropdown, toggle on "Default UDIM List" and pick "from Geometry". Then specify your Geometry Path with the UDIM List attribute. Inside COPS, the important thing when you rasterize your geometry is to connect a default Layer COP followed by a Match UDIM COP otherwise the same UDIM tile will be written out to each UDIM file. Again, use a channel join if you wish to combine your layers into a single image. For your ROP Image Output node specify "<UDIM>" in the Output file name. If you are in H22 you can set the UDIM List to "Use Context". If you are in H21 you will have to specify the UDIM range manually.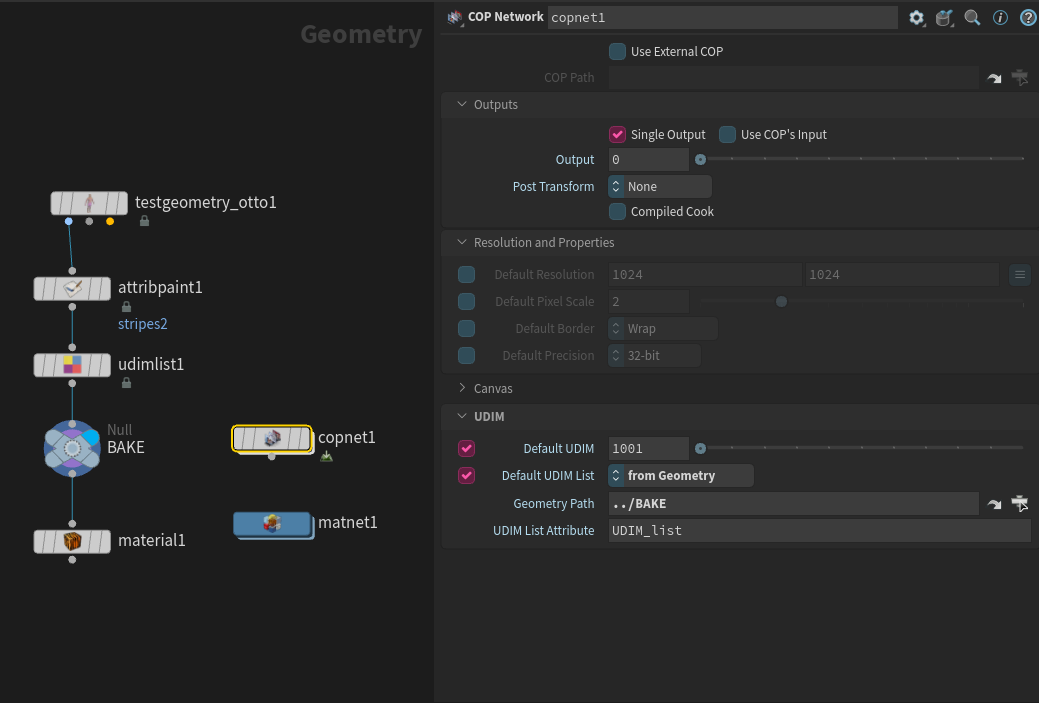
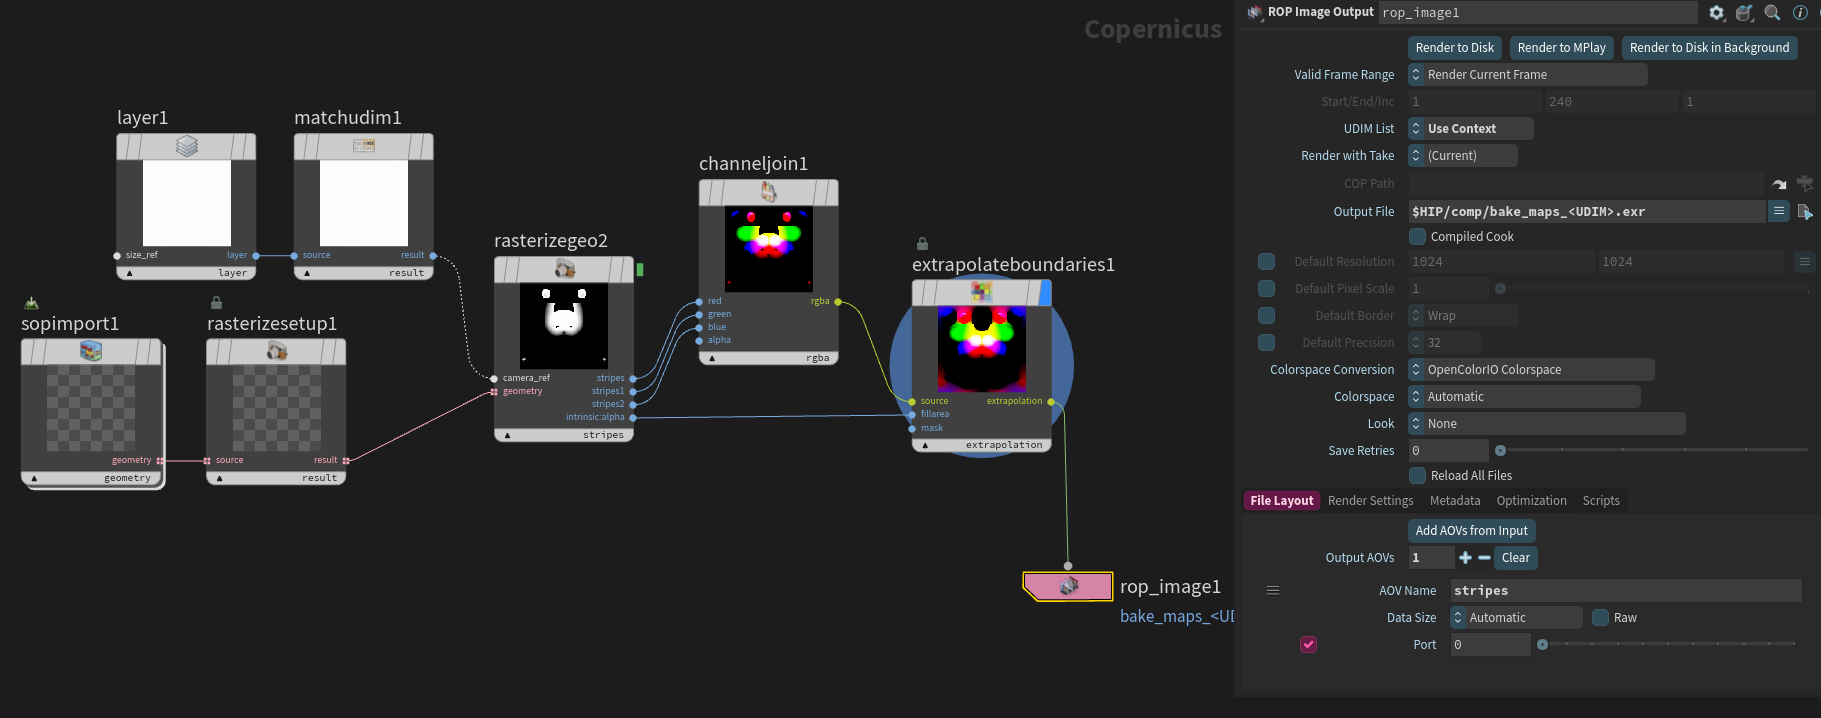
In both setups I also added an Extrapolate Boundaries COP with the alpha of the geometry UVs connected as the "fillarea". This prevents uv seams from showing in the maps.
I've attached an H22 file to illustrate both methods.
However, if you wanted to create them in Houdini for your own characters, there are two options, depending on if you have UDIMs or not.
1) No UDIMs, H22 only. Use a Paint 3D COP. You can paint different layers and then use a Cable Unpack and Channel Join with the signature set to RGB to combine the different layers into the R,G,and B components of an image the way it is in the Fur Lookdev tutorial. You can also just write out each layer as a separate map if you prefer.
2) With UDIMs - easiest in H22, but also doable in H21. Use an Attribute Paint SOP to paint your maps. Subdivide your geometry first if you need to paint more detail than the resolution allows (this is only used for baking the maps, not for your actual groom). Ensure you also create a UDIM List SOP on your geometry before importing it into COPs. On your COP Network, under the UDIM dropdown, toggle on "Default UDIM List" and pick "from Geometry". Then specify your Geometry Path with the UDIM List attribute. Inside COPS, the important thing when you rasterize your geometry is to connect a default Layer COP followed by a Match UDIM COP otherwise the same UDIM tile will be written out to each UDIM file. Again, use a channel join if you wish to combine your layers into a single image. For your ROP Image Output node specify "<UDIM>" in the Output file name. If you are in H22 you can set the UDIM List to "Use Context". If you are in H21 you will have to specify the UDIM range manually.
In both setups I also added an Extrapolate Boundaries COP with the alpha of the geometry UVs connected as the "fillarea". This prevents uv seams from showing in the maps.
I've attached an H22 file to illustrate both methods.
Thank you for sharing a very clear and throughout approach. I have succeeded in masking grooming area of my own in MaterialX. My understanding is that transfer the uv of the skin to the grooming guide (?) and then use the st attribute in the usd primvarReader and then UV texture map (?).


I followed step by step and a lot go back and forth and somehow got it to worked! but not really fully understand it.
I followed step by step and a lot go back and forth and somehow got it to worked! but not really fully understand it.