| On this page |
Overview 
There are two main ways of shattering in Houdini:
-
Voronoi fracturing pre-fractures a model into pieces and then creates a glue constraint network between the pieces. When the pieces collide with enough force, they will separate.
-
Solid objects (also known as Finite Element Method or FEM) converts the model into solid made up of 3D tetrahedrons. The solid
 FEM Solver simulates the object as solid matter: it can bend, have elasticity, shift internal mass, chip, crumble, or shatter depending on its physical parameters.
Solid objects are slower but more accurate. Voronoi fracturing is less realistic but is much faster. You can use the solid solver for close-up “hero” effects and voronoi fracturing for mid-ground/background effects.
Voronoi fracturing 
-
Use the
 Make Breakable shelf tool on an RBD object. Houdini adds a node rig that automatically fractures and glues the object if and when it collides with another object.
Tip
You may want to increase the number of sub-steps in the solver to have the automatic shattering occur closer in time to the first impact.
-
If you need more control, you can pre-fracture the geometry “manually” in SOPs.
-
In the geometry network, add a
 Voronoi Fracture node. Connect the geometry you want to fracture to the first input.
 -
The Voronoi Fracture node’s second input takes a point cloud that represents the centers of the resulting shattered pieces. You can easily create a configurable number of center points by wiring the geometry into an
 Iso Offset node to create a volume representation, then adding a
  Scatter to scatter points in the volume, then connecting the scatter to the Voronoi Fracture’s second input.
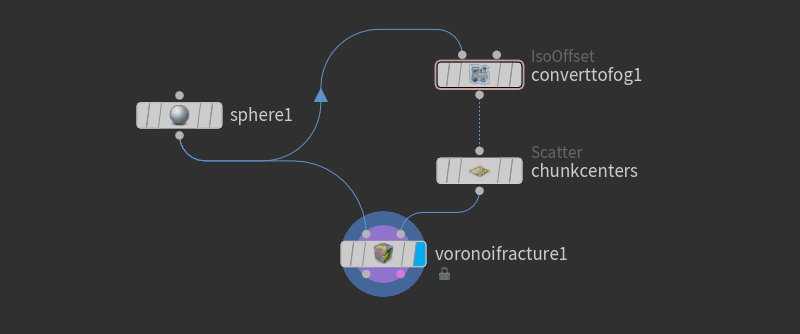
Other ways of creating points may give interesting effects. For example, you could use a
 Box node to create a regular grid of points and use that as the center points, to get regularly spaced rows and columns of pieces.
 -
At the Network Editor’s obj level, select the geometry object. On the Rigid Bodies shelf tab, click the
 RBD Fractured Object tool to create an RBD object from the geometry.
 -
Use the
 RBD Glued Objects tool on the object to automatically set up a glue constraint network between the pieces.
-
The following nodes may also be useful in a shattering workflow.
-
The
 Transform Pieces SOP copies transforms into point attributes packed primitives. The shelf tools use it to copy the simulated transformations of pieces back onto the packed geometry in the geometry network. You can use it in a workflow where you write out just the transformations of simulated pieces to disk, then use Transform Pieces to instance heavy geometry onto points using the transformations at render time.
 -
The
 Exploded view SOP lets you move disconnected pieces away from each other. This can be useful for visualizing the results of fractures, and also for effects.
 -
The RBD Fractured Object tool can automatically convert the geometry to packed pieces in the DOP network. However, if you need to convert regular geometry to packed pieces in the geometry network, you can, for example, use the
 Assemble SOP.
 -
If you are using Voronoi pre-fracturing and getting L-shaped groups, try changing the jitter (for example, from the default
0.8to0.25).
Solid objects (FEM) 
-
On the Solid Object node, turn on Fracturing. Use the Fracture threshold to control how much force is necessary to fracture the object.
-
You can specify parts of a solid that always stick together, allowing you to pre-fracture objects. The
 Fractured Solid Object shelf tool is an example of this workflow.
 -
There are some limitations on solid object collisions.
-
The
 Embed Highres Object tool tool on the Solid shelf tab lets you select low resolution and high resolution geometry. The solver solves using the low resolution geometry for speed, then applies the same forces and fractures to the high resolution geometry. This tool uses the parameters on the Solid Object’s Geometry tab.
Tips 
-
You can use the
 Debris tool to emit particles from the shattered pieces as they separate. This lets you simulate dust and small debris being jolted loose from the impact.
 -
You can set up a hybrid simulation where you use voronoi fracturing to separate “large scale” pieces and then at a certain frame switch the geometry to solid objects. The best way to do this is to simulate the voronoi fracturing, cache the simulated geometry to disk, and then use the cached geometry and switch it to Solid objects at the given frame.
-
You can simulate low-resolution geometry and replace it with high-res geometry at render time using the
 Alembic procedural shader. See how to use Alembic proxy geometry.