Houdini 20.0 Reference Stand-alone utilities

renderstatsoverlay

Generates a (possibly scaled down) version of a rendered image with render statistics baked in.

On this page

Overview

This command lets you specify an EXR file rendered by Karma, and generate a PNG or JPG version of the image, possibly scaled down, with render statistics baked into it.

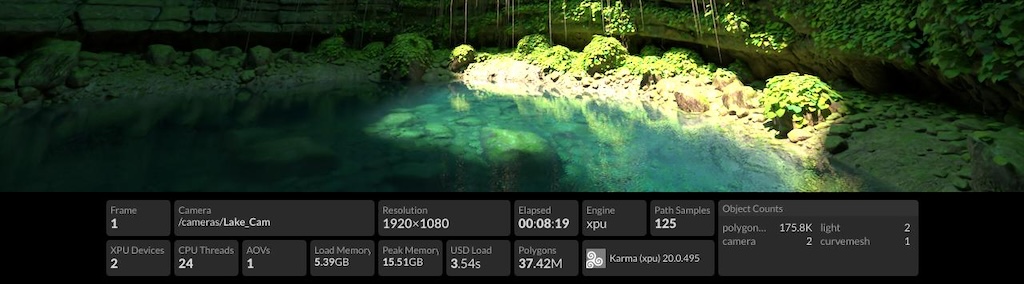
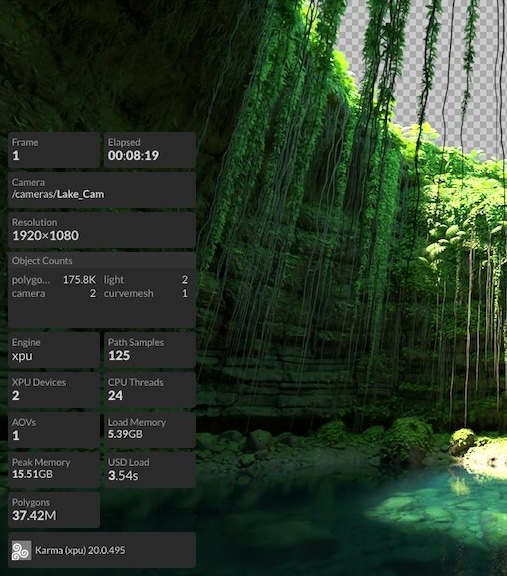
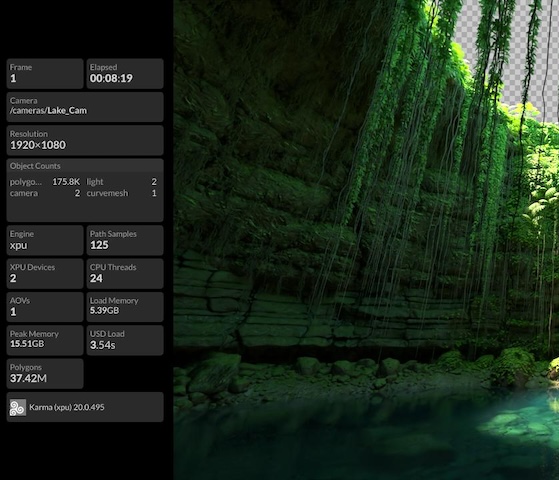
By default, the command adds the stats in a “sidebar” above, below, or beside the image. You can specify the --overlay option to overlay the stats tiles onto the image.

Tips and notes

  • In --overlay mode, you can specify the alignment of the overlay with just --align. However, you can also use --edge to affect the alignment. For example:

    renderstatsoverlay example.exr --edge top --align start
    

    …is the same as:

    renderstatsoverlay example.exr --align topleft
    
  • In --overlay mode, if the specified alignment would put the stats in the center of the image, the command automatically changes it to center bottom alignment.

  • Images generated by Karma XPU are missing some statistics compared to Karma CPU.

  • You can customize the stats shown in the overlay using a JSON tile template.

  • Where the command takes AOV names, you can also use numbers to specify the AOV index, for example 0 for the first AOV.

  • Currently this command is specific to render stats saved by Karma. Future versions will make the command more renderer-agnostic and customizable.

Usage

renderstatsoverlay [options] infile.exr [ outfile.jpg ]
  • If you don’t specify an output file, the command creates an HTML file with the name original_name_preview.jpg, in the same directory.

  • If the second argument is an existing directory, the command creates an HTML file with the name original_name_preview.jpg, in that directory.

Options

File options

-x file / --overlay-output file

Outputs the render stats tile graphic to a separate file as a transparent PNG.

-a aov_name / --aov aov_name

The name of the AOV to use as the image source.

-t template_file / --template template_file

The JSON tile template file to use to generate the overlay graphic. The default is $HFS/houdini/config/render_stats_overlay.json.

See JSON tile format for how to customize the layout.

--overlay / --sidebar

Whether to draw the render stats over top of the image (--overlay), or add extra space to the image for the stats (--sidebar). The default is sidebar mode.

-s size / --resize size

By default, the command does not resize the input image. You can use this option to resize the output image to a target width (--resize 1280) or a percentage of the original size (--resize 50%).

renderstatsoverlay example.exr --resize 1280

renderstatsoverlay example.exr --resize 60%

--force-resize

Normally, the command will only resize the image to be smaller. Use this option to force the --resize` option to work even if the output is larger than the original.

-F format / --format format

The file extension to use for the output file, if you don’t specify an output name.

--color-space name

Convert the output image to this color space. The default is sRGB.

--preserve-transparency

Normally, the command replaces the transparent parts of the input image with a checkerboard pattern in the output. If you specify this option, it preserves any transparency in the original image. (This only makes sense if the output image format supports transparency, such as PNG.)

Stats graphic options

-B color / --sidebar-bg color

In --sidebar mode, the background color of the sidebar. This can be a web-style “hex color” the form #rrggbb or a named color such as black, white, transparent. The default is black.

renderstatsoverlay example.exr --sidebar-bg "#808080"

-e edge / --edge edge

In --sidebar mode, this sets which side of the image the sidebar is added to. In --overlay mode, this overrides the corresponding axis of the --alignment option.

This is one of top, left, right, or bottom. The default is bottom.

Note

If you specify the left or right edge for the sidebar, you should also specify a width for the sidebar with -w/--width.

renderstatsoverlay example.exr --sidebar --edge left -w 240

-A alignment / --align alignment

In overlay mode, this is how to align the stats within the image bounds. In sidebar mode, this is how to align the stats within the sidebar.

  • This is a combination of left, right, or hcenter, and/or top, bottom, or vcenter.

  • You can use center to mean hcenter vcenter.

  • You can also use topleft, topright, bottomleft, or bottomright, or compass directions such as n, nw, e, se, and so on.

  • In --sidebar mode, you can use start to mean the top/left (depending on the sidebar orientation), and end to mean the bottom/right.

The default is center.

renderstatsoverlay example.exr --overlay --align "top left"

renderstatsoverlay example.exr --sidebar --edge top --align end

-w width / --stats-width width

The width of the stats graphic. Tiles are “word wrapped” within this width. You can specify a pixel width (-w 1280) or a percentage of the output image width (-w 50%).

-M pixels / --margin pixels

The margin (in pixels) to add around the stats graphic.

--scale fraction

Scale the contents of the stats graphic by this factor.

renderstatsoverlay example.exr --scale 1.5

--rotate degrees

Rotate the contents of the stats graphic by this many degrees.

renderstatsoverlay example.exr --rotate 90

Stand-alone utilities

  • abcconvert

    Convert between Alembic formats.

  • abcecho

    Print information about an Alembic file.

  • abcinfo

    Print information about an Alembic file.

  • chchan

    Copies channel collection to/from action channel format.

  • chcp

    Copies channel collection file to another format.

  • chinfo

    Prints information about a channel collection file.

  • claudio

    Copies CHOP data (clip) to/from audio formats.

  • clchan

    Copies CHOP data (clip) to/from action channel format.

  • clchn

    Copies CHOP data (clip) to/from channel collection format.

  • clcp

    Copies CHOP data (clip) to another format.

  • clinfo

    Prints information about a CHOP data (clip) file.

  • dsmconvert

  • dsmmerge

  • dsparse

    Parses and displays dialog scripts.

  • gabc

    Convert between Alembic and Houdini geometry.

  • gconvert

    Convert between Houdini polygon formats.

  • gdxf

    Converts DXF polygons to/from Houdini format.

  • geodiff

    Display Geometry Differences.

  • geps

    Converts EPS files to Houdini polygon format.

  • giges

  • ginfo

    Prints polygon file statistics.

  • glightwave

    Converts LightWave files to/from Houdini format.

  • gpdb

    Converts .pdb files to/from Houdini format.

  • gplay

    Geometry viewer.

  • gply

    Converts .ply files to/from Houdini format.

  • gptex

    Makes a ptexture image file from a geometry file.

  • greduce

    Reduces polygons in a file.

  • gwavefront

    Converts .obj files to/from Houdini format.

  • hcollapse

    Collapses a directory structure.

  • hcpio

  • hexpand

    Expands hip files into a directory structure.

  • hkey / License Administrator

    Opens a graphical user interface for viewing and managing licenses and license server options.

  • hoiiotool

    Swiss-army knife of image operation tools.

  • hotl utility

    Command line utility to work with .hda/.otl files.

  • hrender

  • hsc

  • hscript

    Command line HScript interpreter.

  • hserver

    Houdini communicates through this proxy server to the sesinetd licensing daemon.

  • htexcache

    Query or modify the disk texture cache.

  • husk

    Command line utility for rendering a USD file using Karma or some other Hydra client.

  • i3dconvert

  • iautocrop

    Crops images based on pixel values.

  • icineon

    Convert images from 10-bit Cineon format to an 8 bit format.

  • icomposite

  • iconvert

    Converts an image of one type to another type.

  • icp

    Isolate a region of an image in a new image.

  • idenoise

    Removes noise from an image file.

  • idiff

    Display Image Differences.

  • iflip - Flip Image

  • iinfo

    Outputs information about an image.

  • ilut

    Generates a lookup table (LUT) from standard channel formats or another LUT.

  • ilutcomp

    Generates a single lookup table (LUT) from from two LUTs.

  • ilutinfo

    Prints information about a lookup table (LUT) file.

  • imaketx

    Creates mipmapped .exr or .rat textures from image files.

  • imdisplay

    Sends an image to an mdisplay window.

  • iprint

    Prints the RGBA values for an image as text.

  • iquantize

    Reduces the number of colors in an image.

  • isixpack

    Generates an environment/reflection map from six images representing the six sides of a cube, or a cross image.

  • itilestitch

    Assemble a series of image files with crop windows into a single image.

  • izg

    Converts Z-depth images to 8-bit grayscale images.

  • Launcher

    The Houdini Launcher downloads, installs, upgrades, and uninstall Houdini and its components.

  • mcacclaim

    Converts an Acclaim motion file to a Houdini script and channel file(s).

  • mcbiovision

    Converts a BioVision motion file to a Houdini script and channel file(s).

  • mcmotanal

    Converts a Motion Analysis TRC motion file to a Houdini script and channel file(s).

  • mcp

    Convert an image sequence to a movie file.

  • minfo

    Prints information about movie files.

  • mqserver

    Message Queue Server for PDG/TOPs

  • py23convert

    Convert Python 2 expressions in HDAs to Python 2/3.

  • renderstatsoverlay

    Generates a (possibly scaled down) version of a rendered image with render statistics baked in.

  • renderstatsreport

    Generates an HTML page containing render statistics from an EXR image.

  • sesictrl

    Sets Houdini license server options from the command line.

  • sesinetd

    The Houdini license server. This program runs in the background managing Houdini licenses.

  • siminfo

    Prints simulation cache file statistics.

  • spiff

    Display Text Differences.

  • spy

    Shell utility for navigating the UNIX filesystem.

  • usdview

    Command line utility for viewing and inspecting USD scenes.

  • vexcache

    Query or modify the VEX compile cache.

  • vexexec

    Execute a cvex shader.