| On this page |
Overview 
This tool sets up the ![]() source and
source and ![]() solver for a whitewater simulation. Whitewater is created from a source
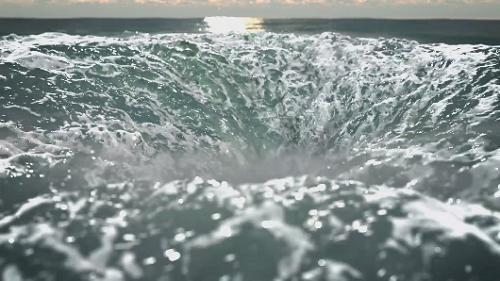
solver for a whitewater simulation. Whitewater is created from a source ![]() FLIP simulation based on several criteria including fluid acceleration, curvature, and vorticity. Whitewater enhances the look of fluid animation with secondary effects such as spray, foam, and bubbles.
FLIP simulation based on several criteria including fluid acceleration, curvature, and vorticity. Whitewater enhances the look of fluid animation with secondary effects such as spray, foam, and bubbles.
Note
We recommend using the shelf tool to set up whitewater, as it is difficult to do from scratch.
Using Whitewater 
-
Click the
 Whitewater tool on the
Particle Fluids tab.
Whitewater tool on the
Particle Fluids tab. -
Select a
 FLIP Fluid Object and press Enter to complete your
selection.
FLIP Fluid Object and press Enter to complete your
selection.
Note
You may need to navigate into the DOP Network containing the fluid object to select it.
For specific parameter help, see the ![]() Whitewater Source,
Whitewater Source, ![]() Whitewater Object, and
Whitewater Object, and ![]() Whitewater Solver node help.
Whitewater Solver node help.
Understanding the network of nodes 
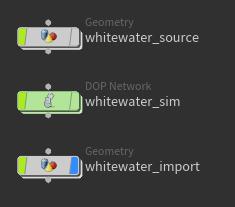
Whitewater Source 
This is where the spray and foam come from, and where some of the most important parameters to change the amount and location of your whitewater can be found.
-
The Curvature tab on the
Whitewater Source node allows you to control where the whitecap is created. You can specify at what surface curvature to emit whitewater as well as the Max Velocity Angle. -
The Acceleration tab on the
Whitewater Source node controls whitewater where then are velocity changes. For example, if the fluid changes direction suddenly, like when a wave collides with a rock and goes back in the opposite direction. -
The Vorticity tab on the
Whitewater Source node looks for areas that are spinning, or the curling of velocity. When water is churned, bubbles are created. This is not typically something you would want in an ocean, unless a boat is traveling through, or a person is flailing around in the water.
Whitewater Sim 
This where the whitewater is simulated, and where you can modify the animation.
-
Whitewater Object is the container for whitewater. It contains several visualization options for the particles, as well as parameters that control the nature of their interactions with collision objects.
-
The
Whitewater Solver is where you can control the behavior of the whitewater particles.-
The Emission tab has controls for birthing particles. You can also set different aging rates for bubbles, foam, and spray here, which will result in particles having different lifespans based on their depth.
-
You can set the simulation region and states of its boundaries in the Limits tab. Here you can also give the solver access to the signed distance field of the collision geometry. This is important if you expect whitewater to come to rest atop other objects: without access to this signed distance field, particles may get wrong forces applied to them.
-
The solver’s Forces tab allows you to set the basic forces that are experienced by whitewater particles and their effect at different depths. With default settings, for instance, buoyancy force opposes gravity and only acts on submerged particles.
-
The Foam tab contains the more advanced mechanisms that drive whitewater dynamics.
-
Clumping is responsible for maintaining particle density, giving whitewater fluid-like behavior.
-
Erosion can be used to preserve whitewater in denser areas and accelerate particle reduction in regions where whitewater is more scarce.
-
Repellants can be used to generate cellular foam patterns.
-
Adhesion can help in preventing whitewater from separating from the liquid’s surface.
-
-
Tip
Typically you will not need to make changes in the Advanced tab.
Import Whitewater 
This is the result of whitewater_source and whitewater_sim combined.
For information on how to animate a wave tank with whitewater, see whitewater.
Tips 
-
The Visualization tab on the
Whitewater Source node has controls for visualizing things like curvature, acceleration, and vorticity. Enabling Source Particles can be useful to get an idea of the emission amount that will be generated in your simulation by setting the Whitewater Scale and Emission Amount values to the same values as the matching parameters on the Whitewater Solver. -
The Whitewater Scale parameter on the
Whitewater Solver controls particle separation. You can use a higher value when testing for quicker simulation playback, and then reduce to a smaller value later for more particles and more detail. -
Increasing the Aging Rates of bubbles, foam, or spray on the
Whitewater Solver will boost it’s death chance by that amount. For example, if you don’t want bubbles in your whitewater but you want foam to stick around for a longer period of time, you can set the Bubbles Aging Rate to a higher value and set the Foam Aging Rate to a lower value. -
To prevent particles from over accumulating in small regions or from separating too far, use the Clumping controls on the
Whitewater Solver's Foam tab. This will give the whitewater a more cohesive look.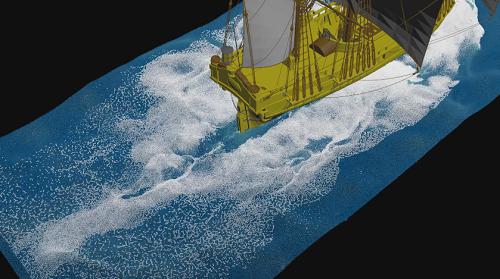
Image courtesy of Igor Zanic.
-
Get foam to stick to the surface of the fluid and prevent artifacts when rendering by using the Adhesion controls on the
Whitewater Solver's Foam tab.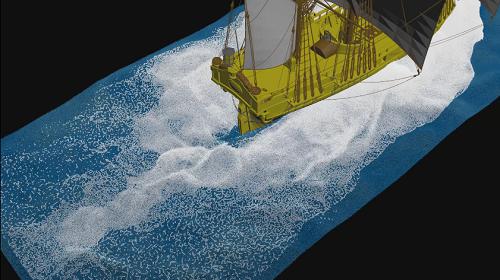
Image courtesy of Igor Zanic.
-
The Erosion controls on the
Whitewater Solver's Foam tab can be used to eat away whitewater from the outside inward and eliminate whitewater that has separated from the main body.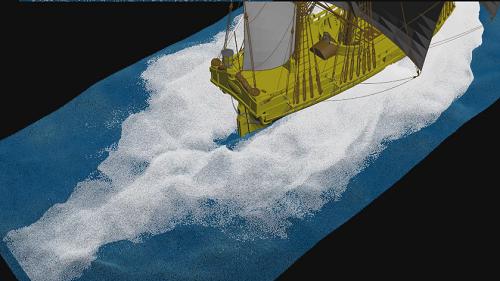
Image courtesy of Igor Zanic.
-
Repellants are used to create cellular foam patterns in whitewater. These parameters are on the
Whitewater Solver's Foam tab. The Noise Range and Pulse Frequency Range parameters control the look and shape of the repellants. Repellants with a higher pulse change shape more rapidly, and repellants that are less noisy appear more circular. For more information see the Whitewater page in the Fluid chapter.Note
Unless Density Threshold is enabled, repellants are not affected by whitewater.
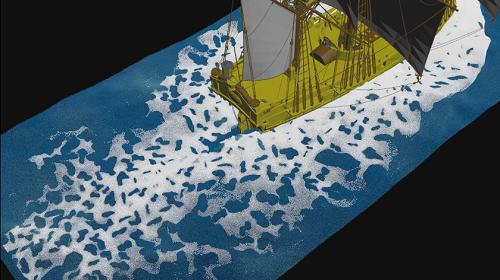
Image courtesy of Igor Zanic.
| See also |