|
Houdini Engine 9.0
|
|
Houdini Engine 9.0
|
Curves are often an important source of input in terms of user control. In this case we want curves that can be fed into the underlying Houdini asset to influence its computation, but which also appear in the host environment so they can be displayed and manipulated by the user.
Houdini Engine currently provides two alternative mechanisms for inputting curves from the host application: Curve Nodes and Curve Marshalling.
A Curve Node is an easy way to create a curve OBJ node representing a single curve that can be manipulated and fed as an input for other nodes. See Asset Inputs for more on inputs.
You instantiate a curve node with a call to HAPI_CreateNode(), using "SOP/curve" for the operator_name and -1 for parent_node_id. You get back a HAPI_NodeId that can be used like for any other node. See Nodes.
The way this node is intended to be used is via its exposed parameters. The control vertices (CVs) themselves are stored as a space-separated list string parameter named "coords". Other parameters exist to change properties on the curve such as primitive type, input method, order and whether or not it is closed.
It is often necessary to access curve data, as curve data, that has been produced as a result of computation. Curves come as parts. You can tell if a part is a curve if HAPI_PartInfo::type is equal to HAPI_PARTTYPE_CURVE. A curves part can contain one or more curves as a curve mesh. Here are the general steps to get curve information:
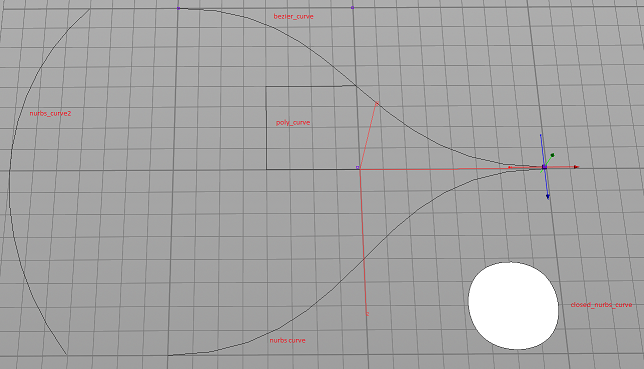
Note that you will get 1 part per type of curve. For example, the asset below contains a merge of 5 separate curves:
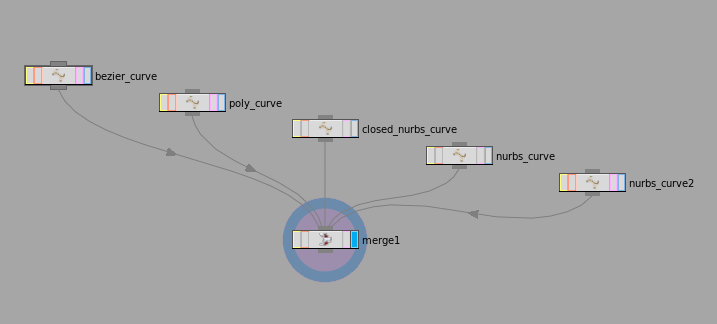
Two of them, nurbs_curve and nurbs_curve2, are represented as a single part because they are both open nurbs curves, while poly_curve and bezier_curve have their own part because they are curves of a different types. Finally, closed_nurbs_curve has its own part, even though it is a Nurbs curve, because it is closed, and thus different from nurbs_curve and nurbs_curve2:
Curve Marshalling follows the same principles as Marshalling Geometry Into Houdini. Curves are just another primitive type that can be stored in a part of an Input Node. Multiple curves can be stored per part in which case they represent a Curve Mesh. One possible use case for Curve Meshes is a hair system.
First, you need to have an Input Node created with HAPI_CreateInputNode(). Remember, an input node can have only one part, so just use 0 for your HAPI_PartId.
Once you have an Input Node, you have to set the parameters of the curve mesh part with a HAPI_SetPartInfo() call. For curves, HAPI_PartInfo::type has to be set to HAPI_PARTTYPE_CURVE. Just like with poly meshes, you have to set HAPI_PartInfo::vertexCount, HAPI_PartInfo::pointCount and HAPI_PartInfo::faceCount to the number of elements in attributes of the respective HAPI_AttributeOwner. The meaning of HAPI_PartInfo::faceCount for curves is per primitive, i.e. per curve.
You also have to set properties of the curve mesh with a call to HAPI_SetCurveInfo(), then HAPI_SetCurveCounts() to specify the number of CVs per curve and optionally HAPI_SetCurveOrders() and HAPI_SetCurveKnots(), depending on the type of the curve.
Next, you have to create and populate attributes of the curve mesh as described in Adding Attributes and Setting Attribute Values. Just like with poly meshes, you have to at least set the "P" (HAPI_ATTRIB_POSITION) per-point attribute, which represents the curves' control vertices.
Finally, you have to commit the curve mesh by calling HAPI_CommitGeo().
As of Houdini 19.0, "input-specific" curves were added to HAPI. These curves, classified "Input Curves" are really just helpers for marshalling curve data to Houdini in a easy and error checked way. No need to worry about invalid curve type/order combinations, curve knots, curve counts, etc as it handles that as well. HAPI_CreateInputCurveNode and HAPI_SetInputCurvePositions will also cook the curves for you. It is, in essence, a regular curve part with a "hapi_input_curve_coords" float array detail attribute, specifying the input coordinates. This attribute can be used to get the original input coordinates of the curve, if for example, you are creating a NURBs or Bezier curve of order greater than 2 and need to resync the input positions.
The HAPI_InputCurveInfo struct is used to specify the options regarding the generated curve. The difference between these options and HAPI_CurveInfo are that HAPI_InputCurveInfo does validity checking and contains additional options such as the curve method type. Setting the equivalent options using the raw HAPI_CurveInfo may result in errors, crashes or invalid curves. For example, you can set the curveMethod to breakpoints to have the Bezier or NURBs curve go through each control point. The outputted part will match as closely as possible with the inputted options. (i.e. even if you have an invalid point count / order / method combination, the outputted curve will match the specified options as closely as possible)
It must be noted that the new input curves API only supports one curve per input node, whereas the HAPI_CurveInfo method of creating curves allows multiple curves to be marshalled at the same time. With the new input curve API, multiple curves must be marshalled separately and then merged in Houdini.
Here's an example of creating a basic NURBs input curve of order 4, using breakpoints, and uniform breakpoint parameterization.
Additionally, HAPI_SetInputCurvePositionsRotationsScales is an alternative to HAPI_SetInputCurvePositions which allows you add interpolated "rot" or "scale" attributes along the curve.
 1.8.6
1.8.6 
