| On this page |
Overview 
Once you create a digital asset, you can use the Type properties window to edit the new node’s parameter interface. You can promote parameters from the node inside the asset up to the asset’s user interface. You can also add render properties to object assets for control over how they're rendered.
Right click an instance of the asset and choose Type properties, the click the Parameters tab.
As you edit the asset’s interface, remember that you need to click Apply or Accept in the type properties window to see the changes on the node.
Create and promote parameters 
| To... | Do this |
|---|---|
|
Promote a parameter |
In the network editor, dive inside the asset and select the node with the parameter you want to promote. Find the parameter in the parameter editor pane. Then do one of the following:
Or
|
|
Promote all parameters of a node |
In the network editor, dive inside the asset and select the node with the parameter you want to promote. Then drag the node into the parameter list of the type properties window. If you drag a nested digital asset into the list, Houdini will promote the parameters from the nested asset with their organization intact. |
|
In the type properties window, on the Parameters tab, click the From nodes subtab under Create parameters. This shows a tree view of every parameter on every node in the entire scene. Use it to find the node and parameter you want and drag it into the parameter list under Existing parameters. |
|
|
Create a new parameter from scratch |
In the type properties window, on the Parameters tab, click the By type subtab under Create parameters. Drag the type of parameter you want to create into the parameter list under Existing parameters. You can channel reference the value of the parameter on nodes inside the asset, or use it in scripts. |
You can channel reference the value of the parameter on nodes inside the asset, or use it in scripts. |
Organize parameters 
| To... | Do this |
|---|---|
|
Organize parameters into groups |
You can also drag a Separator into the parameter list to create a separator line between groups of parameters. |
|
Put consecutive parameters side-by-side to save space |
|
Set up the asset for animation 
| To... | Do this |
|---|---|
|
Set a parameter to auto-add to the channel list |
|
Add scripted controls and behavior 
| To... | Do this |
|---|---|
|
Run a script whenever a parameter changes |
In the type properties window, select the parameter under Existing parameters, then under Parameter description, on the Parameter sub-tab, enter a script in the Callback script field. The pop-up menu to the right of the Callback script field lets you choose whether the script is HScript or Python. See the help for the Parameters sub-tab for more information. See the HOM documentation for information on Python parameter callback scripts. |
|
Run a script when an instance is created or destroyed |
See the HOM documentation for Python event handlers. |
Handles and HUD sliders 
You can also promote handles and HUD sliders from nodes inside the asset, so they appear in the viewport when the asset is selected. The type properties window must be open.
If you want a handle to drive parameters on nodes inside the asset, you must first promote the parameters onto the asset, then you can bind them to a handle.
Note
Handles and HUD sliders only appear when you are using the ![]() Handles tool, unless you right-click them and turn on “Persistent”.
Handles tool, unless you right-click them and turn on “Persistent”.
| To... | Do this |
|---|---|
|
Promote handles or HUD sliders from inside the asset |
You may need to deselect and reselect the node for the handle/slider to show up. |
|
Create a handle for parameters on your asset |
|
Specifying files inside an asset using opdef: 
You can embed files inside the digital asset, using the Extra files tab in the Type properties window.
In parameters where you can specify a file path, you can use the following syntax to instead specify the content of a section inside an asset:
opdef:/‹Network_type›/‹asset_name›?‹section_name›
You can use this to include all the files an asset needs (such as textures) in the asset itself.
For example:
opdef:/Object/my_asset?Texture.png
You can also use opdef:.?‹section› (to get a file from the current asset) and opdef:..?‹section› (to get a file from the parent of the current node). For example, if you have a ![]() File node directly inside an asset, you can load a geometry file from the asset using:
File node directly inside an asset, you can load a geometry file from the asset using:
opdef:..?test.bgeo
Note that relative opdef: may not work in all places. For example, in a shader you can say texture("opdef:/Shop/foo/texture.rat") but you can’t use opdef:.. because the compiled VEX has no concept of a parent node.
Tip
You can interactively choose embedded files from inside assets using the Houdini file chooser. Click the opdef: root on the left side of the chooser window.
Custom labels for multiparm instances 
Parameter interfaces can have multiparms, which are special folders where the parameters inside act as a template for “items” the user can create. For example, the designer could create a “Mappings” multiparm in the node template with two parameters inside: “Source” and “Destination”. On instances of the node, the user can use the parameter interface to create multiple items in the “Mappings” multiparm, each with its own “Source” and “Destination” parameter.
Normally, the label for each parameter is taken from the template, and can’t be changed by scripting. However, there may be times where it might make sense for each instance of a parameter in different multiparm items to have a different label.
There is a somewhat convoluted and imperfect workaround to do this:
-
Houdini allows you to give a parameter an alias, which is used instead of the parameter’s internal name in the animation curve editor. You can set the alias in a script using hou.Parm.setAlias.
-
If a parameter label contains the magic string
%s, Houdini replaces it with the parameter’s alias when it displays the label in the UI.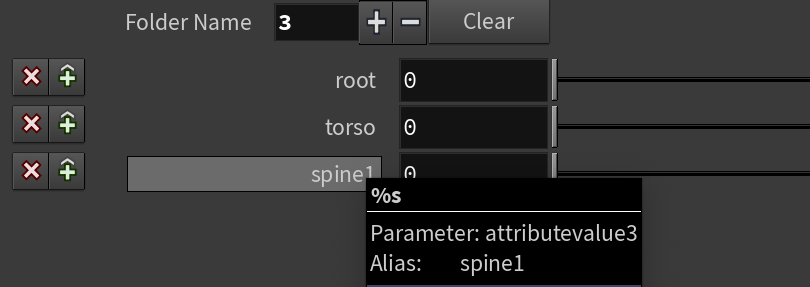
Not only does this change the label, it can also be useful to reference the parameter value using its alias in expressions (for example torso instead of bone2) and in the animation curve editor. However, because the alias has to obey parameter naming rules, the “custom label” cannot have spaces or punctuation.
You can see an example of this technique is used in the ![]() Blend Shapes surface node (where clicking the Update Channel Names from Inputs button runs a script that sets the aliases of multiparm instances), and in the
Blend Shapes surface node (where clicking the Update Channel Names from Inputs button runs a script that sets the aliases of multiparm instances), and in the ![]() Merge Packed surface node.
Merge Packed surface node.