| On this page |
|
Overview 
Channels record how the value of a parameter changes over time. You can think of a channel as a parameter animation.
A channel is an extra object associated with a parameter. It stores keyframe information, essentially acting as a keyframe container for the parameter. If you delete all the keyframes on a parameter, you have a parameter with an empty channel (a channel that doesn’t hold any keyframes).
The channel list holds the parameters on which keyframes are set. Parameters can be added to the channel list automatically or manually. When you select a node, the channel list shows the node parameters that are already keyed or have been added to the channel list. Parameters that are added to the channel list can be displayed in the animation editor. When you set keyframes, Houdini sets keyframes for the parameters that are in the channel list.
There is also a special type of channel called geometry channels or channel primitives. Channel primitives are not associated with any parameter. They are animation curves that are stored along with geometry and are optimized for use in the animate state. See geometry channels for more information.
View the channels in the channel list 
To see the parameters in the channel list:
-
In the animation editor, the channel list is displayed in the left channel list subpane. You can click the name of a parameter to show or hide the channel in the graph display.

Graph view of the animation editor or
-
Open the channel list pane by clicking the
 New Tab icon at the top of a pane and selecting New Pane Tab Type ▸ Animation ▸ Channel List.
 or
-
Click the channel list button on the right side of the playbar:
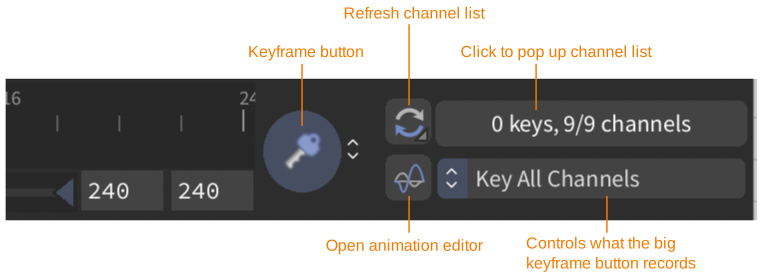
The channel list button displays statistics such as the number of parameters that have keys at the current frame, the number of selected parameters, the total number of parameters in the channel list, and whether channel list filtering is active. Click the channel list button to open a floating channel list window:
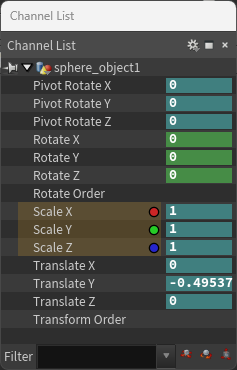
Channel list window
The Filter toolbar at the bottom of the channel list allows you to filter for the parameters that match a given pattern. You can choose common patterns from the menu to the right of the Filter field. You can also click the  translate,
  rotate and
  scale toggle buttons to filter the transform parameters.
In the parameter editor, a parameter displayed with a colored underline means that the parameter is selected in the channel list. See parameter underline for more information.
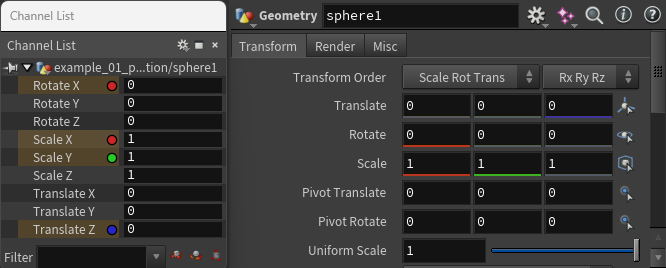
Select, add, and modify channels in the channel list 
See the parameter context menu for descriptions of the available options when  clicking channels in the channel list.
| To... | Do this |
|---|---|
|
Select multiple parameters in the channel list |
Drag to select multiple parameters. or Hold ⇧ Shift to select groups of adjacent parameters. or Hold CTRL to select or deselect individual parameters. In the channel list below, only the scale parameters are selected. The rest of the parameters are in the channel list, but are not selected. The
|
|
Add a parameter to the channel list |
In the parameter editor, or In the parameter editor, ⇧ Shift + or Drag a parameter name or individual component from the parameter editor into the channel list pane. |
|
Only display a particular parameter in the channel list |
Replaces any parameters in the channel list with this parameter. In the parameter editor, or In the parameter editor, ⇧ Shift + |
|
Keep a parameter always visible in the channel list |
In the channel list pane:
|
|
Mute/unmute the selected channels |
Muted channels don’t affect the animation.
or Mute/unmute individual channels from the parameter editor by |
|
Select the nodes from the selected channels |
or
Note This allows you to select nodes for viewport interaction without having to pick the object in the viewport. This comes in handy when selecting finger controllers on character rigs. |
|
Set multiple parameter values at once |
|
|
Change multiple parameter values at once |
|
|
Copy/Paste multiple parameter values at once |
|


 pin icon that appears to the left of the parameter to pin it. Click the
  icon to unpin it.
Tip
All the options when clicking a parameter in the parameter editor are also available for the parameters in the channel list. You can use the  + modifier shortcuts on parameter names and individual components. click a parameter to see the shortcuts.
Tip
When you manually add parameters to the channel list, you may notice that the animation editor window pops up in front of the screen. You can turn this off by setting the Open Animation Editor if Closed animation preference.
Auto-add to the channel list 
When you select an object, certain parameters are automatically added to the channel list. Each object type has a list of parameters that are automatically added to the channel list by default, and these are usually the most important parameters for animation, such as translation, rotation, and scale. Some objects have other parameters that are automatically added, for example, the  Ambient Light node adds the Light Intensity parameter.
You can customize the parameters to auto-add for each object. This is useful when you only want to key a few parameters, for example, Translate Y and Translate Z of a bouncing ball. Then whenever you select and key the ball, only those parameters will be keyed.
| To... | Do this |
|---|---|
|
Set a parameter to be automatically added to the channel list |
|
Tip
When you create a digital asset, you can choose the asset’s parameters to auto-add in the Parameters pane of the asset’s type properties window.
Auto-select in the channel list 
When you select an object, certain parameters are automatically added to the channel list, and by default, all of these auto-added parameters are also selected in the channel list. You can change the default selection state of a parameter by turning off the Auto-Select flag. This is used to control the selection of parameters that you may not want to keyframe all the time.
| To... | Do this |
|---|---|
|
Set a parameter to be automatically selected when it is added to the channel list |
|
Tip
When you create a digital asset, you can choose the asset’s parameters to auto-select in the Parameters pane of the asset’s type properties window.
Keep channel list selections 
When you select an object, you can choose to reset the channel list selection to its default state or keep the current channel list selection.
Tip
If you keep the channel list selection, you can switch between different objects in the animation editor without having to reselect the channels.
| To... | Do this |
|---|---|
|
Keep the current channel list selection |
In the animation preferences (Edit ▸ Preferences ▸ Animation), turn on Keep Channel List Selection. or On the playbar, |
 channel list refresh button and turn on Keep Channel List Selections.
Geometry channels 
Geometry channels, also called channel primitives, are animation curves that are stored along with geometry and are optimized for use in the animate state. When a character’s control is selected in the animate state, channel primitives for that control are added to the channel list, and you can interact with them like regular channels.
click the channel primitives in the channel list to bring up the following options:
Set Keyframe
Sets a keyframe on the channel primitive at the current frame.
Remove Keyframe
Removes any keyframe on the channel primitive at the current frame.
Step to Previous Key
Goes to the previous keyframe on this channel primitive.
Step to Next Key
Goes to the next keyframe on this channel primitive.
Delete Channels
Removes all the keyframes on the channel primitive and keeps the current value.
Unmute Channel
Turns on the channel so that it affects the animation.
Mute Channel
Turns off the channel so that it doesn’t affect the animation.
Extrapolation
Sets the behavior of the selected channels outside the keyframe range. Choose from the following extrapolation modes: Default, Hold, Cycle, Extend, Slope, Cycle Offset, and Oscillate. You can set the extrapolation before the channel starts and after the channel ends. See Edit Channel Properties for descriptions of the different extrapolation modes.
Channel Properties
Opens an Edit Channel Properties window that allows you to edit channel metadata such as how to extend the channel before and after the keyframed animation.
Geometry channels subpane 
The geometry channels subpane allows you to view the channel primitives in an animation scene without having to enter the animate state. The subpane is organized in a tree structure with SOP nodes at the top level, and animation clips and layers underneath:
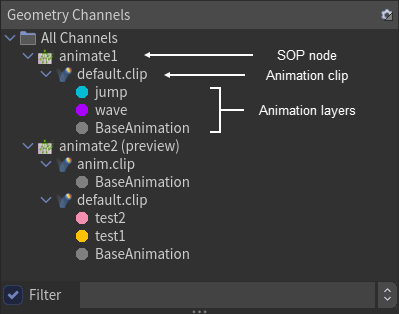
To open the geometry channels subpane:
-
In the animation editor, select Tools and turn on Geometry Channels.
or
-
Open the channel list pane by clicking the
New Tab icon at the top of a pane and selecting New Pane Tab Type ▸ Animation ▸ Channel List. In the channel list pane, click  on the top toolbar and turn on Geometry Channels.
or
-
Press ⌃ Ctrl + 4 over the channel list.
If you select a layer in the geometry channels subpane, the animation curves in the layer are displayed in the  graph view. If you select a clip, the curves in all the layers within the clip are displayed.
If you are not in the animate state on a particular node, the text “(preview)” will appear beside the node name, indicating that the curves cannot be edited (the curves are displayed as dotted lines in the graph view). If you are in the animate state on a particular node, the curves can be edited (they are displayed as solid lines). You can also select multiple layers and edit all the curves at once.
Channel groups 
Channel groups are groups of parameters. They allow you to easily see, select, and keyframe different groups of parameters. You can also build hierarchies of channel groups, so that selecting a parent group selects all the parameters in its subgroups. For example, you can set up a channel group for a character with subgroups for the arms, legs, and head. When you animate the character, you can quickly and easily select the appropriate groups of parameters to keyframe.
You can create and manage channel groups in the channel groups subpane:
-
In the animation editor, select Tools and turn on Channel Groups.
or
-
Open the channel list pane by clicking the
New Tab icon at the top of a pane and selecting New Pane Tab Type ▸ Animation ▸ Channel List. In the channel list pane, click on the top toolbar and turn on Channel Groups.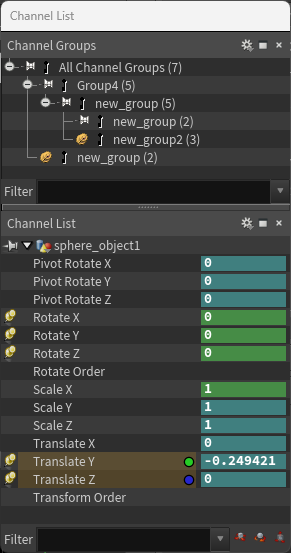
or
-
Press ⌃ Ctrl + 2 over the channel list to open the channel groups subpane. Press G over the channel list to open the channel groups subpane and create a new group.
| To... | Do this |
|---|---|
|
Select and display the parameters in the channel group |
Click the name of the group in the channel groups subpane. The channels in the group will be selected and displayed in the channel list. Selecting a parent group shows all the subgroup channels in the channel list. |
|
Create a new channel group |
or
or
|
|
Create a subgroup |
|
|
Create channel groups for an object |
Creates nested channel groups for the object parameters that are keyed or have been automatically added to the channel list. If you have organized the parameters of the object into tabs, Houdini will create nested channel groups corresponding to the organization of the parameters. In the network editor, |
|
Add parameters to an existing group |
or
or In the channel groups subpane, drag and drop any group into another group and choose one of the options from the Drop Actions menu that pops up. |
|
Remove parameters from a group |
|
|
Rename a channel group |
|
|
Keep the parameters in the channel group always visible in the channel list |
Click the Click the |
|
Create a take containing the parameters in a group |
|
|
Modify channel groups |
Use the HScript commands chgadd newgroup
chgop newgroup set `strreplace(chgroup("oldgroup"),
"old_name", "new_name")`
Note Channel groups are global for the entire scene file. Copying a node will not modify channel groups. |
Tip
To create a single  CHOP node that includes all the parameters from a channel group, click the channel group and choose Motion FX ▸ Create Clip. Alternatively, if you have multiple parameters in the channel list, click the playbar and choose Motion FX ▸ Create Clip.
Keyframes in the channel list and channel group 
| To... | Do this |
|---|---|
|
Set keyframes on the parameters in the channel list |
Press K to add keyframes to all the parameters or selected parameters in the channel list. The Global Set Key animation preference determines which parameters the keyframes are added to. You can also set the Global Set Key preference on the playbar. |
|
Remove keyframes on the parameters in the channel list |
Hover over the channel list and press ⌦ Del to remove the keyframes from the selected parameters in the channel list at the current time. |
|
Delete channels on the parameters in the channel list |
Hover over the channel list and press Ctrl-Del to delete the selected channels from the channel list. |
|
Set keyframes on the parameters in a channel group |
|
|
Remove keyframes on the parameters in a channel group |
|
Color coding in the channel list 
Houdini color codes the background of parameter text boxes in the parameter editor and channel list according to the current channel and keyframe status.
Houdini tints parameter backgrounds to indicate various types of animation-related information.
The following shows the default full tint colors. You can change the colors, or change the level of tinting, in the main preferences. In the main menus choose Edit ▸ Preferences, then click Parameters on the left. However, you may want to avoid changing the colors since it will make it harder for other people to understand your parameter editor if it doesn’t use the standard colors.
Parameter background |
State |
|---|---|
No tint |
The parameter is not animated. It has no channels associated with it. |
Green |
Keyed The parameter is animated (controlled by an expression) and the current frame has a keyframe. |
Yellow |
Pending changes The keyed parameter has changed, but hasn’t been explicitly keyed. You need to explicitly key a changed parameter if auto-commit is turned off. You can set Houdini to automatically commit changes on keyframes. |
Blue |
Between keyframes The parameter is animated (either with keyframes or an expression), but the current frame does not have a keyframe. (Click the name of a parameter to switch between showing the current value and the expression.) |
Purple |
Python expression language The parameter expression language is set to Python. See python parameter expressions for more information. |
Gray blue |
Muted from dopesheet The parameter is animated (either with keyframes or an expression), but the channel is muted in the |
Orange |
Overridden by CHOPs The parameter is currently controlled by a CHOP node. |
Dark Green |
Empty channel The parameter has an empty channel (a channel that doesn’t hold any keyframes). If you delete all the keyframes on the (This can also happen if you enter use a To delete the empty channel, right-click the parameter and choose Delete Channels. |
 dopesheet
The playbar’s keyframe markers and keyframe button also use some of the same color codes to give a quick status of all the keys at the current frame.
| See also |
