| On this page |
Channels record how the value of a parameter changes over time. You can think of a channel as a parameter animation. Houdini’s animation editor allows you to view and edit animated parameters (channels), and shows how the transitions between keyframes are filled in.
To open the animation editor, select Windows ▸ Animation Editor, or click the ![]() New Tab icon at the top of a pane and select New Pane Tab Type ▸ Animation ▸ Animation Editor.
New Tab icon at the top of a pane and select New Pane Tab Type ▸ Animation ▸ Animation Editor.
Animation editor views 
The different views of the animation editor can be selected using the buttons at the top left of the animation editor pane:
-
The graph view displays the animated values of parameters as a graph. You can edit the shapes of the animation curves between keys, move keys backward or forward in time, and edit keyed values.
-
The dopesheet shows keys as colored squares on a grid of channels and frames.
-
The table view displays the value of the parameters at each keyframe.

You can also navigate to the different views by hovering over the animation editor and using the following hotkeys:
Hotkey |
View |
|---|---|
1 |
|
2 |
|
3 |
|
Additional animation editor interfaces 
The animation editor provides the following additional interfaces for editing animation:
-
The channel list allows you to view and edit the values of parameters, and control which parameters are keyed. You can view the channel list on the left side of the animation editor, as well as put the channel list in its own pane.
-
Channel groups allow you to easily see, select, and keyframe different groups of parameters. You can view the channel groups on the left side of the animation editor, as well as in the channel list pane.
-
You can create layers of animation to edit the existing base animation.
Tip
![]() in any of the animation editor sub-panes to show the commands and options specific to the sub-pane.
in any of the animation editor sub-panes to show the commands and options specific to the sub-pane.
Common toolbar controls 
General animation editor options 
![]()
Switches the pane to graph view.
![]()
Switches the pane to dopesheet view.
![]()
Switches the pane to table view.
![]()
Launches the help browser.
Start Frame/End Frame
The far left and far right frames that are displayed in the main window.
![]()
Jumps to the previous keyframe.
![]()
Jumps to the next keyframe.
View framing options 
![]() Home Channels (All Graphs)
Home Channels (All Graphs)
Homes all the channels by panning and zooming the main window to show all the keys in the graph or dopesheet.
![]() Vertical Adapt
Vertical Adapt
Automatically pans and zooms the graph to keep all the vertical values visible when selecting different channels.
![]() Horizontal Adapt
Horizontal Adapt
Automatically pans and zooms the graph to keep all the horizontal values visible when selecting different channels.
![]() Frame Selection
Frame Selection
Pans and zooms the main window to show the area of the graph or dopesheet that is selected.
Frame range and frame range slider 
The start and end frame values are the far left and far right frames that are displayed in the main window.
The frame range slider above the main window represents the range and location of the animation editor’s timeline within the global frame range (the global frame range is displayed in the playbar at the bottom of the Houdini UI).
Note
The frame range slider does not line up with the frames on the timeline directly underneath it nor is it directly tied to the start and end frame values.
Resize the slider by dragging the left and right edge of the slider. Drag the middle to move the slider along the global frame range.
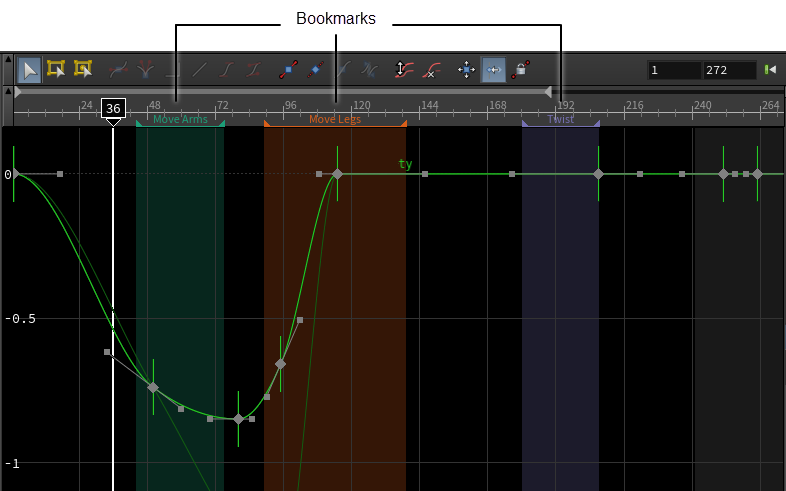
Bookmarks 
Bookmarks are markers on a single frame or range of frames in the timeline that help to organize and identify the different parts of your animation at a glance. You can create, edit and view bookmarks in the graph view and dopesheet of the animation editor, as well as on the playbar and in the bookmark editor.
To view/hide bookmarks in the graph view or dopesheet, select one of the options in View ▸ Show Bookmarks.
| To... | Do this |
|---|---|
|
Create a bookmark |
In the Bookmark pop-up window:
|
|
Move to the previous/next bookmark on the timeline |
⌃ Ctrl + ← to move to the start frame of the previous bookmark. ⌃ Ctrl + → to move to the start frame of the next bookmark. |
|
Move and resize bookmarks on the timeline |
⌃ Ctrl + ⌃ Ctrl + |
|
Double-click a bookmark to set the displayed frame range to the frame range of the bookmark. Double-click the bookmark again to jump back out to the previous frame range. If you have navigated into the bookmark frame range, doing ⌃ Ctrl + ← and ⌃ Ctrl + → will move you to the previous/next bookmark frame range. |
|
|
Edit Bookmark Brings up the Bookmark pop-up window that is used when creating a bookmark. Set Frame Range from Bookmark This is equivalent to double-clicking the bookmark. Delete Bookmark Deletes the bookmark. Send Bookmark to Back Sends the bookmark to the back of the timeline so as not to obscure the user from interacting with other bookmarks at the same frame range. |