| On this page |
Overview 
This browser lets you organize, create, and edit constraints from RBD and Vellum simulations, which use geometry to represent the constraints. Typical examples are RBD constraints connecting fractured pieces in destruction, or glue constraints in Vellum. Often, you can end up with a large number of constraint combinations, making it hard to inspect and edit particular sets of constraints.
For example, imagine you create some RBD constraints and want to isolate, inspect, and edit only hard constraints. First you tag the constraints to create the hierarchy tree. Then you can filter the hard constraints, and display them in the viewport. Finally, you change their values on the panel’s right side or separate edit nodes.
Tags and constraint layers 
The constraint browser relies on tags to determine a customizable hierarchy tree, where all constraints are listed. With tags you create the primary hierarchy to organize your constraints. Constraint layers are added when there are multiple types of constraints with the same tag:
-
For RBD, layers are defined by the
constraint_nameprimitive attribute. This attribute is typically set via the Constraint Name parameter on RBD Constraint Properties.
 -
For Vellum, layers are defined by the
typeprimitive attribute. This attribute is typically set via the Constraint Type and Stretch Type parameters on Vellum Constraints.
 -
The
constraint_tagprimitive attribute defines the tag.
The browser will show these constraint layers under the primary tag in the tree, as illustrated in the examples below. What you can finally see in the browser’s right subpane depends on the currently selected node.
Working with RBD constraints 
In the ![]() RBD Material Fracture you can select a Constraint Type, for example Concrete or Glass. Depending on the type, the node creates editable Fracture ID tags like
RBD Material Fracture you can select a Constraint Type, for example Concrete or Glass. Depending on the type, the node creates editable Fracture ID tags like concrete_fracture1 and concrete_fracture2, or glass_radial and glass_concentric. These tags are added to the hierarchy tree.
For the ![]() RBD Constraints from Curves |
RBD Constraints from Curves | ![]() Lines |
Lines | ![]() Rules set the Group Type parameter to Tag. Under Tag enter a name, for example
Rules set the Group Type parameter to Tag. Under Tag enter a name, for example rubbertoy. This name will be the top entry in the tree’s hierarchy. Each slash in this field adds a new level to the tree, as in rubbertoy/connectors.
In the RBD Constraint Properties node, the entry for Constraint Name (e.g. Hard) will be associated with the tags of the currently edited constraints. In this example it’s rubbertoy/connectors. The Hard layer is shown in Constraint Layer on the right subpane. Please note that the Hard layer is not part of the hierarchy tree here, because the tag has only one layer/constraint type:
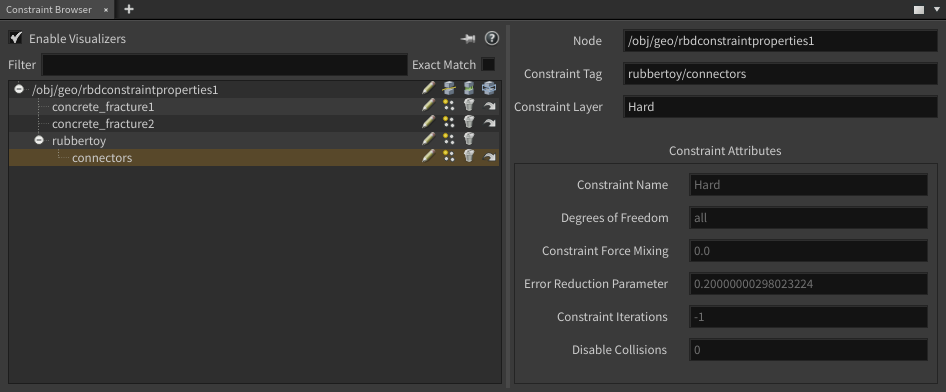
You can also associate the constraints directly through Constraint Group by addressing the tag. In this example, the entry was set to @constraint_tag=rubbertoy/connectors to edit the properties for the constraints with the tag rubbertoy/connectors.
Working with Vellum constraints 
The workflow for ![]() Vellum Constraints is almost identical with RBD constraints. The main difference is that you can find the Tag parameter to create the tree hierarchy in the Vellum Constraints node at the bottom. For example, set
Vellum Constraints is almost identical with RBD constraints. The main difference is that you can find the Tag parameter to create the tree hierarchy in the Vellum Constraints node at the bottom. For example, set
-
Constraint Type to Cloth
-
Stretch Type to Distance Along Edges to create
bendanddistanceconstraint layers -
Tag to
fabric.
In the browser you will now see a fabric entry with additional bend and distance layers. Again, each slash in the Tag parameter creates a new branch like in fabric/silk.

Attributes 
When you select a constraint on the browser’s left side, the pane displays attributes associated with that constraint on the right side. The constraint browser only shows the attributes you can use to adjust the constraint’s dynamics.
Sometimes the browser can’t find nodes associated with the selected constraint. For example, when multiple nodes modify the same constraint group, or when the node that created a constraint doesn’t exist anymore. In these cases, the browser will add a new RBD Constraint Properties node.
How to 
| To... | Do this |
|---|---|
|
Create a new constraint browser pane tab |
|
|
View constraints |
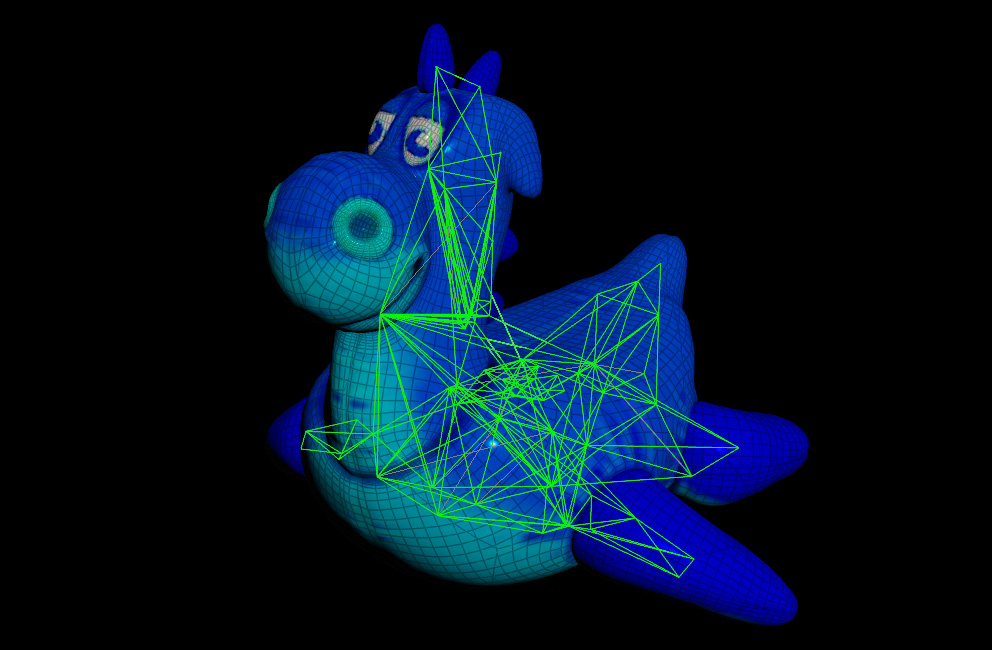
Hover over the constraints in the viewport to highlight them as shown in the image above. |
|
Display a subset of constraints |
Show only what you want to see in the viewport with the |
|
Select constraints |
Select highlighted constraints in the viewport, or an entry in the browser’s hierarchy tree. |
|
Hide constraints |
Turn off Enable Visualizers to hide the constraint lines in the viewport. |
|
Edit attributes |
Click a constraint in the viewport or the hierarchy tree. A list of Constraint Attributes and their values will be displayed in the right side of the pane. Alternatively, click the |
Hierarchy tree 
The constraints hierarchy tree is the browser’s core element, and located on the left subpane. Its structure is based on the constraints' tags. You can select and edit the constraints from the tree, and you have buttons for creating, and isolating constraints in the viewport, and many more:
Enable Visualizers
Show lines in the viewport representing the constraints.
Filter
Only show item whose names contain this text.
Exact Match
When this is on, only show items whose full names match the filter.
Push Pin
When on, the constraint browser is locked to the selected node and the tree will not change.
Tree
Select an item in the hierarchy tree and edit its properties on the constraint browser’s right side.
A top-level item in the tree on the left represents the nodes your are viewing. It has the following buttons:
![]() Edit
Edit
Opens a new constraints property editor (RBD or Vellum) with access to the full set of attributes.
![]() Create Constraints from Curves
Create Constraints from Curves
Click this button, and draw over the pieces you want to connect with constraints. For more information, see the ![]() RBD Constraints From Curves help page.
RBD Constraints From Curves help page.
![]() Create Constraints from Lines
Create Constraints from Lines
Click this button, and draw lines between the pieces you want to connect with constraints. For more information, see the ![]() RBD Constraints From Lines help page.
RBD Constraints From Lines help page.
![]() Create Constraints from Rules
Create Constraints from Rules
Click this button to add a procedural node, and create constraints based on a set of rules and conditions. For more information, see the ![]() RBD Constraints From Rules help page.
RBD Constraints From Rules help page.
The top-level entry can also have Vellum items, for example cloth or granulars. Vellum items have the following buttons:
![]() Edit
Edit
Opens a new Vellum Constraints Properties editor with access to the full set of attributes.
![]() Create Constraints
Create Constraints
Adds a ![]() Vellum Constraints SOP node and will create constraints from the incoming geometry.
Vellum Constraints SOP node and will create constraints from the incoming geometry.
The items under a top-level entry represent constraints. Constraint items have the following buttons:
![]() Edit
Edit
Opens a new Constraints Properties editor with the full set of attributes.
![]() Isolate Constraint
Isolate Constraint
Hides any constraint group in the viewport other than the selected entry by connecting a ![]() Blast node. You should click this icon only once, and then use the appropriate Blast node in the network view.
Blast node. You should click this icon only once, and then use the appropriate Blast node in the network view.
![]() Delete Constraint
Delete Constraint
Removes the active constraints from the scene. This action can be undone with ⌃ Ctrl + Z. Please note that individual constraints can’t be deleted.
![]() Jump to Creator Node
Jump to Creator Node
Opens the constraint’s associated node attributes for editing. If the browser can’t find an appropriate node it will create a new one.
Tips and notes 
-
You can quickly create new constraints with the buttons next to the top-level tree entries in the browser’s left subpane.
-
If updates on the constraints don’t show up automatically,
 anywhere in the browser’s left side and select Reload.