| On this page |
Overview 
Takes are hierarchically overlayed sets of parameter changes. They let you create chains of overlayed changes, or alternatives, and quickly switch between them.
Any parameters you don’t explicitly change in a take are inherited from the parent take. You can create a take and within that take change some parameters, then create a parallel take with different changes. Both takes will inherit the values in their parent takes.
Takes are useful for:
-
Exploring alternative designs with the ability to switch back and forth to compare the alternatives.
-
Layering tweaks or explorations on top of a “known good” or approved shot/design. You can see which parameters you've changed and easily return to, copy-paste from, etc., the original scene.
-
Holding different sets of parameters for different render passes. You can use the Render with take parameter on render nodes to control which take to use when you render.
Parameters not included in the current take appear disabled in the parameter editor unless you turn on Auto-take mode.
Example 
You start with the “Main” take. You might start working on a pyro effect and create a tweaks_1 take to hold your initial explorations:
Main
    tweaks_1
When you get to an effect you like, you can start a new take tweaks_2 as a sub-take of tweaks_1 to build off it. This acts as a “checkpoint” that lets you easily go back and forth between tweaks_1 and tweaks_2.
Main
    tweaks_1
        tweaks_2
How to 
You can use the controls in the top right corner of the main interface to quickly switch between and create takes. For more involved editing, you can use the take list pane.

Mac
On Mac, Houdini has a Takes menu in the main menus instead of a pop-up in the main window.
| To... | Do this |
|---|---|
|
Create a new take |
Open the take list pop-up menu and choose New Take. |
|
Choose the current take |
Open the take list pop-up menu and choose a take. |
|
Add a parameter to a take |
Right click the parameter and choose Include in Take. |
|
See which parameters are included in a take |
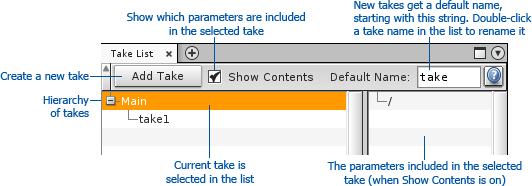
In the take list pane, click the take on the left side to see its contents on the right side. (If the take list is not divided into left and right sub-panes, click the Show contents checkbox in the toolbar.) |
|
Add all of a node’s parameters to a take |
Drag the node’s tile from the network pane onto the take in the take list. |
|
Remove a parameter from a take |
Press |
|
Add the state of a node flag to the current take |
Right click the node and choose Take Toggle ‹flag name›. |
Auto-takes 
By default, you must explicitly add parameters you want to change to a take. This helps keep takes “clean”.
However, you can turn on auto takes to enable all parameters and automatically add any changes you make to the current take. This obviously can be more convenient in certain situations, however you should try to avoid using Auto-take mode too much. It makes it easy for you to unintentionally include parameters and override parent takes, which in turn can make diagnosing problems difficult when takes don’t behave the way you expect.

| To... | Do this |
|---|---|
|
Turn on automatic adding of parameters to takes |
Open the take list pop-up menu (or Takes menu on the Mac) and turn on Auto-takes. An |
|
Assign a hotkey to the auto-take toggle |
⌃ Ctrl + Alt + ⇧ Shift click the menu item. |
Take list pane 
The full Take list pane/window lets you rename, rearrange, and delete takes as well as create and select them.
Click the Add Tab button in a pane and choose
Take list to add a new tab with a take list, or choose
Windows ▸ Take Manager to create a take list in a floating window.

| To... | Do this |
|---|---|
|
Create a new take |
In the take list pane, click Add Take. |
|
Create a new take as a child of an existing take |
Press |
|
Insert a new take between an existing parent and its children |
Press |
|
Choose the current take |
Click the take in the take list, or choose it from the Take pop-up menu in the main menu bar. |
|
Rename a take |
Double-click the take and type the new name. |
|
Merge takes |
|
|
Move a take under a new parent |
Drag and drop the take onto its new parent, then click Move take here. |
|
Remove a take from the hierarchy |
Press |
|
Delete a take and all its children |
Press |
Tips and tricks 
-
You don’t have to worry about giving takes descriptive names as you create them. When you select a take in the takes pane, it displays which parameters are changed in the take.
-
You might want to start by creating an “empty”
defaultstake, and do your work in sub-takes ofdefaults. This lets you switch to thedefaultstake to quickly check the default values of parameters.