Houdini operates on a bone based system, whereas Maya operates on a joints based system. Bone based systems allow riggers to rotate bones around their parents and scale the length. Joint based systems, on the other hand, allow riggers to move joint orientations liberally in space.
In Maya you have joints where the equivalent in Houdini would be a null object with a look-at object specified as the Aim constraint (don’t rig this way). You can clearly see the underlying difference when you draw a bone chain in Houdini in the Bone state tool and then import a Maya rig via FBX. The imported FBX rig will have the null-joint arrangement that you get in Maya. It is not recommend that you rig this way in Houdini.
Joint based systems provide the flexibility and control of being able to move joints freely; however, improper joint orientations often produce unwanted artifacts which require post-processing. Bones, on the other hand, have an orientation. They always point down the -z axis, while up is the y dimension and x is the flat dimension. Bone hierarchies can also understand the whole bone chain, which makes it easier to squash and stretch rigs with bones.
Although Houdini operates on a bone based system, you can simulate joint based systems with null nodes and bones filled in between them. However, for every joint, you will need an IK Solver constrained to the next null.
Simulating a joints based system 
Building a rig by simulating a joint based system is extremely complicated. It is recommended to use a bone based system when building a rig from scratch, since all of the tools in Houdini are built with bone bases systems.
-
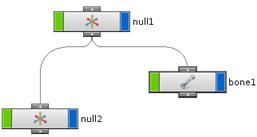
Wire them both into null1.
-
On the Transform tab of the bone node, set the Look At parameter to null2.
-
On the Bone tab of the bone node, use an expression for distance in the Bone Length parameter.
Note
You can import an FBX skeleton to see an example of what the expression should be.