| On this page |
Overview 
Vellum is Houdini’s fast cloth (and other PBD) solver. You can associate cloth with agent shapes and then simulate the cloth as part of the overall dynamics simulation along with the crowd and any other dynamics such as rigid bodies.
Because you can set up Vellum cloth in geometry using SOPs, it’s ideal for inclusion in an agent shape.
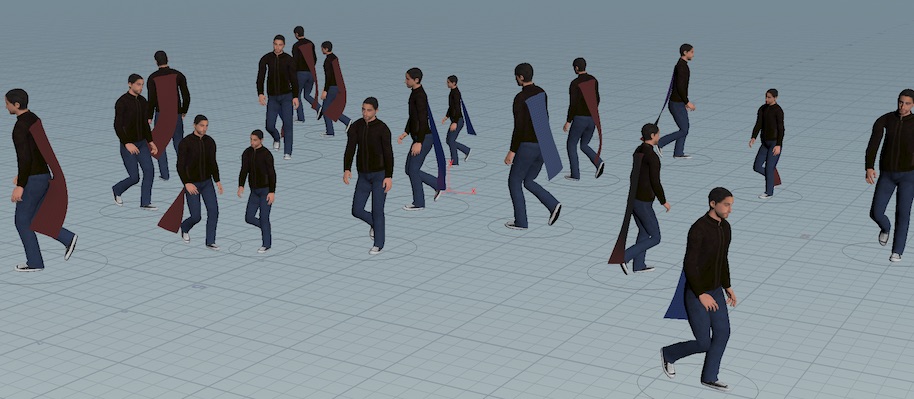
See the SimpleCrowdCloth node example for a fully worked example attaching capes to agents and simulating them.
Set up the cloth 
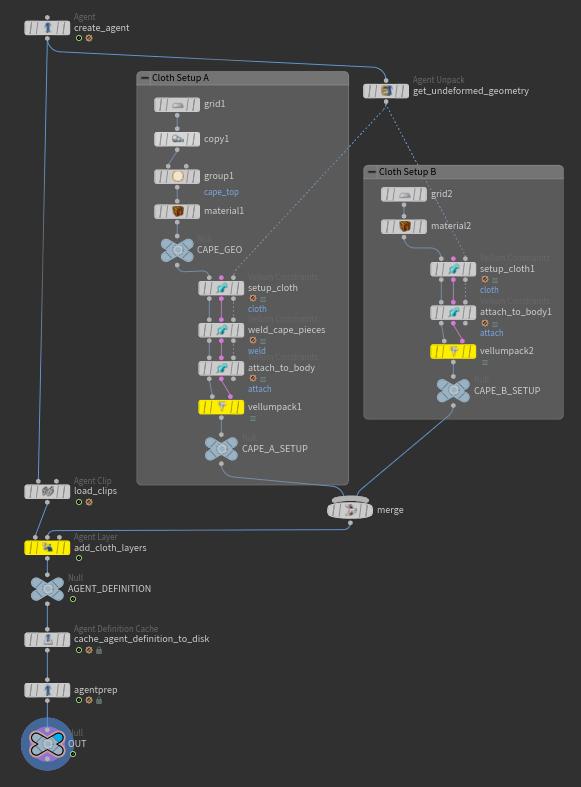
In the SOP network where you set up your agent definition(s), you will add vellum cloth on top of the imported agent geometry, and then use that as the agent shape geometry.
-
Alongside the agent definition SOPs, create a new SOP chain that creates the cloth geometry.
You can import the cloth geometry or define it here. In the cape example, the cloth is a simple grid.
-
Append a
 Vellum Constraints node to the cloth geometry. Set the Constraint type to “Cloth”. This sets up attributes on the geometry for the Vellum solver to treat it as cloth.
 -
Connect the agent shape’s rest geometry to the Vellum Constraints node’s third input.
-
Append another
Vellum Constraints node and set the Constraint type to “Attach to Geometry”.Instead of attaching specific points, you can simply specify a group on the cloth geometry and turn on Constrain to closest point.
-
Append a
 Vellum Pack node to pack up the cloth geometry and constraints, and set the Name parameter to a unique descriptive name for the cloth setup (for example,
 long_cape). This name will be used by Agent Layer as the name of the agent shape and layer.
 -
If you are creating multiple cloth shapes, append a
 Merge node to combine the outputs from the Vellum Pack nodes.
Tip
You can add a Vellum Solver SOP at the end of the vellum setup chain to do a quick sim of the cloth, for example to check how it hangs on the character. This is faster than running the full crowd + cloth simulation.
Add the cloth to the agent definition 
-
In the SOP chain where you define the agent, above the
AGENT_DEFINITIONNull, add anAgent Layer node.Agent layers are used to assign shapes to an agent to produce geometry variations.
-
Wire the cloth shapes (the output from the
Vellum Pack nodes) into the second input of the Agent Layer node. -
Enable Use Layer Name Attribute and set the Layer Name Attribute to
name.This will create a separate agent layer for each of the cloth shapes, using the same name as the shape (the shape names were assigned using the Name parameter on
Vellum Pack).
Assign the cloth layers to the crowd 
-
After populating the crowd, append a
 Crowd Assign Layers node.
Tip
The Vellum layers can also be assigned to the agents at any point before simulating the cloth (for example, after the crowd simulation).
-
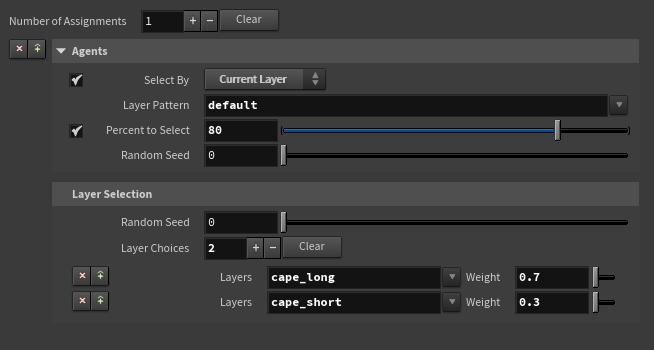
Set the Layer Choices to the Vellum layers that should be randomly assigned to the agents, and adjust the Weight values to control the random distribution. Patterns such as
cape_*can be used to specify a list of layers that will be selected from with equal probability. -
To assign the Vellum layers only to agents that have specific geometry variations, set Select By to Current Layer and set the Layer Pattern to the list or pattern of layer names.
-
The layer assignment can also be limited to specific agents by using the Group parameter or specifying the Percent to Select.
Simulate the cloth 
-
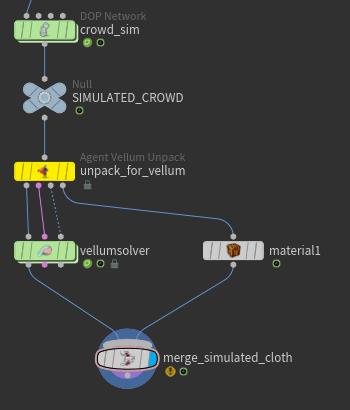
In a SOP network, grab the output of the
 Crowd Solver DOP.
For example, you can use a
 DOP Import SOP and point it to the
  Crowd Object inside the DOP network.
 -
Append an
 Agent Vellum Unpack node to extract the vellum geometry.
Set the Layers to Simulate to the names of the layers containing Vellum shapes (for example,
cape_*). Any other layers assigned to the agents will be unpacked as collision geometry.If only some of the agents in the crowd have Vellum shapes, you can use the Select By parameter to select the agents to simulate based on a primitive group or by which layers are assigned to the agent.
-
Append a
 Vellum Solver SOP to simulate the vellum geometry.
 -
Optionally, merge the simulated cloth geometry with the crowd geometry to visualize the results. The fourth output of
Agent Vellum Pack provides the original agents, but with the Layers to Simulate removed from their list of current layers so that they can be displayed with the simulated Vellum geometry.