| On this page |
Geometry variation 
To create geometry variations within a single agent type, you can assign a different set of agent layers to each individual agent to specify the shapes that should be displayed for them.
A layer contains one or more shape bindings, which specifies a shape from the agent’s shape library along with the deformer that should be applied to it. For static shape bindings that do not have a deformer, the shape binding also specifies which joint the shape should be rigidly attached to.
Multiple layers can be assigned to an agent, and the combination of shape bindings from these layers determines the agent’s geometry.
Tip
While it is possible to create a single layer containing all of the shape bindings that should be assigned to an individual agent, this becomes unwieldy since a new layer must be added to the agent definition for each unique combination that will be used in the crowd.
We recommended partitioning the shapes into smaller sets (layers), and then assigning combinations of those layers to each individual agent to produce new variations. This requires significantly fewer layers and allows you to create new combinations after populating the crowd without having to modify the agent definition.
In this workflow, a layer could contain multiple shape bindings that should always be assigned together (for example, a skin mesh with separate shapes for the eyes), but a layer could also just contain a single shape binding (for example, a prop).
Adding shapes and layers 
When you create an agent from a character, the ![]()
![]() Agent SOP generates a default layer from the original character’s visible geometry. The
Agent SOP generates a default layer from the original character’s visible geometry. The ![]()
![]() Agent Layer SOP node lets you add additional shapes and layers.
Agent Layer SOP node lets you add additional shapes and layers.
To create a layer with a different overall character skin:
-
In the agent setup geometry network, add an Agent Layer SOP node.
-
Wire the new character skin geometry into the second input of the Agent Layer SOP node.
-
To import skin geometry, use nodes like the
 Scene Character Import SOP,
  FBX Skin Import SOP, or
  USD Skin Import SOP.
 -
The
nameprimitive attribute on the geometry is used to determine the names of the agent shapes. The geometry will be split into multiple agent shapes if thenameattribute has varying values.
-
-
Set the Layer Name for the new layer.
Partitioning shapes into multiple layers 
By default, the ![]()
![]() Agent Layer node creates a single layer containing all of the new shapes.
Agent Layer node creates a single layer containing all of the new shapes.
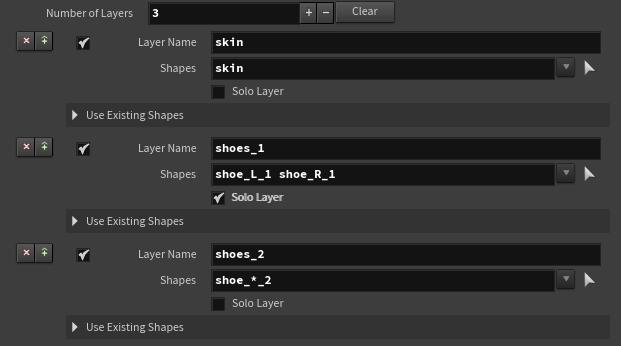
To partition the shapes into multiple layers:
-
Click the
 Add button next to Number of Layers to add a new layer.
 -
Enter a Layer Name for the layer.
-
Set Shapes to the list or pattern of new shapes that should be included in the layer. You can click
 to select shape names from a tree view dialog.
-
Turn on Solo Layer to visualize only the shapes in this layer. This overrides the Set Current Layers parameter, which by default displays all of the new layers.
-
-
Repeat for each group of shapes.
Tip
You can use a primitive string attribute on the shape geometry to partition the new shapes into layers procedurally. For example, setting the Layer Name Attribute to name (which is the default Shape Name Attribute) would create a separate layer for each shape and use the shape name as the name of each layer.
Adding static shapes 
There are multiple ways you can create static (non-deforming) shape bindings. Static shape bindings can be used to, for example, attach rigid props to a joint in the rig.
-
If the shape geometry consists of a single packed primitive and the
boneCapturepoint attribute is present, a static shape binding will be created if the packed primitive’s point is weighted to a single joint (for example, describing a rigid deformation).Note
This format matches how rigid skinning is represented in KineFX. For example,
 Capture Packed Geometry can be used to rigidly capture shapes.
 -
If the shape does not have a
boneCaptureattribute, a static shape binding will be created. In the Shape Bindings tab, set the Transform Name to the joint that the shape should be attached to. You can also click to select the joint from a tree view dialog.-
You can also specify the Transform Name using an attribute on the shape geometry, which is useful when adding multiple shapes that should be attached to different joints. Change the Transform Name Mode to Set from Attribute, and then set the Transform Name Attribute to the primitive attribute that should be used.
-
Assigning layers to agents 
Each individual agent primitive has a list of current (display) layers. Agents also have a list of collision layers, which specify the geometry used for ragdoll simulations, computing the agent’s bounding box, and so on.
-
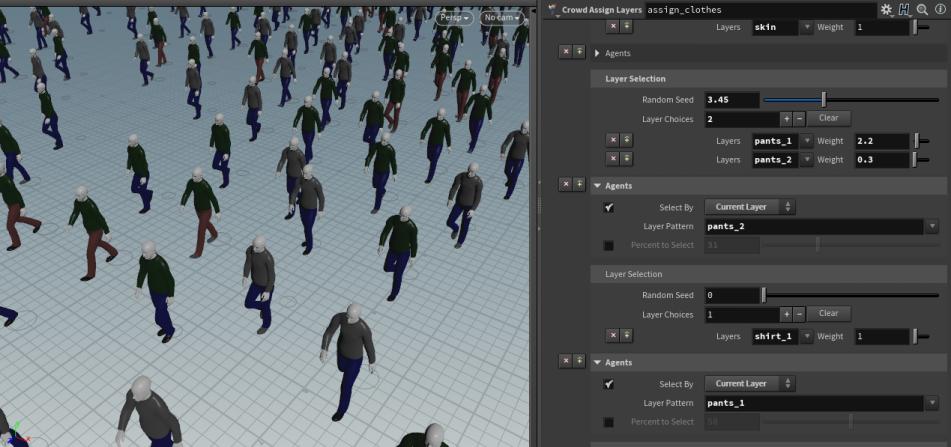
The high-level
 Crowd Assign Layers node has options to assign random combinations of layers throughout the crowd.
-
You can turn on Remove Layers to remove specific layers that were already assigned to the agent. For example, setting Remove Layers to
*will remove all of the agent’s original assigned layers. The layers assigned by this node are appended to the agent’s list of layers. -
For each of the Number of Assignments, you can specify a weighted distribution of Layer Choices to control which layers are assigned to the agents in the Group. Patterns such as
hat*can be used to specify a list of layers that are selected with equal probability. -
Turn on Percent to Select to only assign a layer to a random subset of the crowd.
-
To build geometry variations with more complex rules for which layers can be combined together, set Select By to Current Layer and set the Layer Pattern to a list or pattern of layer names. This can be used to, for example, only assign layer
Ato agents which already have layersBorCin their list of current layers. -
To replace some of the agent’s assigned layers with different layers, you can use Switch Layers to specify one or more search/replace patterns. For example, when setting From to
proxy_*and To torender_*, an assigned layer namedproxy_skinwill be switched to therender_skinlayer.
-
-
You can use the
 Agent Edit SOP to set the current layer for selected agents.
 -
If you want to set the current layers in a wrangle or VOP network (for example, to change an agent’s layer when it’s in a certain state), you can use the setagentcurrentlayers VEX function or the
 Agent Layer Name, Agent Layers, and Set Agent Layer VOPs.
Tip
You can change the layers assigned to an agent at any time. For example, you could initially assign layers with low-res proxy geometry to the agents for working interactively, and then switch to layers containing high-res geometry before rendering.
Material variation 
Material style sheets let you modify material settings on agents at render time, when rendering in Mantra or the viewport. This lets you, for example, randomize texture settings on agents to give them different looks.
When rendering crowds in Solaris, you can use nodes such as ![]() Vary Material Assignment to assign different material variations throughout the crowd.
Vary Material Assignment to assign different material variations throughout the crowd.
Using multiple agent types 
You can use multiple agent definitions to populate a crowd with different character types. For example, like horses and riders.
-
Set up each agent definition and then assign a unique Agent Name to each
Agent or  Agent from Rig node used to create an agent.
-
By convention, the
agentnamepoint attribute contains a unique name identifying the agent type being used.
-
-
Merge the agents together and append a
 Crowd Source node.
 -
On the Randomize tab, turn on Randomize Agent Primitive. This will randomly select one of the prototype agents from the first input when populating the crowd.
-
You can control the distribution of agent types by creating an
agentnameattribute on the second input’s points.
-
-
If the
 Agent Clip Transition Graph or Agent Clip Properties nodes are being used, merge the resulting geometry for each agent type (the
 agentnameattribute is used to avoid conflicts if clips with the same name exist in multiple agent definitions). Set thecrowd object’s Clip Transition Graph and Clip Properties paths to reference the combined transition graph and clip properties, respectively.
Attributes 
-
If the input points to the
Crowd Source node have agent related attributes on them, the attributes will be copied onto the new agent primitives. This is a very effective way for expert users to manually or randomly specify different starting conditions, looks, and so on across agents. -
You can use controls on the
Crowd Source node’s Randomize tab to vary properties such as the agents' scale, initial orientation, and clip time.