| On this page |
The ![]() Vellum Brush SOP is an interactive tool for shaping Vellum geometry such as cloth, grains, or fluid particles in the viewport. It is most commonly used to shape cloth or grass, and add detail to softbodies. However, you can also use it to brush Vellum grains into a pile or clear areas from sand and dust. This tool lets you add detail precisely where it is needed.
Vellum Brush SOP is an interactive tool for shaping Vellum geometry such as cloth, grains, or fluid particles in the viewport. It is most commonly used to shape cloth or grass, and add detail to softbodies. However, you can also use it to brush Vellum grains into a pile or clear areas from sand and dust. This tool lets you add detail precisely where it is needed.
The brush SOP provides a built-in ground plane for collisions. It also uses its own minimal solver with force and quality settings, so you don’t have to press ![]() Play in the playbar to start the simulation. This means that you don’t need a
Play in the playbar to start the simulation. This means that you don’t need a ![]() Vellum Solver SOP. You can easily toggle between two simulation modes by pressing G in the viewport.
Vellum Solver SOP. You can easily toggle between two simulation modes by pressing G in the viewport.
-
Damped is normally used for sculpting objects. The points won’t move after the brush stroke.
-
Settle turns on Live Simulation to simulate how the points behave with gravity.
You can also add a ![]() Vellum Post-Process SOP, which will allow you to brush objects at a lower resolution and subdivide them later to create high-res versions and add thickness.
Vellum Post-Process SOP, which will allow you to brush objects at a lower resolution and subdivide them later to create high-res versions and add thickness.
Example: Brushing cloth 
Creating the cloth 
This example sets up a standard cloth network, where the solver is replaced with a ![]() Vellum Brush SOP. A basic
Vellum Brush SOP. A basic ![]() Grid SOP is deformed to give it a cloth-like look.
Grid SOP is deformed to give it a cloth-like look.
-
Use the
 Grid tool on the Create shelf to put down a grid.
 -
Dive inside and select the
Grid SOP. -
Set the Size to
5.5and increase the Rows and Columns to50to get enough resolution. A value of50is a good compromise between resolution and speed. -
Add a
 Transform SOP and wire its input to the grid’s output. This node is optional, but helps you to position, scale, or rotate the grid if necessary.
 -
Add a Vellum Configure Cloth node, and connect its first input the Transform’s output. This is a preconfigured
 Vellum Constraints SOP and it’s optimized for cloth simulations.
 -
Put down a
 Vellum Brush SOP and connect the first two inputs with the first two outputs of
 vellumcloth1. This connects the Vellum Geometry (grid) and Constraint Geometry (connections between the cloth’s points). The third input isn’t required because there is no collision geometry in this scene.
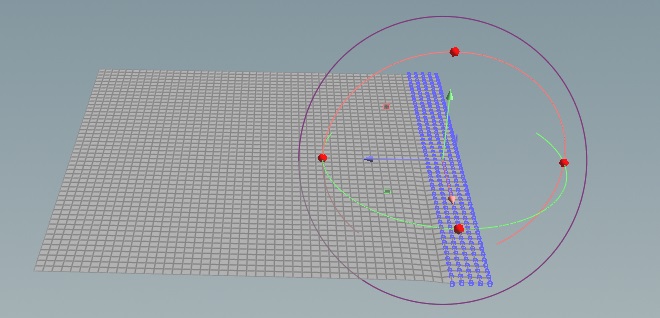
Shaping the cloth 
You're now ready to shape the cloth. When you select the node and turn on its blue Display/Render flag, you may notice that nothing happens. This is because you have to enter the brush’s edit mode.
-
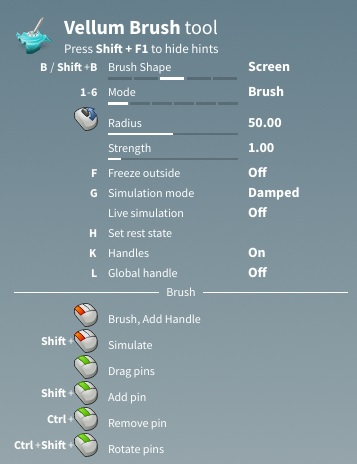
Move the mouse over the 3D viewport and press Enter. In the viewport’s upper left corner you can see a HUD with the most important parameters, shortcuts, and mouse actions. The mouse cursor also turns into a red circle, indicating the brush size.
-
To change the brush size, scroll the mouse_wheel up and down.
-
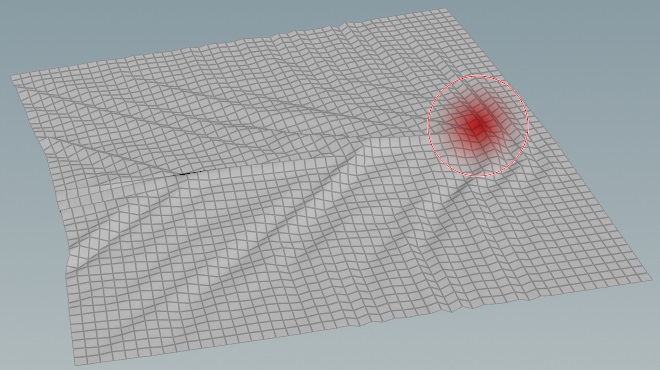
With the LMB pressed, draw on the grid to brush it. A fading red spot inside the brush indicates the brush’s Soft Edge size. By default, this parameter is set to
1. -
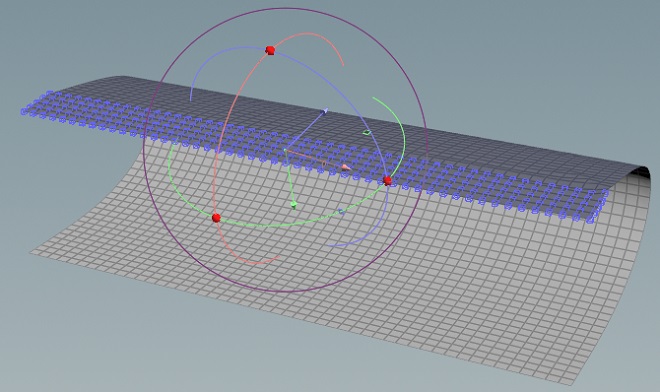
Press and hold the LMB and drag the mouse to shape the cloth.
-
Click Set Rest State in the parameter editor to save your work.
-
Move the cursor over the viewport and press ⎋ Esc to exit brush mode.
This is a simple setup to illustrate brushing cloth. For more information on all of the ways you can shape cloth, see the How to section below.
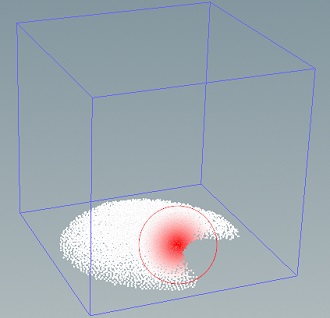
Example: Brushing grains and fluids 
Similar to the cloth setup above, you don’t need a Vellum Solver for brushing grains and fluids, and the entire simulation is controlled through the brush SOP. The simulation process relies on a minimal solver and runs entirely on the GPU.
Creating grains 
-
Use the
 box tool on the Create shelf to put down a grid. Double-click the node to dive inside. The box will act as a source object for Vellum grain particles.
 -
Put down a
 Vellum Configure Grain SOP and connect its first input to the output of the box.
Note
If you want to work with fluids instead of grains, add a Vellum Configure Fluid SOP instead. This node is also a Vellum Configure Grain SOP, but configured for fluids.
-
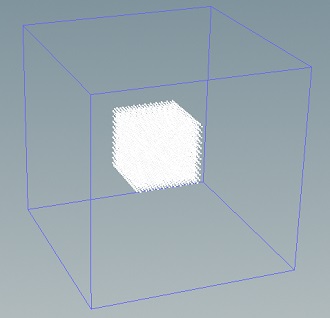
Turn on Create Points from Volume to fill the box with grain particles.
-
To get more grain particles, set Particle Size to
0.05or less. -
Add another Box SOP and connect it to the third input of the
vellumconstraints_grain1node. This box will be a collision object. -
Set the second box’s Uniform Scale parameter to
3to make it bigger and enclose the particles. -
Put down a
Vellum Brush SOP and connect its 3 inputs with the 3 outputs of vellumconstraints_grain1.
Settling 
Instead of brushing particles in the air, it’s more likely that you want to create a settled state first.
-
Move the mouse cursor over the viewport and press Enter. In the viewport’s upper left corner you can now see a HUD with parameters, mouse actions, and shortcuts.
Note
The mouse cursor also turns into a red circle, indicating the brush size. You can use the mouse_wheel to change the size interactively.
-
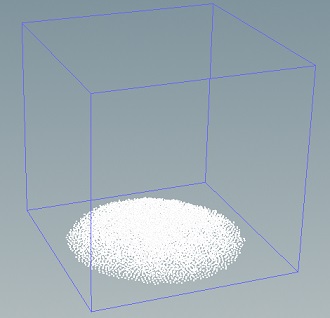
Press G in the viewport to switch from Damped mode to Settle. This turns on Live Simulation and the particles will start to fall and collide the the surrounding box.
-
Press G again to switch back to Dampen mode. This turns off Live Simulation.
Brushing and sculpting 
-
Press and hold the LMB, then drag the mouse to shape the grains. The brush SOP’s Brush subpane provides different Mode options for customizing the brush effects.
Note
Grain and fluid particles only support the Screen brushing.
For the final shape you can brush, sculpt, simulate, and settle the particles as often as necessary.
Also consider the brush node’s Post Drag Frames parameter. When Live Simulation turned off, this parameter defines for how many frames particles are simulated after a brush stroke. This can be used to minimize gaps between particles while sculpting fluids and grains.
-
Click Set Rest State in the parameter editor to save your work.
-
Move the cursor over the viewport and press ⎋ Esc to exit brush mode.
Tip
If you encounter misbehaving particles, consider increasing the brush SOP’s Substeps to improve simulation quality. See How to below for more information.
Handles 
Translate, rotate, and scale handles are available for pinned points. These handles are especially useful for cloth-like objects, as they let you easily fold, drape, and stretch cloth. However, you can also use them with grains and fluids.
-
Press K to turn on the handles.
-
To create pins, drag ⇧ Shift + MMB over the points you want to pin. Blue pins will appear where the pins are placed, and a handle is applied to the selection. This process can be repeated and each selection will get its own handle.
Tip
Another way to select points or edges is to press S, which will put you in Selection mode where you can select loops, edges, etc.
-
Drag the handles to translate, rotate, and scale the pinned points.
Tip
You can toggle between individual handles using the T, R, and E hotkeys.
To remove a handle, press ⌃ Ctrl + MMB and drag over the pins. Once the pins are completely removed, the handle disappears.
If you want to hide the handles, press K again and leave the brush’s handle mode.
How to 
| To... | Do this |
|---|---|
Turn on brush mode |
|
Restore the brushed object’s initial state |
In the Vellum Brush SOP, click the Reset All Changes button. |
Increase the brush’s strength |
Change the brush SOP’s Strength parameter. |
Reduce gaps between grain/fluid particles |
By default, points are only displaced as long as you're drawing strokes. If you want to keep the points moving after finishing a stroke, increase Post Drag Frames. This parameter lets you adjust how many frames are solved after finishing the drag. As a result, the particles have more time to settle and gaps are minimized. |
Pin points |
|
Control forces |
The Forces section on the Vellum Brush SOP has parameters for turning on Gravity and adjusting other forces like Static Friction. The Live Simulation checkbox turns on the brush’s simulation mode and its effect on the points depends on Simulation Mode. Normally, you don’t have to worry about this toggle, because it’s turned on and off automatically when you change from Damped to Settle and vice versa.
With grains and fluids, you normally brush the particles in Damped mode with Live Simulation turned on. Then you switch to Settle and stop the points' motion with Damped. You can repeat this process until you get the desired result. |
Improve simulation quality |
The Vellum Brush SOP’s Quality section is responsible for simulation quality. In Settle mode, the simulation requires more Substeps, but less iterations. When you change modes, the ideal number of steps and constraints is automatically adjusted. If you think you need more precision, increase Substeps. In this case you can also decrease iterations. Especially with fluids, it’s necessary to use at least To get an adequate number of iterations, divide the values by the number of substeps. For example, if you need |
Work with self collisions and collision objects |
|
Post-process your results |
The
|
Brush other types of Vellum constraints |
The workflows presented above are also valid for hair or balloons. Replace the cloth and grain/fluid constraints node through a |