| On this page |

In Houdini there are several methods to design feathers. These methods are covered in the chapters of the Drawing an shaping section and used to shape individual feathers. Techniques, that are typically used for close-ups or certain feather types like decorative plumes and down.
It is, however, very unlikely that all feathers of a bird (or any other character) have exactly the same look. There are always differences in size, clumping, barb length, and other characteristics. In this example, the starting point is a basic feather template without splits, clumps, etc. You can add all the relevant details later to randomize the instances and give them a unique look. All the feathers in the image above originate from a single feather template.
The approach, presented here, is a fast and convenient after-groom method. You can randomize large amounts of feathers with just a few nodes. Be aware that this method only works with condensed feathers! If you're template or atlas contains uncondensed feathers, you need a Feather Match Uncondensed SOP to recreate the condensed state.
Note
The following workflow guide is based on the network (see below) of the previous Interpolation and deintersecting chapter.

From surface to barbs 
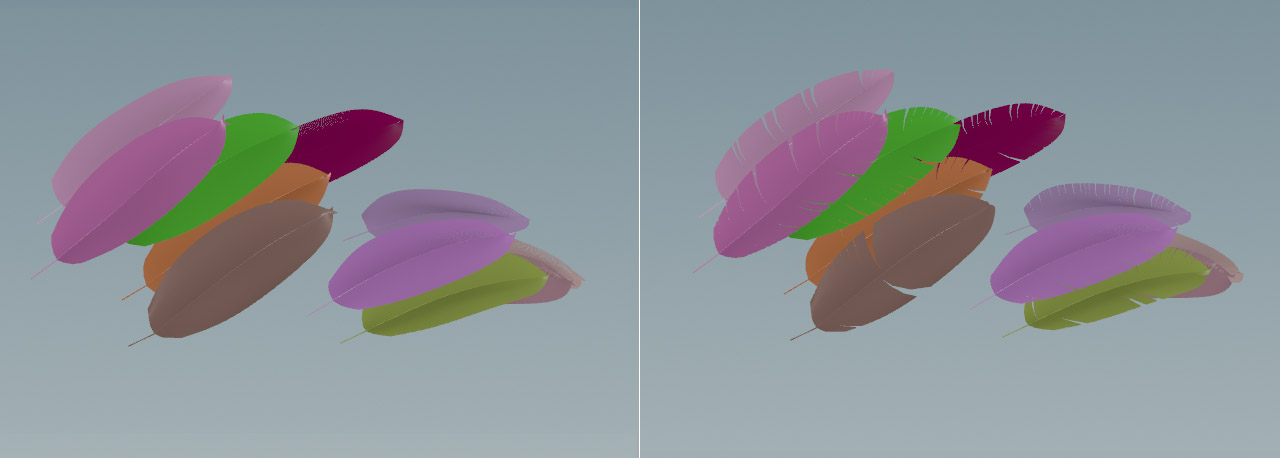
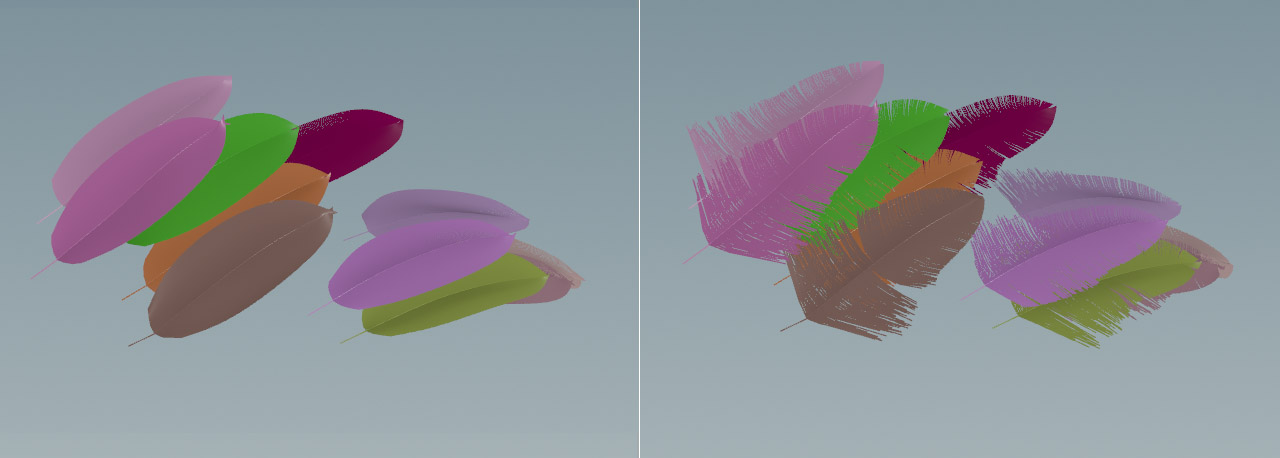
The feathers are still displayed as polygon surfaces, but you need to visualize the barbs if you want to see the details. In the network graph above, the last node is a ![]() Feather Deintersect DOP. Start here.
Feather Deintersect DOP. Start here.
Note
To give you a better idea of how the different nodes change the feather’s look, you’ll only see a subset of the entire groom. The actual groom consists of several thousands of feathers.
-
Add another
 Feather Visualize SOP and connect its first input with the first output of the upstream
  Feather Deintersect SOP.
 -
From the Barb Mode dropdown menu, choose Curve.
Resampling to render resolution 
You might have decreased the feather template’s initial Barb Density for performance reasons. In this case it’s necessary to increase the number of barbs to render resolution. If you're already working at full resolution, you can skip this chapter.
-
Add a Feather Resample SOP and connect its first input with the output of the Delete SOP.
-
Go to the Shaft section and turn on Resample Shaft.
-
Switch Mode to Length.
-
Drag the Maximum Length slider to the left to increase the number of barbs. If the slider’s resolution isn’t fine enough, enter a value. It’s likely that you have to work with very small numbers like
0.00025.
Splits and clumps 
On real feathers, splits and clumps occur when the tiny hooks on the barbs are torn apart. These hooks are called barbules and they're not represented in Houdini’s feather system. Anyway, it’s possible to mimic their influence and create clumps procedurally. You most probably did that already, when you're following the Feather clumping tutorial. The workflow, described here, is basically the same. The main difference is that now everything happens on an entire groom, not just one or a couple of feathers.
-
Add an
 Attribute Noise SOP and connect its input with the first output of the upstream Feather Visualize SOP (if you're using a Feather Resample SOP, then this will be the node for the connection).
 -
Go to the General section and look for Attribute Names. Change the type from Vector to Float, and replace
Cdbysplitfreq. This attribute is noise-driven and defines the distances between the splits. Noise cares for a natural distribution. -
On the Noise Value section, change Operation to Set. This will set the maximum value for
splitfreqto Amplitude. In this case, Amplitude is1, so the highest possible frequency will also be1. -
Lay down a
Feather Clump SOP and connect its first input with the output of the Attribute Noise SOP. -
Go to the Splits section and change the dropdown next to Frequency from No Override to Guide Attribute. You will notice a Frequency Attribute parameter with a
splitfreqentry. -
You can now start to adjust Frequency. What you get looks more like a fern rather than a feather. Most probably you need very high values of
400or even more. -
With increased Jitter you can add more randomness to the splits.
The split points are still very close to the shaft. There are certainly feather types, where this look is wanted, but here splits shouldn’t be too deep.
-
On the the Clumping section, decrease Amount with the slider. You will see how that splits points are pushed towards the feather’s boundaries.
Here’s a possible results compared to the original feather.
Bending 
This step lets you bend the barbs.
-
Add a
 Guide Process SOP and connect its first input with the first output of the Feather Clump SOP.
 -
On the Operations tab, set Operation to Bend. The second dropdown’s default entry is Curves. There, choose Feather Barbs. Now you can also differentiate between left and right barbs through the buttons.
-
You can try also try different Mode options. With Direction Constant you can most probably achieve the best results, because you're able to set a Direction value.
-
To control the bending of the barbs, change Angle. This parameters accepts both positive and negative values. With a decent amount of Random Angle you can also avoid a uniform look.

Length variations 
Maybe you've also noticed that the Guide Process SOP provides a wide range of Operation modes. Not every option is suited for feathers, but Set Length is definitely something you might want to try.
-
Add another Guide Process SOP and connect its first input with the first output of the upstream Guide Process SOP.
-
From the Operation dropdown menus, choose Set Length and Feather Barbs.
-
Turn on Randomize.
-
Use Min Length and Max Length to randomize the barbs and create frayed boundaries. Most probably you’ll need very small values.
The result of the Set Length operation isn’t very appealing, so it’s better to apply a mask and limit the effect to the bottom of the feathers.

Masking 
As you can see in the image above, a mask is particularly useful for the Set Length mode to avoid intersecting barbs at the feather’s tip.
-
Open the last Guide Process SOP’s Masking tab and turn on Use Curve Mask.
-
The Curve Mask Ramp lets you interactively control the mask’s influence. It might happen that you have to click
 Reverse Domain to mirror the curve.
 -
Use the ramp sliders to control the masks size, for example when you drag the right slider to the left, the mask will only act on the feather’s base barbs.
The effect in the image below is exaggerated to give you a better idea of the mask’s influence.
Randomizing atlas feathers 
On the Feather clumping and Guide processing and noise pages you've learned how to add detail to a single feather. Nothing speaks again applying the clumping and guide processing nodes to a complete feather atlas or its subsets before the grooming process.
All you have to do is to connect the ![]() Feather Template from Shape SOPs (our the last nodes of the condensed network) through a
Feather Template from Shape SOPs (our the last nodes of the condensed network) through a ![]() Merge SOP. Then you add a
Merge SOP. Then you add a ![]() Feather Clump SOP, for example, and link its first input to the merge node’s output.
Feather Clump SOP, for example, and link its first input to the merge node’s output.
You can add split and clumps to all connected feathers and control their distribution through a single node. It’s also possible to “stack” multiple clumps, e.g. if there’s already a Feather Clump applied to a certain feather. Then you can also apply another clump node after the merge.
You can also use ![]() Guide Process SOP and
Guide Process SOP and ![]() Feather Noise SOP nodes, and they work in the exact same way as the Feather Clump SOP.
Feather Noise SOP nodes, and they work in the exact same way as the Feather Clump SOP.
