| On this page |
You put a lot of work in the creation of realistic feather and a sophisticated groom. Now you want to render your masterpiece, of course. Houdini’s feather system is tightly connected to Solaris and the Karma CPU and XPU render engines. The centerpiece of the rendering workflow is the ![]() Houdini Feather Procedural LOP. Houdini Procedurals are a renderer-agnostic mechanism to create or modify primitives on the stage at render time. The main idea behind procedurals, however, is to use low-res geometry and turn it into high-res geometry at render time.
Houdini Feather Procedural LOP. Houdini Procedurals are a renderer-agnostic mechanism to create or modify primitives on the stage at render time. The main idea behind procedurals, however, is to use low-res geometry and turn it into high-res geometry at render time.
The procedural is perfectly suited for animation and complete grooms, but sometimes you want to render stills or just a few individual feathers. In this case you should import an uncondensed version of your feather to Solaris and do the rendering without the Houdini Feather Procedurals.
Tip
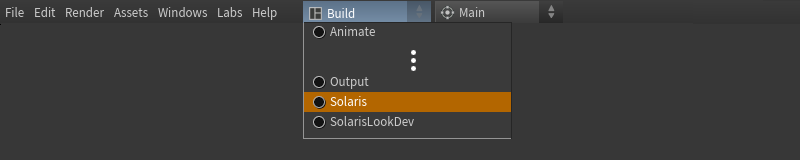
Before you start to create your render network, we recommend changing Houdini’s desktop.
-
From the main menu bar, open the first dropdown menu and choose Solaris or Solaris LookDev. It’s important to have access to the Scene Graph tree, where you can see the scene’s primitives and their hierarchy.
Importing the groom 
The first step is to import the groom to the Solaris stage. The stage is one of Houdini’s fundamental networks like obj or mat. The stage is also your bridge to USD and Karma. Here’s the complete procedural network.

-
On the stage level, press ⇥ Tab to open the tab menu. From there, choose the Component Builder tool. This tool creates a network of five nodes.
-
Select the
 Component Geometry LOP. From the Source dropdown, choose External SOP Network.
 -
On the Default/Render parameter, click the
 Open floating operator chooser icon. A floating panel appears where all nodes are listed in a tree. Navigate to the node that contains the groom’s rest state.
In the previous chapters of this documentation we recommended to terminate your networks with
 Null SOPs and apply meaningful names in capitals like
 GROOM, etc. This will help you to quickly find the right output.When you look at the Scene Graph tree, you can see that the node created an
/ASSET/geo/shapeentry. You can also see that the Primitive Type ofshapeis BasicCurves, This means that the virtual barbs are already converted into real geometry. And the guides appear in the viewport as curves.
-
Add a
 Primitive LOP and place it between Component Geometry and Component Material LOP to connect it. This node creates another primitive with the path and name you enter on Primitive Paths.
The idea behind this node might not be immediately obvious, because it basically creates a copy of the already existing curves. This copy will only provide the most basic attributes that are required by the Houdini Feather Procedural. So, you’ll get a more resource-friendly version.
-
Go to Primitive Path and enter
ASSET/geo/groom. The new primitive will also appear in the Scene Graph tree. -
Right now, the Primitive Type is set to Xform. Choose BasicCurves instead.
-
Select the
 Component Output LOP. This node assembles all primitives and materials for rendering.
The only change you have to make is on the Component Options section. Go to Root Prim and enter
/ASSETto maintain the original scene path.Here you can also save your groom to an USD file. To do this go to the Caching section and define Name, File Name and Location. Then press Save to Disk.
Material 
A basic material is necessary to see the feathers. For the component network you can’t use common methods like the ![]() Material Linker LOP.
Material Linker LOP.
-
Select the
 Component Material LOP. You can now see a new entry in the Scene Graph tree:
 ASSET/mtl. -
Go to Primitives and drag the
groomprimitive from the Scene Graph tree to this parameter. This primitive is the one you've created with the Primitive LOP.Depending on the names in your network, you will see the complete path. Here, the path is
/ASSET/geo/groom.
The Component Material would already be enough to give you a first impression of the feathers, but in most cases you want to apply a shader with a texture. This is how the viewport should currently look.

Shader 
Shaders strongly depend on personal preferences or production requirements. Therefore, you’ll only learn how to connect a shader. You can read more about building shaders in the Karma User Guide.
-
Double-click the
 Material Library LOP to dive inside. There, open the tab menu and choose the Karma Material Builder tool.
 -
Also double-click the new
karmamaterialnode to dive inside. -
Put down a
 Karma Hair VOP or
  Karma Fur VOP and connect the shader’s
 surfaceoutput to thesurfaceinput of the Subnet Output VOP.
 -
Make your adjustments and load textures through a
 MtlX Image VOP to complete the shader. Then return to the stage level.
 -
Select the library node again and go to Material Path Prefix. Enter
/ASSET/mtl. This is the path that was created by the Component Material LOP and it’s the place where the shader should live. -
On Material VOP, enter
karmamaterial- the subnetwork for your shader. -
You can find the Material Path in the Scene Graph tree.
If you're using a Karma Fur shader, you will see a
kma_fur1entry. Drag the entry to the input field. The complete path should now be/ASSET/mtl/karmamaterial/kma_fur1. -
Finally, select the Component Material LOP again. Go to the node’s own Material Path and reuse the path from the library:
/ASSET/mtl/karmamaterial/kma_fur1
You have to follow a couple of steps to establish a connection between feathers and shader, but in most cases you can drag the paths/elements from the Scene Graph tree to the nodes. Here’s a schematic node card that shows all paths.

The render procedural 
You have imported the geometry and you can see the guides in the viewport. To finally create the feathers, you need the procedural.
-
Add a Houdini Feather Procedural LOP and connect its input with the output of the upstream component node.
-
Go to Procedural Prim and drag the
groomprimitive from the Scene Graph tree to this parameter. This is the same workflow as for the Component Material LOP. The path is now/ASSET/geo/groom. -
The Groom Rest parameter will keep the path to the
shapeentry - the curves you've imported through the Component Geometry LOP. Dragshapeto the input field. In this example, the full path is/ASSET/geo/shape.
The preview procedural 
To finally see the feathers in the viewport you need another node and a basic material definition. The preview procedural is not mandatory. When you add a light source and a camera, you're actually ready to render your groom. However, in most cases you certainly want to have an idea of how your artwork looks before you send it to Karma.
-
Lay down a
 Preview Houdini Procedural LOP and connect its input with the output of the render procedural.
 -
Turn on its blue Display/Render flag to make the feathers appear in the viewport. Depending on the complexity of your groom it might take a few moments until you can see the feathers.
Light, camera, render settings 
To make things work correctly, you also need a light source and a camera, as well render settings.
-
Add a light source, for example an Environment Light LOP and connect its input with the output of the preview procedural. Environment lights let load HDR textures fro image-based lighting.
-
On the viewport, use the Alt + LMB, Alt + MMB and Alt + RMB combinations to rotate, pan and zoom. Once you've found a good perspective, go to the Viewport Options menu and change No Cam to New Camera.
This action creates a new
 Camera LOP and connects it to the light source.
 -
Finally, open the tab menu again and choose the Karma tool. This tool adds a
 Karma Render Properties LOP and an
  USD Render OUT. Connect the first input of the render settings node to the output of the camera.
The properties node lets you make adjustments like image resolution, motion blur or denoising. On the render node you define the frame range. Press one of the Render to … buttons to start the rendering process.
Viewport rendering 
You can also render the viewport to get a preview of the final scene, e.g. for look development, and to get a general impression of your shaders and textures.
On the viewport’s upper right corner you can see a small dropdown with Persp as default. Open the menu and choose Karma CPU, for example to render the viewport. Any other render delegate will appear here as well. With Karma XPU it might take a while until the Optix GPU engine kicks in, because it has to compile all shaders first. Please also consider that feather rendering might require a lot of memory.
Of course, you can choose any other available render delegate, but you might see something like this: Warning: settings/viewport engine mismatch. This message tells you that the results from Karma CPU and XPU are different. So, what you're seeing in the viewport with Karma XPU won’t be the same as in the final render with Karma CPU and vice versa.
Here’s a screenshot showing the viewport.
