| On this page |
Feathers aren’t static objects, but living entities with lots of dynamic properties. The shaft of many feather types is rigid, while the barbs are elastic, but held together through tiny hooks. Fluffy down, however, behave almost like hair and their shafts are also flexible. And, of course, you have countless transition forms.
Houdini’s feather system is capable of simulating some of the effects listed above. Anyway, it’s not possible to simulate the interactions between individual barbs that you can see with real feathers. In Houdini, the feather is simulated as a whole and the barbs follow the motion of the shaft/feather’s body. This approach creates a very realistic impression already as you can see in the video below. Adding dynamics to potentially hundreds of millions of barbs, however, is extremely challenging.
All simulation work is performed by Houdini’s versatile Vellum solver. This system lets you create believable wind, gravity and turbulence effects. Feather simulations in Houdini take a couple of steps.
-
In a first step you resample the feathers to create a resource-friendly proxy.
-
This proxy is then converted into a surface to make it work with the Vellum solver.
-
The feather’s shaft must be separated, because it acts like an anchor to pin the feather to the character’s body.
-
Convert the feather into a Vellum cloth object.
-
The Vellum solver adds forces to the feathers and simulates their dynamic behavior.
-
Finally, the simulated surface is used to deform the original feather.
Here’s a preview of the simulation network you’ll be creating. Note that all workflows, presented here, are just one method to perform simulations. Of course you can apply our own techniques and use wrangles instead point selections.

Single feather simulation 
To understand the basic idea of the workflow, described above, start with a single feather. Later you will learn how to use this method qith a complete feather atlas.
-
On the obj level, press ⇥ Tab to open the tab menu. From there, add a
 Geometry OBJ. Double-click the node to dive inside.
 -
Open the tab menu again and choose the Feather Template entry. This tool creates a network with three nodes and draws a complete feather. The feather will be the basis for the simulation.
-
Go to Resolution ▸ Barb Density and increase the value to
500to get more barbs. -
Terminate the network stream with a
 Null SOP and rename it to
 FEATHERGEO.
Resampling and conversion 
The idea is to create a low-res version of the feather to speed up the simulation. Later you’ll transfer the motion from the proxy to the high-res feather.
-
Add a
 Feather Resample SOP to decrease the number of barbs for the proxy. Connect its first input with the output of the
 FEATHERGEOnull. -
Turn on all three Resample toggles.
-
For Shaft ▸ Segments, enter
12. The actual number depends on the feather’s, but values between10and20should work in many cases. -
To turn the “skeleton” into a surface, put down a
Feather Surface SOP. Connect its first input with the first output of the resample node. -
When you turn on the surface node’s blue Display/Render flag, you’ll see an enlarged shaft. To fix this, open the Surface section and decrease Shaft Width, e.g. to
0.005. -
Now, open the Output Groups tab and turn on Create Shaft Group.
The
shaftgroup’s points will remain static during the simulation and so you must separate them from the rest of the feather.
Tip
The Feather Surface SOP is not only interesting for simulations, but also for previewing your groom and evaluating the overall impression of the character’s feathering.
Remeshing (optional) 
The remeshing process is optional. For highly detailed feathers, however, remeshing can improve your results, because you can define the simulation’s level of detail.
-
Put down a
 Remesh SOP and connect its first input with the first output of the surface node. Remeshing does not only convert the surface’s quads into triangles, you can also use it to control the number of triangles.
 -
Right now, the mesh’s resolution is very coarse. To get a denser mesh, go to Element Sizing and set Target Size to
0.04. You can change this value if you need more or less resolution for the Vellum simulation.With smaller settings you get more polygons and more accurate simulation results. The flip side is that the simulation can take significantly longer.

The shaft 
The shaft is of particular importance, because it will act like an anchor to hold the feather in place. Currently, the shaft group is a primitive group. However, for the Vellum simulation you need points. In this step you add the points to the shaft group.
Note
If you don’t need fixed points, for example if you want to simulate the motion of a single feather in the wind, you can skip this chapter.
-
Add a
 Group Promote SOP and connect its input with the output of the remesh node.
 -
For Group Name and New Name, enter
shaft.When you open the Geometry Spreadsheet pane, you can see entries with an orange label. A closer look reveals that these points now belong to
group:shaft. -
To complete this part of the network, lay down a
 Group Expand SOP and connect its input with the output of the promote node. The idea behind this node is add some barb points to the shaft group. This will care for a more smoother and more realistic behavior. This node is optional, but it’s a convenient method add new points without having to chage the original point selection.
 -
Use the Steps parameter to control the expansion of the
shaftgroup. Higher values add more points to the group.
For demonstration purposes and a better impression of the points in the image, the Remesh SOP’s Target Size was decreased to 0.02.

Vellum Solver 
The feather surface is simulated as a sheet of cloth. If you're not familiar with Vellum, we recommend reading the Vellum Cloth chapters for more information.
-
From the tab menu, add a Vellum Configure Cloth tool. This helper creates a preconfigured
 Vellum Conatraints SOP. Connect its first input with the output of the Group Expand SOP. If you don’t need static shaft points, connect the node to the output of the Remesh SOP.
 -
If you want the shaft to be static, go to the Pin to Animation section. For Pin Points. enter
shaft- the group with the shaft’s points. Otherwise proceed with the default settings. -
Lay down a
 Vellum Solver SOP. Connect its three inputs with the three outputs of the constrains node. Start with the default settings on the Solver tab. If you observe problems like instabilities or intersecting polygons, increase Substeps and Constraint Iterations. The simulation will take longer, but it’ll also be more accurate.
Forces 
The solver has some built-in forces on the Forces tab, but sometimes you can’t achieve the desired effect. To create noisy turbulence, for example, double-click the solver node to dive inside. There you can see a FORCE output.
-
Add a
 POP Force DOP and connect its output to the
 FORCEnode’s input. Instead of the POP Force node you can also use a POP Wind DOP. This node combines noise and wind.
 -
On the Noise tab you’ll find a wide range of parameter to control the force. With Amplitude you can define the force’s strength.
-
Return to the solver level.

Caching 
Simulations should be cached to reuse them, free system resources and guarantee smooth playback. For Vellum simulations there’s a specific node that lets you store all relevant data automatically.
-
Add a
 Vellum I/O SOP and connect its three input with the three outputs of the solver.
 -
If you don’t want to use the Constructed file path, consisting of Base Name and Base Folder, you can specify an Explicit path. In both cases, click the
 Open floating file chooser button. Then, choose the folder where you want to save the simulation data.
 -
Once you've defined path and file, go to the Caching tab and click Save to Disk. Houdini will go through the frame range you can set on the Sequence section. The node will also turn on the Load from Disk option.
Motion transfer 
The last step transfers the simulation data to the high-res feather. For this process you need a total of three input sources.
-
Add a
Feather Deform SOP. -
To transfer the data, connect the
-
first input with the output of the Feather Template from Shape SOP to get the high-res feather
-
fourth input with the first output of the Vellum Constraints SOP to read out the surface rest position
-
fifth input with the first output of the Vellum I/O SOP for the motion data.
-
-
From the transfer node’s Deformer Type dropdown, choose Surfaces.
-
On the playbar, click the
 Play button to see the motion of the high-res feather.
 -
Terminate your network with a
Null SOP. You should also apply a name, e.g. FEATHERGEO_SIM.
With enough resolution and appropriate settings it’s possible to achieve convincing animations with a high level of detail.
Single feather animation 
It’s not always necessary to perform a complete simulation through Vellum. Sometimes you can also use procedural animation methods to quickly achieve results. The advantage with this approach is that doesn’t differ very much from the simulation method presented above. The basic workflow is the same: you create a surface from a resampled feather, add the animation, and transfer the motion back to the high-res version.
Here’s the network you're going to create. Lets assume that you have created a feather and turned it into a low-res surface already.

-
The shaft should remain static and you have to separate it from the vanes. Select the Feather Surface SOP and open the Output Groups section. Turn on Create Shaft Group to create the
shaftprimitive group. -
To turn the primitive group into a points group, add a Group Promote SOP and connect its input with the first output of the surface node.
-
For both Group Name and New Name enter
shaft. -
Put down a
 Group Invert SOP and conenct its input with the output of the Group Promote SOP.
With Group Invert you select the points of the feather’s vanes. The reason why you need this node is that the Vellum solver provides a Pin Point option, where you can just add the point group you want to remain static. This approach doesn’t have such an option and you must define an explicit group for the vanes.
-
On the invert node, set Group Name to
shaft, while the New Name will bevanes.
Noise deformation 
Noise is a perfect method to mimic the influence of wind. Instead of a physically correct Vellum simulation, you're going to use a “hack” to create a turbulent behavior. However, if you need gravity or combinations of different forces, Vellum is the only solution to achieve believable results.
-
Add an
 Attribute Noise SOP and connect its input with the output of the invert node.
 -
On the General section, go to Group and enter
vanes. -
For Attribute Names, replace the default
Cdentry withPto modify the feather’s point positions. -
On the Noise Value section you can find an Amplitude parameter to control the strength of the displacement effect. Start with a value around
0.05or less. -
Open the Noise Pattern section and decrease Element Size to get more structure.
-
Finally turn on Animation and expand the section. With Pulse Duration it’s possible to control the speed of the noise displacement.
Motion transfer 
This last step transfers the motion from the low-res surface to the original feather.
-
Add a Feather Deform SOP.
-
From the Deformer Type submenu, choose Surfaces.
-
To transfer the data, connect the
-
first input with the output of the
FEATHERGEOnull to get the high-res feather -
fourth input with the output of the Feather Surface to read out the its rest position
-
fifth input with the output of the Attribute Noise SOP for the motion data.
-
-
On the playbar, click the
Play button to see the motion of the high-res feather.
Groom simulation 
The previous chapters describe how to simulate a single feather, but in many cases you’ll add wind or turbulence to an entire groom.
Note
If you have followed the descriptions from Single feather simulation, you can reuse this network without changes.
This setup in this example is a mixture of the basic scattering project and the simulation method described on this page. The main difference to the single feather approach is that you're working with a complete groom, where a larger amount of instanced feathers is distributed over an object. Here you’ll learn how to connect feather, groom and simulation networks.
The scatter groom is described here for your convenience, so you don’t have to jump to the appropriate chapter page.
-
For the groom, add an object of your choice, e.g. a
 Sphere SOP.
 -
Set Uniform Scale to
0.5. -
Lay down a
 Hair Generate SOP and connect its first input with the sphere’s output.
 -
For Distribution ▸ Total Count, enter a value of
1000. This parameter control the number of feathers on the object. -
Go to the Unguided Hairs section and set Length to
0.25to create longer feathers. -
A
 Guide Tangent Space SOP is required to align the feathers along the base object’s (character’s) normals. Connect the node’s first input with the hair generator’s first output.
Template interpolation 
The Hair Generate SOP scatters points, indicating where the feathers appear and creates “proxies”, showing the feathers' length and orientation. A ![]() Feather Template Interpolate SOP brings feather template and scattering data together.
Feather Template Interpolate SOP brings feather template and scattering data together.
-
Add a Feather Template Interpolate SOP and connect its first input with the output of the tangent space node. The fourth input is connected to the Feather Template from Shape’s output.
-
Go to the Templates section. From te Lookup Method dropdown, choose Group. Since you're dealing with just on feather type here, you don’t have to specify a Template Group. If the feather is part of an atlas, you have to define a name like
@name==body. -
Turn on the interpolate node’s blue Display/Render flag to see the feathers.
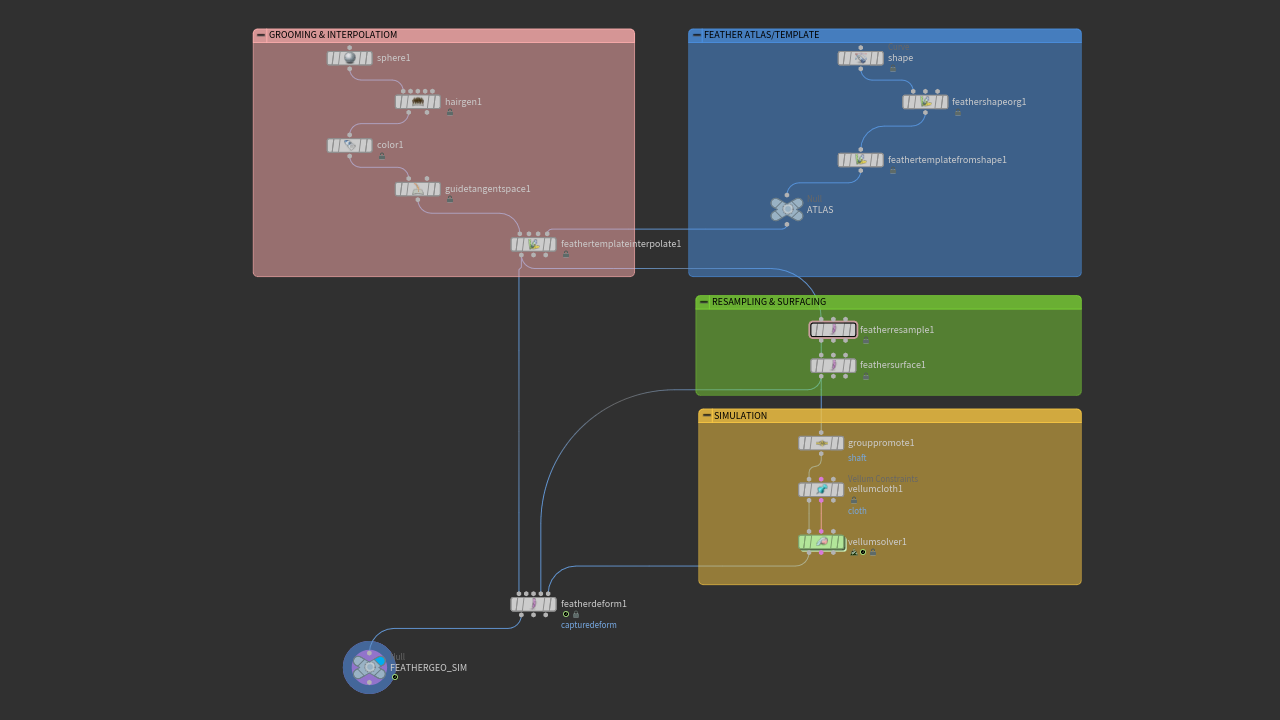
Connect the networks 
Now you can connect the groom with the simulation network.
-
Connect the first output of the Feather Template Interpolate SOP with the first input of the Feather Resample SOP.
That’s already everything you have to do! Even the shaft group will be promoted to points correctly and the resulting points are still pinned. You can start to simulate by clicking the ![]() Play button. Of course, it’s again possible to save the simulation through the Vellum I/O SOP.
Play button. Of course, it’s again possible to save the simulation through the Vellum I/O SOP.
Here’s the result of the workshop with gravity, noise and wind forces. The feathers were colored to separate them visually.