See visualizers for more information.
Parameters 
Style
Determines the style of visualization.
Shows attribute values as a label next to each element.
Element index
Shows each element’s index number as a label next to the element.
Draws a line from the element’s location to the point contained in an attribute value. For example, visualizing the contents of a rest attribute would draw lines from the current point positions to their rest positions.
Draws a line from the point based on a vector attribute value’s direction and length.
Same as “vector trail” but draws the line gradient in the opposite direction.
Draws a small set of axes at each element to visualize a matrix or quaternion attribute.
The attribute must have either:
-
Nine (or more) components, in which case components 0-2, 3-5, and 6-8 are treated as the first, second, and third vector.
or -
Four components, in which case it is treated as a quaternion.
Class
Whether to visualize a point, primitive, vertex, or detail attribute.
Common parameters 
Radius
When Visibility is “Near pointer”, Houdini projects a ray under the mouse pointer to the closest point, then displays markers on elements within this world space distance of that point.
Group
The geometry to visualize on. This can be a group name or a space separated list of group names and/or component numbers. You can use expressions such as 10-30:3 to specify every third component from 10-30. See groups for more information.
Attribute
Name of the attribute to visualize.
Visibility
When the attribute is drawn in the viewport for each element.
Always Visible
Draw the marker on every element. If the geometry has a large number of densely-packed elements, you may want to use one of the other options to reduce clutter.
Only on Selection
Only draw the markers on the selected elements.
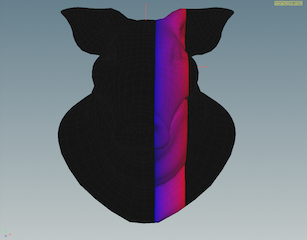
Near Pointer
Only draw markers on elements within a certain (world space) distance of the point under the mouse pointer. It projects a ray under the cursor onto the closest geometry, finds the (X,Y,Z) world space point of that intersection, then shows markers whose anchors are within that distance in 3D space. It should give you a small circular window effect.
Under Pointer
Only draw marker on the single element the mouse pointer is on.
Group
Only draw makers on elements of a group given by a group expression.
Text/Element index 
Text Color
The color of the labels.
Font Size
The size of the labels. “Guide font size” uses the size set on the Guides tab of the viewport display options window.
Point trail 
Marker Color
Color of the points drawn at the attribute positions.
Trail Color
Color of the lines from the current position to the attribute positions. You can use the color’s alpha channel to make the lines semi-transparent.
Point Size
Radius of the point markers.
Vector/Vector trail 
Length Scale
Allows you to scale the lines length up or down. This lets you make long lines shorter to reduce clutter, or make short lines longer to be more visible.
Normalize vectors
Normalize the values to the 0-1 range for display.
Show Arrow Tips
Draw a small barb at the end of each line.
Coloring
Color all quills using the same color.
Color the quills according to the vector values.
Color the quills using the value of another attribute.
Fixed color 
Marker Color
Color of the lines drawn from the element based on the attribute vector.
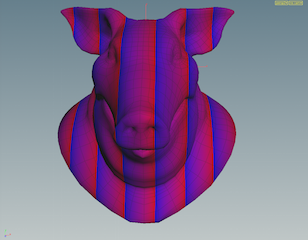
Vector values/vector directions 
Color mapping
How to display scalar data as colors. Choose a preset color ramp, or choose “Custom” to get a ramp control.
Range
To map attribute values onto the ramp, Houdini needs to know the full range of possible values so it can scale that range onto the range of the ramp.
Auto
Looks at the actual values of the attribute in the visualized geometry and picks the minimum and maximum.
Min and Max
Allows you to manually specify min and max values. This can be useful when there’s a “natural” range of values larger than what’s currently in the geometry. You can also use a narrower range than what’s currently in the geometry as a way of highlighting values outside the range (see the Out of range values parameter).
Center and Width
Like Min and Max, except you specify a center value and the width of the range around that value.
Out of Range Values
How to color values outside the given range, when Range is “Min and Max” or “Center and Width”.
Roll Cyclically
Color the value as if the ramp repeated endlessly forward and backward.
Black Out
Color out of range values black.
Clamp to Edge Values
Use the first color in the ramp for values less than the range, and the last color in the ramp for values greater than the range.

Treat As Scalar
Convert vector attribute types (with more than one component) to a single value. This enables a menu for choosing how to convert the values.
Using
How to convert multi-component values to a single number, when Treat as scalar is on.
Component
Pick one of the components.
Component Abs.
Pick one of the components, and use its absolute value.
Component Sum
Sum up the component values.
Component Abs. Sum
Sum up the absolute values of the components.
Length
Use the length of the vector.
Length Squared
Use the square of the length of the vector.
Dot Product
Use the dot product of the vector with a given vector. This may be useful for measuring deviance from a certain direction.
Other attribute 
Attribute
Name of the attribute to visualize.
See above for the other settings.
Axes Style 
X Color
Color of the first vector.
Y Color
Color of the second vector.
Z Color
Color of the third vector.
Show Arrow Tips
Draw a small barb at the end of each axis line.