This pane allows you to build rigged HDAs. You can create simple single control rigs for layout assets such as houses/props or more complex character rigs with the use of a series of modules. The modules are added to the interface by clicking their icon, loading from file, loading from an existing HDA, or from a preset.
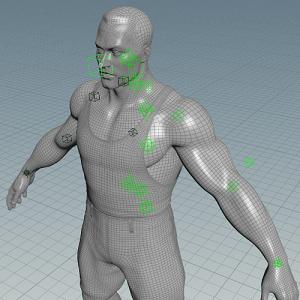
The Autorig System contains various modules for biped rigging. Each the these modules contains a set of guide objects that you can position within your mesh to determine the location of the final rig elements. Additionally, each module has various options and settings to determine the features of the final rig.
Using the Autorigs panel 
-
Open the Autorigs panel in the Python Panel:
-
Click the
 New Tab icon at the top of a pane, and choose New Pane Tab Type ▸ Misc ▸ Python Panel.
 -
In the drop-down menu at the top of the Python Panel, choose Object Autorigs (Deprecated).
-
-
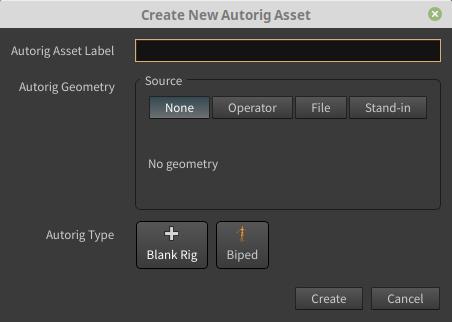
Click the New Autorig Asset button to open the Create New Autorig Asset popup.
-
In the Create New Autorig Asset popup:
-
Provide a label for the Autorig Asset. This is not the name of the asset you will build but the name of the Autorig setup your asset will be built from.
-
Select your Rig Geometry Source. This can be None, Operator, File, or Standin. Selecting Standin will create a box on the origin. The geometry can be changed or added later in the HDA Settings.
-
Choose the Autorig Type. This can be a Blank Rig or Biped.
-
-
Click Create when finished.
This will instantiate an Autorigs HDA in your scene that contains: an HDA called 'Root' which is a 'master module', this stores the settings for the master module, a
master_node_guide,stand_in, andgeo_skinnodes, which are all internal placeholders and should not be edited maually - the Autorigs are edited using the Autorigs python panel.In the python panel a new tab will be created, named with the label specified in the Create New Autorig Asset popup. All assets will contain a master module. In its options, you can set a custom label which will appear within the circle. You can also change the size, color, and position of the master node.
Tip
To review or edit the HDA settings, you can click the
 menu at the top of the asset tab.
 -
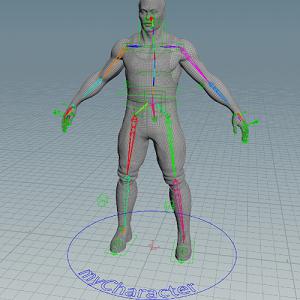
Use the Biped, or Import Preset options on the Presets tab, or build your own rig using the biped modules. For this example, we will build a rig using the modules on the Biped Modules tab.
Clicking on the
 Spine button will add this module to your asset in the viewport. You will see a series of guide objects which can be moved into place to define the shape of the spine.
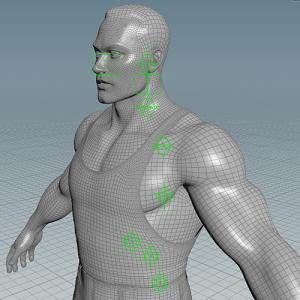
-
Continue for each module.


 \
\Tip
Turn on
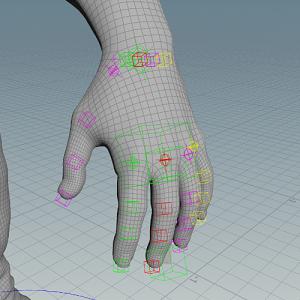
 Interior Snapping in the viewport which will snap to the center of the geometry under the cursor. This is especially useful when setting up the fingers in the hand module.
Each of the modules has an HDA that contains the Options and Parameters that define the features and behavior of the rig part produced by the module, these parameters are displayed within the Autorigs panel. You will need to select a parent for each of the modules using the dropdown menu. For example, the parent for the spine should be the
master_node_guide, the parent for the head should be theSPINE_TOP_HOOK, the parent for the legs should be theSPINE_BASE_HOOK, etc.Note
The Arm, Leg, Hand, and Foot modules have options for mirroring. This will display a mirror copy of the current module’s guide objects. They are not selectable or editable as their positions are determined by the main guide objects.
Note
The Hand and Foot modules have options to choose between a Glove/Boot type and a Fingers/Toes type. The Fingers and Toes types allow you to choose the number of fingers or toes you rig will have and if you want a thumb or big toe.
Warning
There is a hard limit of up to 99 fingers or toes. However, building an asset with this many fingers/toes is not recommended.
-
Click File > Save and save the settings into the HDA, file on disk, or a different HDA.
Tip
You can save individual modules to reuse on other characters by clicking
 → Export.
 -
Click Generate Rig to build the asset.
You will be given the chance to Cancel the rig generation process.
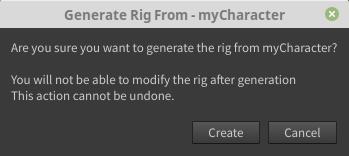
Clicking Create will show a dialog where the following options will be provided:
In this dialog you will
-
Give your asset a name - this is the assset TYPE.
-
Give your asset a Label.
-
Choose to use a custom Control Label ( optional ).
-
Determine where the asset should be saved - either within the hip file or a location on disk.
-
Choose a custom icon ( optional ).
-
Choose how you'd like your geometry to be captured. By default, this is Biharmonic.
-
Decide if you'd like to display the deform SOP. This if off by default, turning this option on can increase the time needed to build the rigged asset as the geometry will need to be captured.

Building the rig will do the following
-
A new custom HDA will be created based on the settings you have used.
-
The current settings will be saved with this new HDA.
-
If a custom name has been added to the master node, it will be saved as a geometry section into the HDA.
-
The specified geometry will be added to a geometry node according to the settings.
-
Each module will build the rig elements needed for that part.
-
The asset will be saved and locked.
-
You will be presented with an info dialog with the asset Name, Type and location.

-
The Autorig panel will return to the editing interface, this will allow you to create another unique asset based on the same or adjusted settings.
-