| On this page |
Pose Library Interface 
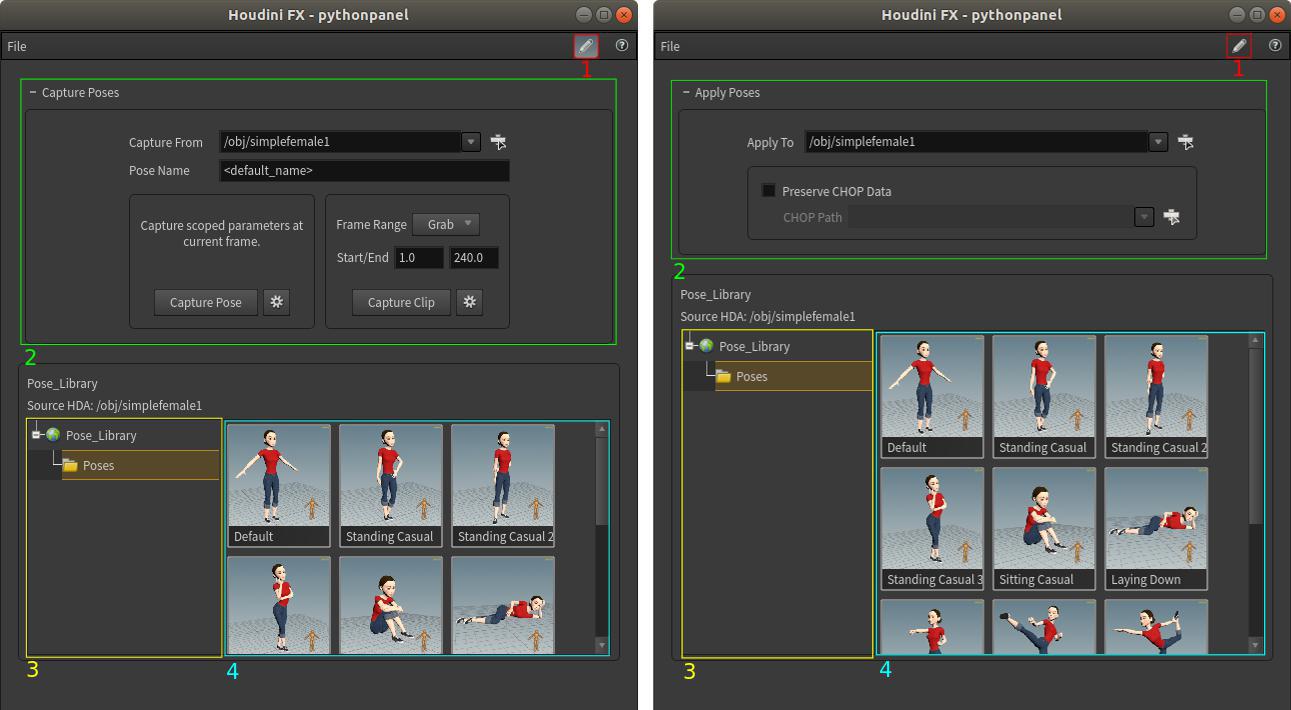
The Pose Library interface consists of several components.
-
The
 Edit mode button allows you to toggle between controls for capturing poses and clips and controls for applying the selected pose or clip to a character rig.
 -
The Capture Poses / Apply Poses controls are used to specify the character rig to operate on as well as options for capturing or applying poses. The Capture Pose Controls can be shown or hidden using the
 and
and  button next to the control title. By default the controls are visible.
 -
The treeview sidebar displays the folder hierarchy in the current library. You can right-click in the tree view and select View ▸ Show Folders and Items to see a hierarchical view of both folders and items in the current library. Selecting a folder in the treeview shows the poses and clips in the selected folder in the current folder view.
-
The current folder view displays poses and clips in the currently selected folder of the treeview. You can switch between a grid view and a list view of the poses and clips by right-clicking an item or empty space in the current folder view and selecting the desired option from the View menu.
Right-clicking in the current folder view shows a context menu containing the View menu for the current folder view. This menu lists options for configuring how the poses and clips are displayed in the current folder view. The Zoom In, Zoom Out, and Default Zoom menu items can be selected to set the zoom factor.
Starting a new Pose Library setup 
| To... | Do this |
|---|---|
|
Create a new pose library |
Note You can store the pose library in a directory or as part of a Houdini Digital Asset. |
|
Open an existing pose library |
Click File ▸ Open From and choose a menu option to select the pose library to open. Alternatively, you can open a recently opened pose library by selecting one of the File ▸ Open Recent Library menu options. |
|
Access controls for capturing poses and clips |
Turn on Edit mode by clicking the |
|
Access controls for applying the selected pose or clip to a character rig. |
Turn off Edit mode by clicking the |
|
Select the character rig to operate on |
Click the Alternatively, you can type the node name into the character text field, or drag it in from the Network Editor. Note A history of the selected characters is maintained in the drop down menu next to the character text field. |
Capturing Poses and Clips 
Before capturing a pose or clip, ensure that Edit mode is enabled and the character to capture from is specified in the Capture From field.
| To... | Do this |
|---|---|
|
Capture a pose |
|
|
Capture a sequence of frames |
Note If the frame values are the same, a pose will be captured at the specified frame. |
|
Capture all parameters |
In the By default, the pose library only saves the scoped parameters within the specified frame range. By checking this box, you may choose to instead capture all of the parameters on the selected character. |
|
Create a thumbnail for your captured pose or clip |
Make sure the Create Thumbnail checkbox is turned on in the By default, the thumbnails will only show the selected character. You can optionally create thumbnails that show all objects visible in the viewport by turning on the Include All Objects in Thumbnail checkbox before capturing the pose or clip. Tip You can optionally store an animated thumbnail with the captured clip by turning on the Animate Thumbnail checkbox. The animated thumbnail will play back the clip when the mouse is hovered over it. Otherwise, a still image will be used. |
|
Bake keyframes to a clip file |
Turn on the Bake Clip checkbox in the If the Binary checkbox is on, the clip will be saved as a binary clip file ( If the Blosc compression checkbox is on, the clip will be saved using blosc compression ( You can also enter a Sample frequency to determine how often a keyframe is created. A value of 1.0 will bake a keyframe every frame, whereas a value of 2.0 will bake a keyframe every other frame. Warning Baking out keyframes to a clip file does not preserve keyframe information. When baking out keyframes, the parameters for the character are evaluated once every frame (or a different interval depending on the Sample frequency setting). On the other hand, when Bake Clip is off, keyframes are preserved on the character, which allows for easy editing at a later time. Tip As a general rule, you should leave Bake Clip off while you are creating and editing the animation, and you should bake out to clip when the animation is ready. A benefit of baking out keyframes is that it can save on disk space usage and library loading times since saving to a |
Note
If the animation is driven by CHOPs, set the Channel > Channel Range parameter to Use Full Animation Range for each node in the CHOP network. This will guarantee that the full animation is captured. Only a single frame may be captured if the parameter is set to Use Current Frame.
Not all CHOP nodes have the Channel Range parameter.
When capturing, the pose library will first check the selected character for scoped parameters by default. If any are found, the captured pose will only contain values for the scoped parameters within the specified frame range. If no parameters are scoped all of the auto-scoped parameters will be captured instead. However, if the Capture all Parameters checkbox is checked, the pose library will capture all parameters on the selected character.
For a pose, the pose library will check for keyframe definitions at the current frame. If a parameter does not have a keyframe, the parameter is evaluated at the frame and the floating point result is stored as part of the pose. If a keyframe is found for a given parameter, the entire keyframe is stored in the pose.
For clips, the pose library performs the pose process at both the start frame and end frame values. Additionally, any keyframes that lie between the start and end frame values are also included in the clip.
Note
For clips, if the Bake Clip option is enabled in the ![]() gear menu beside the Capture Clip button and there are no scoped parameters, then only the auto-scoped parameters that have animation will be captured in the clip. If none of the auto-scoped parameters have animation, the clip will not be captured.
gear menu beside the Capture Clip button and there are no scoped parameters, then only the auto-scoped parameters that have animation will be captured in the clip. If none of the auto-scoped parameters have animation, the clip will not be captured.
Editing and Deleting Poses, Clips, and Folders 
To edit poses and clips, Edit mode must be turned on.
| To... | Do this |
|---|---|
|
Rename an item or folder |
Double-click the item or folder name. You can alternatively right-click on the item and choose Rename. |
|
Reorder items and folders |
|
|
Add a folder |
Right-click an item in the treeview sidebar and choose New Folder to create a new folder. If the selected item is a pose or clip, the new folder is added to the same folder as the selected item. If the selected item is a folder, the new folder is added as a sub folder of the selected folder. |
|
Delete an item |
Right-click the item you want to delete and choose Delete. Deleting a folder deletes all poses, clips, and sub folders in the folder. |
|
Copy/Cut an item |
Right-click the item and choose Copy/Cut. |
|
Paste an item |
In the treeview sidebar, right-click the folder you want to paste the copied item in and choose Paste. To paste in the root folder, right-click the empty space at the bottom of the treeview sidebar and choose Paste. Alternatively, to paste in the currently selected folder, you can right-click empty space in the current folder view and choose Paste. Note You cannot copy an item from one library and paste it into another library. To copy an item between libraries, export the item from the source library, and import it into the destination library. |
|
Change the pose thumbnail with an image file |
Right-click on the pose and choose Change Thumbnail ▸ From File… Supported image file formats:
Note The image file resolution should be 250×250. If it is not, the image will be scaled to 250×250. If the image doesn’t have a square resolution, the image will be cropped from the center. |
|
Change the pose thumbnail with an image from the viewport |
Tip By default, the new thumbnail will only show the selected character. You can optionally create a thumbnail that shows all objects visible in the viewport by turning on the Include All Objects in Thumbnail checkbox before capturing the viewport. |
Applying a Pose 
Make sure Edit mode is turned off and click a pose or clip to apply it to the selected character. If the clicked item is a pose, the parameters in the character rig will be set to match the stored values in the pose at the current playbar frame. If the clicked item is a clip, it will be applied starting at the current frame and ending at current frame + (clip_end - clip_start). Pressing ⌃ Ctrl + Z after applying a pose will undo the pose.
What happens when applying a pose depends on both the character rig and the way the pose was captured. If the captured pose defines a keyframe for a parameter, when the pose is applied that keyframe and its associated value will always be applied to the rig at the target frame. If the pose only contains a floating point value for a parameter and the character does not have any keyframes defined for the parameter, the parameter will simply be set to the floating point value and no keyframe will be created. If the pose contains a floating point parameter value and the rig does have a keyframe set on the parameter, the value will be committed to the existing keyframe.
If the Bake Clip option was off (in the ![]() gear menu beside the Capture Clip button) when the clip was captured and the captured clip data was from a CHOP network, the behavior of applying the clip depends on the Preserve CHOP Data parameter.
gear menu beside the Capture Clip button) when the clip was captured and the captured clip data was from a CHOP network, the behavior of applying the clip depends on the Preserve CHOP Data parameter.
When the parameter is checked, a new CHOP node is created to store the original CHOP sample data. The target parameter is then configured to load animation from the CHOP node. You can specify where the CHOP node is created by editing the CHOP Path parameter. If Preserve CHOP Data is unchecked, the sample data is converted into keyframes which are applied to the target parameter.
If the captured clip data was not from a CHOP network or the Bake Clip option was on when the clip was captured, the Preserve CHOP Data parameter is ignored and the clip is loaded as keyframes.
Note
You can apply poses to characters whose node types do not match those of the character from which the poses were captured. The pose library will skip any missing or invalid parameters when applying the pose.
Blending a Pose 
In addition to applying a pose, you can also blend a pose with the character rig’s current state. This is done by ⌃ Ctrl + ![]() clicking and dragging on a pose in the library. When the blend slider is at 0%, the character rig retains its existing pose. When the slider reaches 100%, the character rig’s pose is set to the selected pose. For any value in between, the character rig and selected pose are linearly blended. The resulting blend of poses is shown in the viewport and applied when ⌃ Ctrl +
clicking and dragging on a pose in the library. When the blend slider is at 0%, the character rig retains its existing pose. When the slider reaches 100%, the character rig’s pose is set to the selected pose. For any value in between, the character rig and selected pose are linearly blended. The resulting blend of poses is shown in the viewport and applied when ⌃ Ctrl + ![]() is released.
is released.
Tip
Pressing ⌃ Ctrl + Z after releasing ⌃ Ctrl + ![]() will undo the blending operation.
will undo the blending operation.
Note
Currently, rotation parameters in the pose are not converted to quaternions and thus are not blended with slerp(). Rotations are treated in the same way as all other floating point parameters and blended linearly based on component values. This limitation may be improved in the future.
Saving and Loading 
To save the state of the pose library, use File ▸ Save. To save the pose library to a different location use File ▸ Save As. Poses can be stored in a directory containing pose library .json files and pose data or as part of a Houdini Digital Asset. Both methods will preserve the state of the pose tabs, icons, and ordering. The Save menu option will save the poses to whichever directory or HDA they were originally loaded from.
Like saving, poses can also be loaded from either a directory containing pose library .json files and pose data or an HDA. Select an option from the File ▸ Open From menu to load poses. The pose library will prompt to save any unsaved changes in the current library before loading poses from the selected library and clearing the current library.
Exporting and Importing 
To export a pose or clip, right-click on the item and select one of the Export menu options. Individual poses can be exported as .json files or as part of a Houdini Digital Asset. Additionally, clips can be exported to a clip file in any of the supported clip formats (.clip, .bclip, .bclip.sc) by changing the file extension of the destination file in the Export to Clip File dialog.
If the selected file exists, or if the selected HDA already has a pose library, you will be asked to confirm whether you wish to overwrite the existing file or pose library.
To import poses into the current library, select File ▸ Import. Poses can be imported from .json files, any of the supported clip formats, or from Houdini Digital Assets.
Note
Importing poses will add the loaded poses into the currently selected folder (the folder shown in the folder view).