| Example for | |
| Example |
If you cluster point source geometry with a changing number of points, the clusters and cluster numbers can change randomly at each frame and you’ll get strange results. To prevent this, you must use a couple of tricks to create the clusters based on the final number of points, and only create the clusters that are needed.
First, connect the second input of the Cluster Points node to specify a set of point positions at which the ![]() Cluster Points node should cluster the points. This is called the rest position.
Cluster Points node should cluster the points. This is called the rest position.
For example, the ![]() Impact analysis tool creates points from RBD object collisions. The number of points in the resulting geometry increases as more RBD objects collide.
Impact analysis tool creates points from RBD object collisions. The number of points in the resulting geometry increases as more RBD objects collide.
-
Cache the impact points geometry to disk using a
 ROP Output driver and
  File node combination.
(The example file may not cache to disk for the sake of simplicity.)
-
Branch a
 Timeshift node from the File node, and connect the output of the Timeshift to the Cluster Points node’s second (rest position) input.
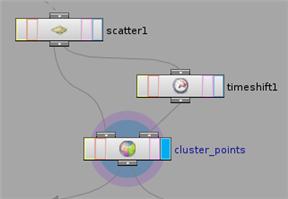
-
Set the Timeshift node’s Frame parameter to the frame you want to cluster at, usually the last frame of the effect. You can use the
$NFRAMESvariable, which always contains the number of the last frame in the scene.
Second, to create the smoke boxes only as they're needed you must turn on
Continuous on the ![]() Smoke Object node. This will
create a new smoke box on each instance point at every frame. To work
around this so the boxes only get created at the frame where the cluster
center appears, the example file uses a For Each SOP
to delete every cluster center at every frame except the frame where it
first appears.
Smoke Object node. This will
create a new smoke box on each instance point at every frame. To work
around this so the boxes only get created at the frame where the cluster
center appears, the example file uses a For Each SOP
to delete every cluster center at every frame except the frame where it
first appears.
See also how to make scattered points stick for how to make scattered point positions and numbers consistent across frames on deforming geometry.