| On this page |
APEX Script can be used to create and customize interfaces for graph inputs (parameters). Using APEX Script, you can specify the parameters to hide and disable on the interface, add drop-down menus containing tags, attributes, and control shapes, and organize parameters into multiparms and folders.
Configuring parameters 
In the BindInput() function, the preset_kwargs keyword argument can be used to configure the following interface properties of a parameter:
preset_kwargs |
Type |
Description |
|---|---|---|
disable_when |
String |
Disables the parameter based on the values of another parameter. |
hide_when |
String |
Hides the parameter based on the values of another parameter. |
joins_with_next |
Int |
If set to |
label |
String |
Creates a label for the parameter. |
prompt_text |
String |
Adds text to the string parameter field that hints at what to do with the string. |
In this example, we configure various parameters using the preset_kwargs argument:
-
On an
 APEX Script SOP, put the following code in the Snippet parameter:
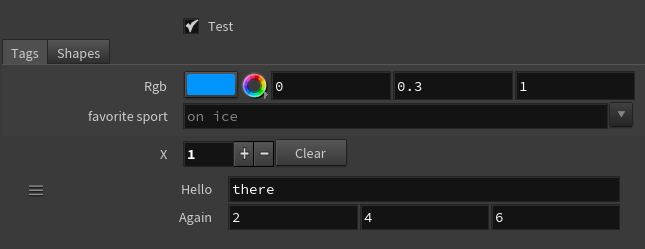
# Inputs of different types a: Int = BindInput(2) b: Vector4 = BindInput((1, 2, 3, 4)) c: String = BindInput('hello') # Rename the label on a string parameter and # add prompt text in the string field d: String = BindInput('', preset_kwargs={'label':'favorite sport', 'prompt_text':'on ice'}) # Put two parameters on the same line e: Int = bindInput(1, preset_kwargs={'joins_with_next':1}) f: Int = bindInput(1) -
Click the
 Reload Setup Parms button. The inputs appear in the parameter editor as parameters you can adjust:
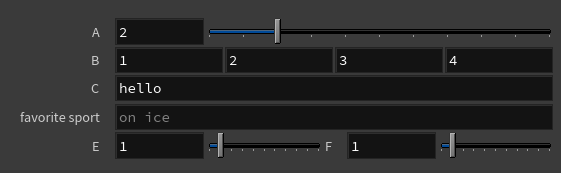
-
Hide and disable parameters:
g: Bool = BindInput(False)

# Hide this parameter when 'g' is turned off
h: Int = BindInput(1, preset_kwargs={'hide_when':'{g == 0}'})

# Disable this parameter when 'h' is set to '1'
i: Int = BindInput(1, preset_kwargs={'disable_when':'{h == 1}'})
Presets 
In the BindInput() function, you can use the preset keyword argument to specify the type of parameter you want to create. Some of the presets have additional options that can be set using the preset_kwargs keyword. The available presets are:
Color 
The color preset creates a color parameter for a vector (Vector3 or Vector4). For a Vector3, the color is RGB. For a Vector4, it’s RGBA.
There are no preset_kwargs for this preset.
Example 
On an APEX Script SOP, put the following code in the Snippet parameter:
a: Vector3 = BindInput((0, 0.3, 1), preset='color')
Click the ![]() Reload Setup Parms button to update the parameter interface:
Reload Setup Parms button to update the parameter interface:

Menu 
The menu preset creates an ordered drop-down menu, where the items and labels can be customized. The menu preset is available for integer parameters.
The menu preset has the following preset_kwargs:
preset_kwargs |
Type |
Description |
|---|---|---|
menu_items |
List |
The names of the menu items. |
menu_labels |
List of strings |
The labels for the menu items. If |
Example 
On an APEX Script SOP, put the following code in the Snippet parameter:
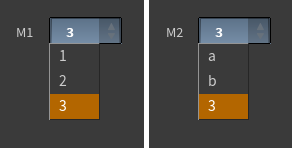
m1: Int = BindInput(2,
    preset='menu',
    preset_kwargs={'menu_items':[1, 2, 3]})

m2: Int = BindInput(2,
    preset='menu',
    preset_kwargs={'menu_items':[1, 2, 3],
                   'menu_labels':['a', 'b']})
Click the ![]() Reload Setup Parms button to update the parameter interface:
Reload Setup Parms button to update the parameter interface:
VEX 
The vex preset creates a multiline VEX string. It is available for string parameters.
There are no preset_kwargs for this preset.
Example 
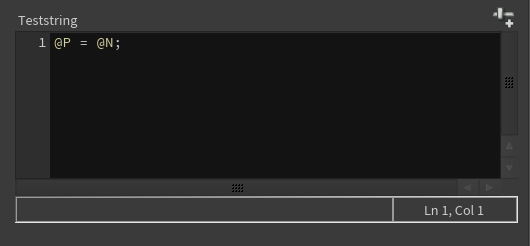
On an APEX Script SOP, put the following code in the Snippet parameter:
teststring: String = BindInput('@P = @N;', preset='vex')Click the ![]() Reload Setup Parms button to update the parameter interface:
Reload Setup Parms button to update the parameter interface:
Python 
The python preset creates a multiline Python string. It is available for string parameters.
There are no preset_kwargs for this preset.
Example 
On an APEX Script SOP, put the following code in the Snippet parameter:
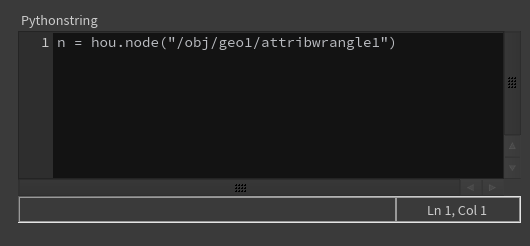
pythonstring: String = BindInput(
    'n = hou.node("/obj/geo1/attribwrangle1")',
    preset='python')
Click the ![]() Reload Setup Parms button to update the parameter interface:
Reload Setup Parms button to update the parameter interface:
Control shapes 
The controlshapes preset creates a drop-down menu of the available control shapes on an unpacked character. The control shapes preset is available for string parameters.
There are no preset_kwargs for this preset.
Example 
To add a drop-down menu of control shapes for the ![]() Electra test geometry:
Electra test geometry:
-
On the Electra test geometry SOP, set Output to APEX Character.
-
Connect the 1st output of the Electra SOP to an APEX Script SOP.
-
On the APEX Script SOP, put the following code in the Snippet parameter:
a: String = BindInput('', preset='controlshapes') -
Click the
Reload Setup Parms button to update the parameter interface.
Tags 
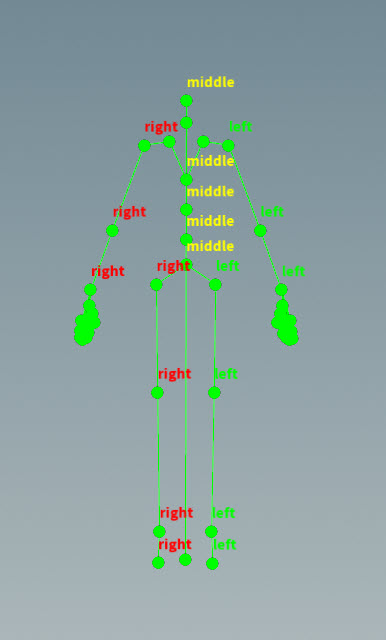
The tags preset creates a drop-down menu of the available tags on a geometry, and is available for string parameters. Tags can be found on both skeletons and graphs.
The tags preset has the following preset_kwargs:
preset_kwargs |
Type |
Description |
|---|---|---|
path |
String |
The path to a geometry. If |
usepattern |
Bool |
If set to True, adds a “ |
Example 
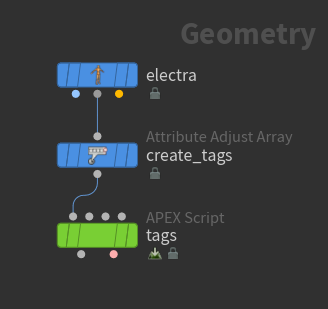
In this example, we first add tags to the ![]() Electra test geometry using an
Electra test geometry using an ![]() Attribute Adjust Array SOP:
Attribute Adjust Array SOP:
On the APEX Script SOP, put the following code in the Snippet parameter:
t1: String = BindInput(
    '',
    preset='tags',
    preset_kwargs={'path':'', 'prompt_text':'side'})

t2: String = BindInput(
    '',
    preset='tags',
    preset_kwargs={'path':'', 'usepattern':False})
Click the ![]() Reload Setup Parms button to update the parameter interface:
Reload Setup Parms button to update the parameter interface:
Attributes 
The attrib preset creates a drop-down menu that lists the attributes of a specific type (for example, string) and class (for example, primitive). The attribute preset is available for string parameters.
The attrib preset has the following preset_kwargs:
preset_kwargs |
Type |
Description |
|---|---|---|
path |
String |
The path to a geometry. If |
attrib_type |
String |
The attribute type, for example, |
attrib_class |
String |
The attribute class - the valid options are |
Example 
In this example, we add a string attribute (tags) and an integer attribute to the ![]() Electra test geometry:
Electra test geometry:
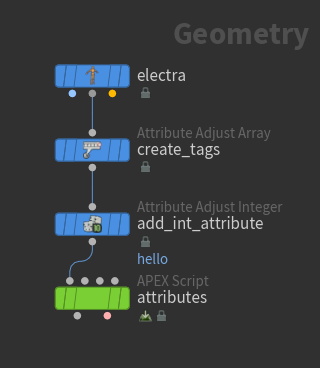
-
Add tags using an
 Attribute Adjust Array SOP.
 -
Add an integer detail attribute using an
 Attribute Adjust Integer SOP:
-
Set Attribute Name to
hello. -
Set Attribute Class to Detail.
-
-
On the APEX Script SOP, put the following code in the Snippet parameter:
string_attrib: String = BindInput( '*', preset='attrib', preset_kwargs={'path': '', 'attrib_type': 'String'}) int_detail_attrib: String = BindInput( '*', preset='attrib', preset_kwargs={'path': '', 'attrib_type': 'Int', 'attrib_class': 'detail'}) -
Click the
Reload Setup Parms button. The updated parameter interface has the following menu items:Parameter
Menu items
Attribute From
string_attrib
name, tags
The
nameattribute is from the Electra SOP, and thetagsattribute is created by the Attribute Adjust Array SOP.int_detail_attrib
hello
The
helloattribute is created by the Attribute Adjust Integer SOP.
Adding parameters to folders 
You can use the addToFolder() function to organize parameters into folders. The syntax for addToFolder() is:
addToFolder(<folder_name>, <list_of_inputs>, [foldertype=<folder_type>, parent=<parent_folder>])
Argument |
Type |
Description |
|---|---|---|
folder_name |
String |
The name of the folder. Note Spaces in the folder name are not supported. |
list_of_inputs |
List of variables |
A list of bound variables (variables declared with the |
folder_type |
String |
(Optional) The type of folder to create. The valid options are |
parent_folder |
String |
(Optional) The folder hierarchy path to put the |
Example 
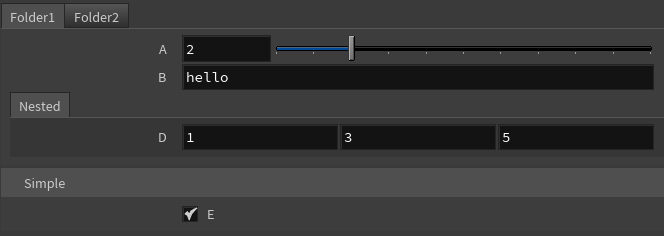
On an APEX Script SOP, put the following code in the Snippet parameter:
a: Int = BindInput(2)

b: String = BindInput('hello')

c: Float = BindInput(3.5)

d: Vector3 = BindInput((1,3,5))

e: Bool = BindInput(True)

addToFolder('Folder1', [a, b])

addToFolder('Folder2', [c])

addToFolder('Nested', [d], parent='Folder1')

addToFolder('Simple', [e], foldertype='folder_simple')
Click the ![]() Reload Setup Parms button to update the parameter interface:
Reload Setup Parms button to update the parameter interface:
If the folders in the parent argument don’t exist, they will be created:
good: Bool = BindInput(True)

addToFolder('Bottom', [good], parent='Top/Mid')
Multiparms 
To add a multiparm to a parameter interface:
-
Use the
bindMultiparm()function to create a new multiparm.bindMultiparm()does not require any arguments. -
Use the
addToMultiparm()function to add elements to the multiparm. The syntax foraddToMultiparm()is:addToMultiparm(<multiparm>, <variable_name>, <default_value>, [preset=<preset>, preset_kwargs=<preset_kwargs>])
Argument |
Type |
Description |
|---|---|---|
multiparm |
Variable |
The multiparm variable created with |
variable_name |
String |
The name of the variable to add to the multiparm. |
default_value |
Any |
The default value to set for the added element. |
preset |
String |
(Optional) A preset for the variable. |
preset_kwargs |
Dictionary |
(Optional) You can use any of the |
Example 
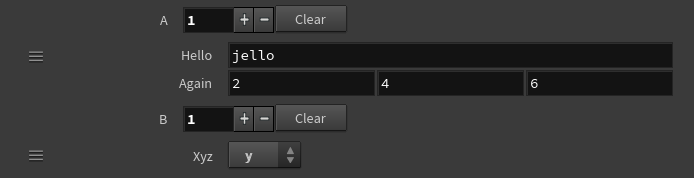
On an APEX Script SOP, put the following code in the Snippet parameter:
a = bindMultiparm()
b = bindMultiparm()

addToMultiparm(a, 'hello', 'jello')

addToMultiparm(a, 'again', (2,4,6))

addToMultiparm(b, 'xyz', 1,
    preset='menu',
    preset_kwargs={'menu_items':['x','y','z']})
Click the ![]() Reload Setup Parms button to update the parameter interface:
Reload Setup Parms button to update the parameter interface:
Note
Multiparms are dictionary arrays. To fetch the vector, again, from the above multiparm:
v: Vector3 = a[0]['again#']