| On this page |
|
The plug-in supports various types of Inputs to send data from Unreal to the Houdini Assets. Any changes made to the inputs will be automatically pushed to the Houdini Asset, causing it to be evaluated and its output recooked.
Currently, Houdini Engine for Unreal supports the following input types:
In version 2, input types do not restrict the type of object/data that an input can send to Houdini. For example, a World Input can now send landscapes to Houdini, or can select and connect other Houdini Asset Actors like an Asset Input would.
These are the type of objects that are currently supported by the plugin’s inputs:
-
Static Mesh
-
Static Mesh Components
-
Instanced Static Mesh Component
-
BSP Brushes
-
Houdini Spline Components (Curve IN)
-
Unreal Spline Components
-
Landscape
-
Foliage
-
Data Tables
-
Actors
-
Houdini Asset Actors
Creating Inputs 
There are two ways you can use to create an input to send data from Unreal to Houdini.
This can be acheived either by using regular Node Inputs for SOP-type assets, or by creating Object Path Inputs in the Operator Path parameter on your asset.
Node Inputs 
By design, SOPs have nodes connectors for passing geometries. This allows SOP type assets to also have node connectors for inputting geometries. Those inputs can be configured by changing the Minimum Inputs and Maximum Inputs values in the Operator Type Properties dialog of the assets.
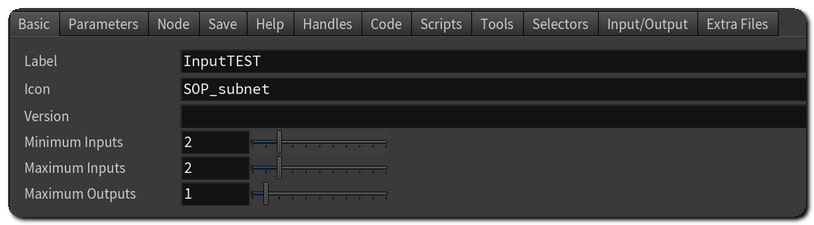
All inputs created in this way will be listed in the Input Details Panel, and their names can be changed in the Input/Output tab of the Operator Type Properties dialog.
Object Path Inputs 
Object Path Inputs are created from Operator Path parameters that accepts a path to a Houdini node. In order to input geometry, the Op Filter needs to be set either to Any Object or Any SOP. When geometry is assigned to this parameter, Houdini Engine will create the appropriate Houdini nodes that will represent the input geometry. The asset can then use these nodes to access the geometry.
Although the Operator Path parameter can be created manually, the simplest way to create one is to create an Object Merge SOP and expose its Object (objpath) parameter to the asset level. The geometry can then be accessed from the output of the Object Merge SOP, and will appear in unreal as an Input in the Parameter Details Panel

These parameters will appear mixed with the asset’s other parameters in the details panel, as parameters are just a regular type of parameters, but they will have the same behavior as Node Inputs.
They can be used for both Object-type assets and SOP-type assets to input geometry, but it is more common to use Node Inputs connections directly for SOP-type assets. Unlike Node Inputs, it is not possible to set the Keep World Transform option on Object Path inputs.
For more details, see Operator Path Parameters .
Setting A Default Input Type 
By default, the input type will be set to geometry when you instantiate the HDA in Unreal.
You can set a different default input type by modifying the input name (for SOP inputs) or object path parameter label (for Object Path Inputs) so that it contains certain keywords:
-
if the name contains curve, the default input type will be a Curve Inputs
-
if the name contains landscape, terrain or heightfield the default input type will be a Landscape Inputs
-
if the name contains world or outliner the default input type will be a World Outliner Inputs
-
if the name contains asset or hda, the default input type will be an Asset Inputs
-
if none of the above condition is met, the default input type will be a Geometry Inputs
The default input type can be changed afterwards and will only be used on the first instantiation of the HDA.
Input Details Panel 
If your asset has Node Inputs, the Houdini Inputs part of details panel of the asset will list them all in an Array. You can change Input Types by using the dropdown menu. The details panel will then update and allow you to modify this input type’s options and parameters.
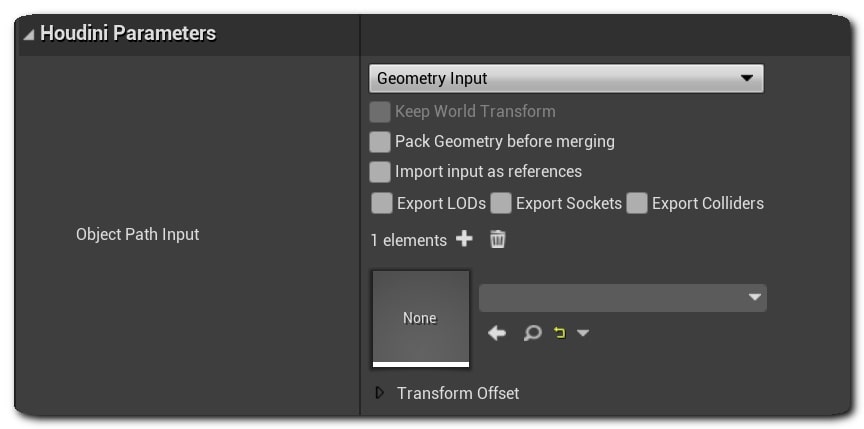
If your input is an Object Path Inputs, its details, options and parameters will be listed in the same way in the Houdini Parameters part of the details panel.

Keep World Transform 
The Keep World Transform checkbox is present for all input types, and controls the way the geometry / asset’s transform is marshalled from Unreal to Houdini.
When geometry is marshalled to Houdini through an input, an Object Merge node is used to connect the asset and the geometry. For Node Inputs, the Object Merge node is automatically created by Houdini engine, and set up in the same way that an object merge is used for Object Path Inputs.
-
If
Keep World Transformis checked, the Object Merge used to connect the input will have its Transform parameter set toINTO_THIS_OBJECT, causing the marshalled geometry to use the Asset Actor’s Unreal Transform in Houdini. -
If unchecked, the Object Merge's Transform parameter will be set to
NONE, causing the geometry to ignore the Asset Actor’s Unreal Transform in Houdini, treating the geometry as if it’s at the origin.
To sum things up, if an asset actor is located at (10, 10, 10) in Unreal, the geometry’s Transform will be (10, 10, 10) in Houdini if Keep World Transform is checked, or (0, 0, 0) if Keep World Transform is unchecked.
Pack Geometry Before Merging 
The Pack Geometry Before Merging checkbox is available for geometry and world outliner inputs.
When checked, all the different meshes and objects in the input will be packed individually before being merged into your asset’s input. This allow you to have each object available as a packed primitive in Houdini, making instancing and differentiating objects easier, but can cause some issues depending on the way your hda is set up ( for example, scattering points on a packed primitive will not work correctly ).
Import input as reference 
When checked, the input geometry will not be created in Houdini, but instead will be replaced by a point, with the “unreal_instance” attribute set to the source asset’s path.
Using this option is useful in a situation where you don’t need to send the full geometry to Houdini since this can be an expensive operation. One such scenario is if you want to create an HDA to randomly scatter multiple instances of the input geometry in a certain area.
Add rot/scale to input references 
If the input has @ref InputsImportAsReference Import input as reference enabled, then when this is checked, the point representing the geometry will have two float vector attributes called rot for rotation and scale for scale. rot has 4 elements while “scale” has 3 elements. They will be the values used by the Transform data on the corresponding Unreal objects.
Having this enabled is useful when you want your HDA to take in information about the orientation and scale of the input, without having to pay the price of sending the actual input geometry to Houdini.
Add bounding box min/max to input references 
If the input has Import input as reference enabled, the point representing the geometry will have two float vector attributes called unreal_bbox_min and unreal_bbox_max. These two vectors will each have 3 elements. They will denote the positions of two vertices in the axis-aligned bouding box of the input.
Having this enabled is useful when you want your HDA to take in information about the dimensions of the input, without having to pay the price of sending the actual input geometry to Houdini.
Add material to input references 
If the input has Import input as reference enabled, then when this is checked, the point representing the geometry will have string attributes that are the paths to the material assets attached to the input geometry. These attributes will be named unreal_material, unreal_material1, unreal_material2, etc.
Export LODs 
The Export LODs checkbox is available for geometry and world outliner inputs.
It will be only enabled if one of the mesh in the input has more than one LOD level, and when checked, all the LOD levels for each mesh will be marshalled to houdini, and each assign to a LOD Groups
Export Sockets 
The Export Sockets checkbox is available for geometry and world outliner inputs.
When checked, all the sockets for the asset in the input will be marshalled to houdini, and available as points in a Socket group. See Mesh Sockets for more details.
Export Colliders 
The Export Colliders checkbox is available for geometry and world outliner inputs.
When checked, the simple colliders found in the input mesh will be created in Houdini as grouped geometry, using the correspond unreal_collision_ groups.
Prefer Nanite Fallback Mesh 
The Prefer Nanite Fallback Mesh checkbox is available for geometry inputs.
When checked, if a Nanite mesh is used as geometry input, Houdini will attempt to use its fallback mesh instead of the full resolution Nanite mesh.
The default state of this setting is the same as the Prefer Nanite Fallback Mesh checkbox in the HoudiniEngine plugin settings.
Input Types 
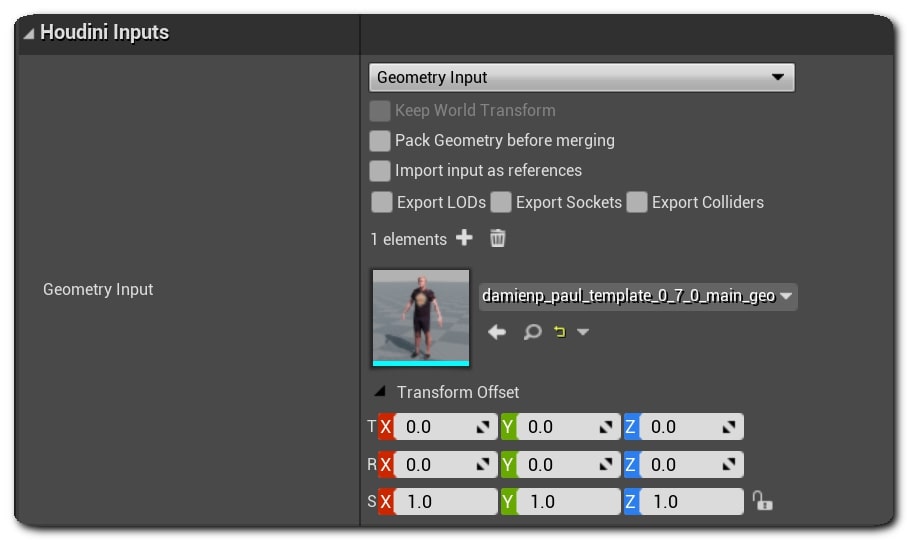
Geometry Inputs 
Geometry inputs are used to marshall data from Unreal assets (in the content browser) to Houdini. To do so, you can either drag and drop an Unreal asset from the content browser onto it, or select one from the drop down menu.
Setting |
Description |
|---|---|
Keep World Transform |
Controls the way the geometry’s transform is used in Houdini |
Export LODs |
Export all the LODs meshes found in the asset to Houdini. Each LOD mesh will be available in a separate group See Level of Details for more details |
Export Sockets |
Export all the mesh sockets found in the asset to Houdini. See Mesh Sockets for more details |
Pack Geometry before merging |
Export all the colliders found in the input mesh as grouped geometry in Houdini |
Import input as reference |
Import the selected mesh as point, with the unreal_instance attribute set to the mesh’s path |
When there is more than one geometry set as input, the geometries can be differentiated in the Digital Asset with the Unreal to Houdini attribute unreal_input_mesh_name which is created on the input geometry primitives.
You can add multiple geometry assets to the input by clicking on the + button. You can also insert, duplicate or delete geometry inputs by using the drop-down menu on the far right.

Each asset selected in a geometry input has its own Transform Offset. This transform offset allows you to translate, rotate and scale individually each asset in the input to compensate for unnormalized assets, misplaced pivot points, etc.
Unreal geometry marshalled through a Geometry Input will contain the following Unreal to Houdini attributes on their corresponding Houdini node:
-
unreal_material -
unreal_face_smoothing_mask -
unreal_lightmap_resolution -
unreal_object_path -
unreal_level_path -
unreal_actor_path -
unreal_input_mesh_name -
unreal_input_source_file
as well as these Standard Houdini Attributes:
-
Point positions
P -
Vertex normals
N -
Vertex colors
Cd -
UV sets
uv,uvX.
You can preset the default object used in a geometry input by setting the default value to a valid unreal asset reference when using Object Path Parameters inputs.
You can also import Data Tables via a Geometry input.
The data will be available in Houdini as a point cloud, with each point representing a row of the Data Table.
Each of the variables will be available as an attribute, named unreal_data_table_X_NAME, where X is the index of the variable, and NAME its name.
The unreal_data_table_rowstruct attribute is also created to indicate the Structure used by the data table, and the unreal_object_path attribute stores the path to the source Data Table asset.
If the original type for any of the properties in the Structure used by the data table are numeric, then it will be converted to an appropriate numeric type in Houdini.
The available integer types in Houdini are signed/unsigned 8 bits, signed 16 bits, signed 32 bits, and signed 64 bits. 16 bit unsigned integers are converted to 32 bit signed integers. 32 bit unsigned integers are converted to 64 bit signed integers. 64 bit unsigned integers are forcibly converted to signed 64 integers since Houdini does not have unsigned 64 bit numbers or larger integer types. This means that overflow can occur in this case.
Houdini supports both single and double precision floating point types, so any properties with a floating point type are converted directly.
The following aggregate types native to Unreal will be converted to tuples in Houdini with each component converted to a numeric type following the above rules.
-
All native vector types in the order (X, Y, Z, W)
-
Rotators in the order (Roll, Pitch, Yaw)
-
Transforms, split into three 3 component vectors
-
Colors and linear colors in the order (R, G, B, A)
Bools will be converted to signed 8 bit integers with a value of either 0 or 1.
All other property types will be converted to a string attribute in Houdini.
Note
The variable names are sanitized before being converted to attributes. Invalid character in a variable name will be replaced by underscores.
Asset Inputs 
The Asset Input type allows you to connect a Houdini Asset to the input of another Houdini Asset. This is actually more efficient than just sending the geometry created by one asset to another input, as both Assets will be directly connected in Houdini.
The actor picker will display a list of all the Houdini Assets present in the world, allowing you to select which Houdini Asset you want to connect to the input. Click on a Houdini Asset Actor in the list to use it as an input. The Houdini Asset Actor currently connected to the input will be displayed as the Current Actor on top of the Actor picker.
For now, only one Houdini Asset Actor can be connected to another via an Asset Input. If you want to connect multiple Houdini Asset Actors to a single input, you can use a World Input instead. In version 2, the Houdini assets will be directly connected in Houdini.

Setting |
Description |
|---|---|
Keep World Transform |
Controls the way the asset’s transform is used in Houdini |
Import input as reference |
Import the selected houdini asset as a point, with the |
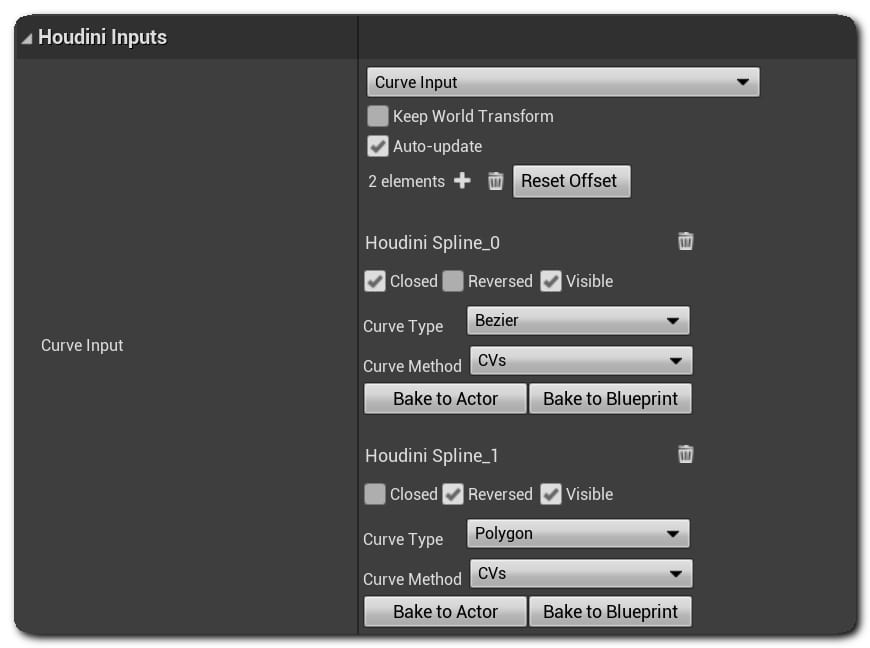
Curve Inputs 
Curve data can be marshalled from Unreal to Houdini using Curve Inputs. The details panel allows you to set up the parameters of the created Curve SOP that is connected to the input in Houdini:
Setting |
Description |
|---|---|
Curve Type |
Choose the curve type between Polygon (linear), Bezier and NURBS |
Curve Method |
Choose the way the curve’s CV are used when using either Bezier or NURBS curves. If CVs is selected, the curve point will be treated as Control Vertices, so the NURBS and Bezier curves will not pass through them. If set to Breakpoints, Houdini will automatically calculate the appropriate Control Vertices so that Bezier and NURBS curves pass through the curve’s control point. The Freehand method should be ignored in the Unreal plug-in |
Closed |
Decide if the curve’s last point should be connected to the curves first points |
Reversed |
Reverse the order of the curve’s control points, and can be usefull to invert the direction of the curve, or the winding of the curve’s polygon when closed |
Bake To Actor |
Bake the curve’s |
Bake To BP |
Bake the curve’s |
The Auto-Update checkbox, when disabled, will prevent cooks from happening when the curve is modified. This lets you easily move the control points without being interupted. Cooking can then be resumed after re-enabling the checkbox.
Curves that are sent to Houdini via Curve Inputs will have the following Standard Houdini Attributes set on their corresponding Houdini nodes:
-
Position
P -
Rotation
rot -
Scale
scale
In version 2, you have the ability to create multiple curves objects in a single input. This can be achieved by using the + button on the current input. Each added curve will be created with a slight offset on its default position from the previous one, to avoid having multiple overlapping curves. Each curve creates its own Curve SOP in Houdini, that will be merged with the other curves nodes in the input.
For more details on how to edit the curve, please see Curves
Landscape Inputs 
Landscape Inputs allow you to send landscape data to your asset’s input.
The actor picker in the Details panel displays a list of all the Landscapes present in the world, allowing you to select the one you want to use as your asset’s input. Click on a Landscape in the list to use it as an input. For now, you can only use one Landscape per input. The current selection will be displayed on top of the Actor picker.

You can choose how you want the landscape data to be exported to Houdini. Landscape can be exported as:
Export setting |
Description |
|---|---|
Heighfield |
Landscape data will be converted to a heightfield 2D volume. All landscape layers will also be added as masks to the heightfield |
Mesh |
Landscape height values will be converted to a triangulated mesh. Landscape layers will not be sent to Houdini. This is the most costing option of the 3, as more data will be sent through Houdini Engine |
Points |
Landscape data will be sent to Houdini as points. Landscape layers will not be sent to Houdini |
If Export Selected Landscape Components Only is checked, only the currently selected Landscape Components will be exported to Houdini. If unchecked, the whole landscape will be marshalled.
When exporting as Heightfield, you can use the Update Input Landscape Data option. When enabled, if the HDA outputs a heightfield that is similar in size to the input landscape, then that input landscape’s data will be updated instead of creating a new landscape actor.
When exporting to Mesh or Points, the following options are also available:
Export setting |
Description |
|---|---|
Export Landscape Materials |
The landscape’s face and hole materials will be exported to Houdini |
Export Landscape Tile UV |
The landscape’s UVs will be exported in a separate texture for each tile |
Export Landscape Normalized UVs |
The landscape’s UV values will be exported in |
Export Landscape Lighting |
The landscape’s UVs will be exported in a separate texture for each tile |
Export Landscape Normalized UVs |
The landscape’s Lightmap information will be exported to Houdini |
Export Landscape Curves |
Currently not implemented |
Recommit Landscape |
Export the landscape data again Used if the landscape’s data has changed, as Landscape Inputs do not automatically update Houdini after a change has been made to them |
Keep World Transform |
Controls the way the Landscape’s transform is used in Houdini |
Unreal landscapes marshalled through a Landscape Input will contain the following Unreal to Houdini Attributes in their corresponding Houdini Node:
-
unreal_input_mesh_name -
unreal_vertex_index -
unreal_lightmap_resolution -
unreal_lightmap_color -
unreal_material -
unreal_material_hole
as well as these Standard Houdini Attributes:
-
Point positions
P -
Point normals
N -
UV coordinates
uv
The input landscape’s Actor/Component tags are sent to houdini as primitive attributes, prefixed by unreal_uproperty_tag_, followed by the tag’s name.
World Outliner Inputs 
The World outliner inputs allow you to connect any Actor in the world to your Asset’s input.
To do so, press the Start Selection button, this will lock the details panel and allow you to select the Actors you wish to connect to your input. Once your selection is finished, just press the Use Current Selection button again. The current selection will be displayed under the button.
In Version 2, World Inputs can work in Bound Selector mode. When enabled, the selected Actors will be used as bound selectors, and will send to Houdini all the actors that are in their bounding box. In that mode the world input will display two lists, one for the bound selectors, and one for the selected actors that are sent to Houdini.
You also have the option to automatically update the bound selector. When enabled, the plugin will periodically check for new/removed actors in the bounds, and will udpate the input and recook the HDA if any change is detected.

In Version 2, World Inputs have gained the ability to support a lot more type of actors. They support regular Actors with Mesh components, Instancers, but also Landscapes, Houdini Asset Actors and BSP Brushes.
Instancers imported via a world input are be created as packed primitives, Landscape as Heightfield, and Houdini Asset Actors are directly connected in Houdini, like an Asset Input would.
World outliner inputs also allow you to use an Unreal Spline Components as a curve input in Houdini. If an Actor with a Spline Component is selected, the Spline will be converted to a Curve SOP in Houdini.
The Unreal Spline components will be resampled to linear curves, as their behavior cannot be reproduced 1:1 in Houdini. The spline’s refined positions are sent as CVs to the corresponding Curve SOP in Houdini.
The Unreal Spline Resolution parameter allows you to choose the sample length used to resample and send these points to Houdini. The default value of 50 will extract a spline point every 50 cm in Unreal and marshall it to Houdini. If set to 0, only the spline’s control point will be marshalled.
Please see Unreal Spline Components for more details.
Setting |
Description |
|---|---|
Keep World Transform |
Controls the way the geometry’s transform is used in Houdini |
Export LODs |
Export all the LODs meshes found in the asset to Houdini. Each LOD mesh will be available in a separate group See Level of Details for more details |
Export Sockets |
Export all the mesh sockets found in the asset to Houdini. See Mesh Sockets for more details |
Pack Geometry before merging |
Export all the colliders found in the input mesh as grouped geometry in Houdini |
Import input as reference |
Import the selected mesh as point, with the unreal_instance attribute set to the mesh’s path |
Unreal meshes marshalled through a World Outliner Input will contain the following Unreal to Houdini Attributes on their corresponding Houdini node:
-
unreal_material -
unreal_face_smoothing_mask -
unreal_lightmap_resolution -
unreal_input_mesh_name -
unreal_input_source_file -
unreal_actor_path
as well as these Standard Houdini Attributes:
-
Point positions
P -
Vertex normals
N -
Vertex colors
Cd -
UV sets
uv,uvX
Unreal Spline Components marshalled through a World Outliner Input will have the following Standard Houdini Attributes set on their corresponding Houdini nodes:
-
Position
P -
Rotation
rot -
Scale
scale
Primitive groups are created for the selected objects’s Actor and Component tags.
Skeletal Mesh Inputs 
Note
Skeletal mesh inputs are currently not implemented in Version 2
Similarly to Geometry Inputs, this type of input can be used to import Skeletal Mesh objects from the content browser to Houdini.
The skeletal mesh’s geometry is available in the input node, that will also contain a skeleton object subnetwork, that contains a recreation of the skeletal mesh’s skeleton.
This type of input is still experimental, so only the skeleton itself (bones and joints) are sent to Houdini, without any skinning information.
You can learn more about Skeletal mesh on its documentation page.