Houdini 20.0 Solaris Karma user guide

Karma User Guide Reducing noise

On this page

Chapters

Overview

Initial render, all samples set to 1.
Finished render, correctly-sampled.

This chapter contains strategies and workflows for reducing noise in Karma. It expands on in the concepts in sampling. This chapter discusses both Automatic and Path Traced convergence modes.

Identifying noise

When looking at a noisy render, the first task is to identify the source of the noise. Many factors can affect the perceived noise in a render, making it difficult to identify where the noise is coming from. You can add AOVs (Render Vars) to inspect the various samples and figure out where the noise is coming from.
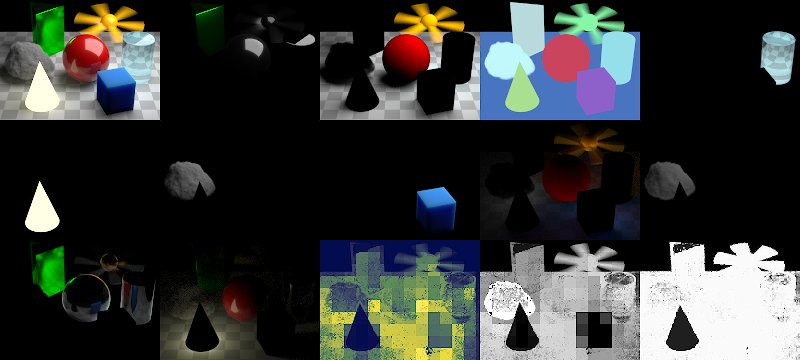
Karma Render Properties has a Quick Setup called Optimization AOVs. Applying this setup adds various AOVs which are helpful when identifying the source(s) of noise.

With these AOVs added, you can now inspect your render and identify which ray types are the source of your visible noise.

Note

Sometimes, an AOV by itself will appear much noisier than you would expect looking at the beauty image. Seeing the different passes in isolation is helpful, but they may not need to look perfectly clean in isolation. Most of the time, a clean beauty image is the goal, and noisiness of individual AOVs doesn’t matter.

Depending on your rendering engine, you can focus on different sections of this guide:

Refining automatic noise

Karma CPU provides many controls to target specific types of noise in automatic convergence mode . You can follow a progression that should reduce confusion and help avoid oversampling on the way to cleaning up a render.

  • To help find the right sample settings, setting all of Karma’s sampling settings to 1 initially can be very helpful.

  • It is useful to build up from the primary samples and build an understanding of sampling in Karma.

  • After a long time of trying different combinations of values, resetting everything back to the defaults and seeing what changes can also be helpful.

Primary samples

Getting the Primary Samples right is the first step. The primary samples affect the quality of geometry and all other sampling Karma performs during the render. Because secondary samples are multiplied by pixel samples, you can reduce time spent making later adjustments by setting Min/Max Secondary Samples to 1. This lets all of the post-primary sample controls build on the primary sampling that Karma is already doing.

Tip

Setting primary samples to values that are easily squared (i.e. 4, 9, 16, 25, etc…) may help to resolve noise.

Looking at the beauty pass is usually enough to tell where more primary samples are needed. While the beauty pass alpha channel is helpful, adding Cryptomatte AOVs can be even more helpful to identify under-sampled primitive edges. If any of the following features are grainy or noisy (in the beauty, alpha, or Cryptomatte planes), start increasing the primary samples until the quality is where you want it:

  • Noisy hair or fur (BasisCurves), or aliased edges of geometry.

  • Strands of curves look pixelated or noisy.

  • Noisy motion blur, or aliased depth of field.

The primarysamples AOV can be useful to inspect, if increasing primary samples doesn’t seem to improve quality. This can happen for renders dominated by depth of field (DOF) or motion blur quality. If the actual number of pixel samples aren’t reaching the value set in the Primary Samples parameter, the pixel oracle is probably preventing sufficient pixel sampling. Try lowering the oracle’s Variance Threshold and see if that sends more pixel samples. If it doesn’t, you can continue to increase primary samples, or switch over to the uniform pixel oracle.

Tip

Sometimes what appears to be motion blur noise in heavily motion blurred areas is actually secondary samples. You should check other secondary sample AOVs once in a while, even while you are finding the correct pixel samples.

Secondary samples

Once you have the correct primary samples, the next step is reducing noise from secondary samples. The Min/Max Secondary Samples parameters affect quality across all direct and indirect rays at the same time. Increasing samples should reduce noise across all of the direct and indirect AOVs.

Min/max secondary samples

After inspecting the various optimization AOVs, if the the noise is fairly uniform, increase the Max Secondary Samples to 2 or 3. This will start to reduce the secondary noise in the image.

If some areas appear to be lacking samples, before jumping to the quality sliders, try decreasing Secondary Samples Noise Level to something lower such as 0.005. This secondary noise level is highly dependent on many factors, such as color configs, monitor calibration, preference, and so on. Once you have a good secondary noise level, you can target any outstanding noise with minimal increases to overall render times.

Indirect samples quality

The Indirect Samples Quality controls let you target specific ray types, to eliminate the last bits of noise. The following AOVs correspond to each quality control:

Control

AOVs (Render Vars)

Diffuse Quality

directdiffuse, indirectdiffuse, indirectemission

Reflection Quality

directglossyreflection, indirectglossyreflection

Refraction Quality

glossytransmission

Volume Quality

directvolume, indirectvolume

SSS Quality

sss

Use the above AOVs as reference points when adjusting the noise in beauty renders. Some ray types will stand out more than others, depending on lighting or other factors. So unless the AOV itself needs to be perfectly resolved, focus on cleaning up the beauty pass.

Light sampling quality

If soft shadows are still undersampled, even after all of the primary and secondary sample adjustments, Light Sampling Quality can improve these areas of the image.

Light Sampling Quality: 1
Light Sampling Quality: 2
Light Sampling Quality: 3

By default Karma samples lights only once. Increasing the Light Sampling Quality makes Karma sample lights more frequently. The quality of shadows is usually pretty obvious just by looking at the beauty pass. The directdiffuse AOV can help you judge shadow quality in isolation.

Reducing path traced noise

In path traced convergence mode (the only mode available in Karma XPU), adding more path traced samples is basically the only control you have for reducing all types of noise. You can increase Light Sampling Quality for better shadows, but otherwise reducing noise requires adding more path traced samples.

Karma CPU supports pixel oracles with path traced convergence. Inspecting the primarysamples AOV can tell you if the oracle is limiting the pixel samples. Try decreasing the Variance Threshold to reduce noise, or at least verify all of the rays are actually being fired from each pixel.

Resolving noise on specific primitives

After dialing primary and secondary sampling, there may still be stubbornly noisy objects in your renders. For dealing with these situations Karma supports per-object render properties. These let you improve sampling of specific objects in your scene.

If the chosen engine and/or convergence mode doesn’t support a given global property, then the per-object property will have no effect. For example, the min/max secondary samples have no effect when rendering with Karma XPU.

Reflection Quality on the sphere
Refraction Quality on the cylinder
SSS Quality on the cube

Render Geometry Settings

Set per-object render properties. All karma properties in the primvars:karma:object namespace should be available on this node.

Light

Set per-light render properties. All karma properties in the primvars:karma:light namespace should be available on this node.

Note

Primary Samples and Path Traced Samples cannot be set per-object.

In most cases the object properties are multiplied with their global counterparts. Properties that don’t scale the global property will act as overrides for that object; an example of this is per-object Min/Max Secondary Samples. Lights can scale the global light sampling quality via per-light Sampling Quality property.

Denoisers

Denoisers can clean up the last bits of noise in renders. However, without sufficient sampling to begin with, denoisers usually filter out important details.

Image Filters

Automatically denoises renders as the images are written to disk.

Denoise COP

Runs the OIDN or Optix denoisers within a COP network.

idenoise

Command-line utility to denoise a given image.

Note

An effective strategy when denoising is to render and denoise at 2× resolution. Because this quadruples the total number of pixels, you should also reduce the pixel samples by 25%. See Rebelway’s excellent overview for more details on this technique.

Karma currently ships with Intel’s OIDN fully functional out of the box. Support for NVidia’s Optix Denoiser is also available, but requires correct GPU drivers to function.

Tips

Interiors

  • Use Portal Lights to direct more samples at dome lights.

  • Try removing lights from the light tree, especially if the interior has long, thin rectangle lights

Hair/Fur

  • Path traced sampling can often be much faster than automatic convergence. There are so many curves, that the time spent trying to clean up secondary noise often gets out of control.

  • Roughness values below 0.1-0.2 on Hair or Fur shaders are likely to introduce a lot of noise. Try to keep roughnesses above that range, especially with Karma CPU.

Depth of Field

  • Scenes with very strong depth of field may be faster to converge with path traced convergence and/or the uniform pixel oracle.

  • Denoising can also be more effective in scenes with strong depth of field.

Motion

  • If the camera and/or objects in the scene are moving a LOT, path traced convergence and/or the uniform pixel oracle may improve render times.

  • Rendering multiple frames in the same process can improve render times. USD and Karma don’t need to re-compose and re-load everything just because the time has changed; moving frames only updates values. This can have a huge impact, especially in larger scenes with lots of layers and textures.

XPU Tips

  • Shaders or scenes with lots of bounces or SSS can cause the Optix devices to do a lot more work. This may result in their contributing to a smaller percentage of the render overall.

  • Shader compile times can cause a delay in the initial frame rendering. Because of this, rendering multiple frames in the same process can improve rendering iterations with Karma XPU a lot.

Materials

  • Texture maps connected to opacity/transmission inputs can bring down quality/performance. Even if the map is a constant value, Karma has to do more work to sample the object.

Caustics

  • Enabling True Caustics requires more samples to resolve noise. You may also need to raise Diffuse Limit and Color Limits, as well as rely on Indirect Guiding.

Chapters

Karma user guide

Chapters

Reference