| On this page |
Blocks in Copernicus 
Blocks in the COP network act similar to compile blocks in the SOP network, as they encapsulate a bunch of nodes that you can treat as a single object. They typically consist of a ![]() Block Begin node and a
Block Begin node and a ![]() Block End, with other nodes in between. Turning on Simulate enables simulation mode, which ties the process to the frame bar, allowing for caching and checkpointing in memory for faster recooking and scrubbing.
Block End, with other nodes in between. Turning on Simulate enables simulation mode, which ties the process to the frame bar, allowing for caching and checkpointing in memory for faster recooking and scrubbing.
Another important feature is Live Simulation, which allows Houdini to continuously animate in almost real-time, providing real-time feedback for changes. This is similar to a video game world, where things play whether or not you are actively pressing anything. This mode is not tied to the playbar, but it’s still recooking all the time. So if you make a change in the network, you will see its results being played back live in the viewport.
Reaction-Diffusion blocks 
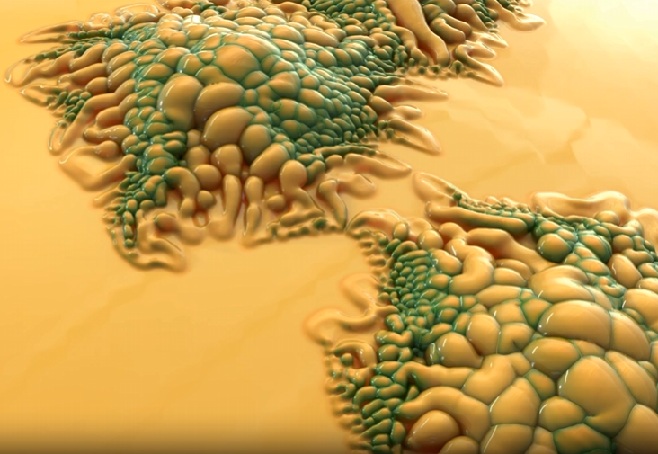
Reaction-Diffusion simulations are complex 2D simulations of chemicals reacting and diffusing. The simulation generates dynamic and unique patterns based on the interactions of two chemicals as they react with each other, diffuse through the medium, and are replenished at specific rates.
Note
Compiled COP networks don’t support simulation.
Note
Reaction Diffusion in this implementation is resolution sensitive. When changing resolution you may encounter instability, which is often due to taking time steps that are too large. To resolve this instability, reduce the size of the time steps by increasing the number of Substeps or decreasing the Time Scale. This has an associated runtime cost. The explicit integration of the equations has time step restrictions to make sure that the results (as in the scale of the reaction) stay resolution independent, but this may cause instability.
If you double the resolution, you may need around four times the Substeps (or quarter the Time Scale) to remain stable.
Create a Reaction-Diffusion simulation block by creating a ![]() Reaction-Diffusion Block Begin and
Reaction-Diffusion Block Begin and ![]() Reaction-Diffusion Block End, and adding other COPs between them. You can also create a Reaction-Diffusion Block node, which automatically places down the Reaction-Diffusion block begin and end nodes. Use the
Reaction-Diffusion Block End, and adding other COPs between them. You can also create a Reaction-Diffusion Block node, which automatically places down the Reaction-Diffusion block begin and end nodes. Use the passthrough input to bring additional inputs inside the block. Use the feedback input to add additional values that must be updated every frame.
Note
Operations that're independent of previous frames should occur before the Reaction-Diffusion Block Begin so that they only get cooked once. Post-processing operations that aren’t required to feedback should occur after the Reaction-Diffusion Block End.
Note
The Reaction Parameters are sensitive. Reaction-Diffusion exhibits nonlinear behavior, meaning that fast changes can flip, kill, or make the entire reaction enter a blow-up state. This occurs for a couple reasons:
-
Some combinations of input parameters sit near bifurcation points, so the stability of the reaction can change abruptly with even tiny variations of the control parameters. The node tries to take care of some of this for you in 'Normalized' mode (when Switch to Raw Values is off), but it can still occur.
-
Changing the input parameters too fast can mean that the chemicals don’t have enough time to fully grow and stabilize into their new diffusion parameters before the input parameters are changed again.
This solver can be interacted with in a few ways: hard iteration counts, cached simulation, or sandbox-style live simulation. You can also wire a Reaction-Diffusion block into another Reaction-Diffusion block (for example, to input the raw chemical values).
For example, use Reaction-Diffusion to create organic patterns such as zebra print, coral, and fish scales.
Using the Reaction-Diffusion solver block 
-
Create a Reaction-Diffusion Block COP in your COP network. This makes
 Reaction-Diffusion Block Begin and
  Reaction-Diffusion Block End nodes.
Note
Instead of a block, you can individually add Reaction-Diffusion Block Begin and Reaction-Diffusion Block End nodes. In Reaction-Diffusion Block Begin, set Block Path to the path of the Reaction-Diffusion Block End and connect their
chemicaloutput and input. -
Create an
activationmask for the solver.Shapes or harsh noise create an active reaction. You can also add decorator recipes on the Block Begin node to set up initial conditions. Some presets and conditions may die out immediately because they require a large contrast between neighboring pixels in order to activate, so if a pattern isn’t working try making it smaller or adding noise.
-
Wire additional nodes between the
chemicaloutput and input of the block. There’s a selection of nodes that you can connect to thischemicalwire.Note
The reaction can be unstable (see Reaction Parameters).
Tip
Use a Distort by Slope recipe to advect the chemical reaction into different directions.
Content library example 
|
The Coral Synapse project explores creative workflows with Houdini’s Flow Solver, focusing on its interaction with Reaction-Diffusion systems. The setup demonstrates how to generate interesting reaction diffusion patterns to add layered detail and variation in your final shader. Download the file here. |
|---|
