| On this page |

Overview 
Copernicus (COP) is a 2D and 3D GPU image processing framework. COP nodes provide real-time image manipulation within a 3D space. Each wire consists of either a layer (which is a single image) or geometry (which is any Houdini geometry). You can use cables to connect multiple wires to an input port using only one wire. The nodes can export as images or volumes. COP nodes also fully interoperate with ![]() SOPs, which lets you solve problems using the suitable network type.
SOPs, which lets you solve problems using the suitable network type.
Use Copernicus nodes instead of Compositing nodes. Though both networks still exist, the Compositing network is now designated as COP Network - Old. The new COP Network node sets the default resolution, pixel scale, border, and precision for COP nodes in the network that don’t have their own input or set values for these parameters. For more information about changing from Compositing to Copernicus, see Copernicus for Houdini users.
For definitions of Copernicus terminology, see Copernicus glossary.
Note
Compiled COP networks don’t support simulation.
How to access Copernicus 
To access the COPs network, you can either manually add a COP network or add a COP network SOP. You can view the COP network in the Scene (3D) and Composite (2D) Views.
After you add a COP network, see Working with Copernicus nodes for next steps. To use slap comp in your network, see Slap comp.

Adding a COP network 
-
Go to the Solaris (
/stage) network. -
Create a COP Network node.
-
Dive into the COP Network node to add Copernicus nodes.
Note
The /img and /out networks also support the COP Network node.
Adding a COP network SOP 
-
Go to the Object (
/obj) network. -
Create a
 COP Network node.
 -
Dive into the COP Network Geometry node. The COP Network SOP is created by default.
-
Dive into the COP Network SOP to add Copernicus nodes.
Note
This COP network is treated as geometry, so you can wire it into other geometry nodes. For example, you can wire the COP Network node into a ![]() Transform node.
Transform node.
Input and output 
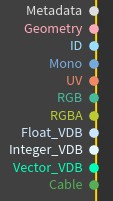
COPs have a similar shape and network orientation as ![]() VOP networks. They have the following inputs and outputs, which are based on data types and differentiated by color:
VOP networks. They have the following inputs and outputs, which are based on data types and differentiated by color:
-
Geometry: This can contain 2D volumes similar to layers and its output is geometry.
-
Layer: This includes the ID, Mono, UV, RGB, RGBA, and Metadata types.
An RGB layer has three values per pixel. These values are usually red, green, and blue, but you can store whatever you want in these pixels.
-
VDB: This includes the Float, Integer, Vector, and Metadata types.
-
Attribute: This includes the Float, Integer, Vector, and Metadata types.
-
Cable: This is a wire that’s made up of multiple, individual wires (inputs). See Cables for more information.
Note
The input and output names on the node can be different than the names listed above, but they're still color-coded based on their type.
When an input with an associated parameter is wired in, the associated parameter usually scales that input. For example, when you wire a bright input into the ![]() Bright node, the associated Brightness parameter multiplies with that input.
Bright node, the associated Brightness parameter multiplies with that input.