| On this page |
The following chapters illustrate an entire basic grooming process from the creation of a single feather to an object, covered with feathers.
It’s then totally up to you how you want to extend this network. You can draw a complete feather atlas and paint the various types onto different regions of your characters. You can also apply highly-detailed feathers or start with basic shapes and randomize them after the groom. There are also methods for planting or scattering large numbers of feather through resizable brushes. Houdini’s Vellum solver lets you simulate how feathers behave under the influence of force fields.
Feather networks can become very complex and it’s therefore a good idea to separate all scene elements like feathers and groom, and keep them in different containers. Below you can see a preview of the networks.

The feather 
Everything starts on the obj level of the Network Editor where you put down a ![]() Geometry OBJ from the tab menu. Rename the node to
Geometry OBJ from the tab menu. Rename the node to feather, then double-click it to dive inside.
The fastest and most convenient way is to use the Feather Template tool. This helper creates a small network with all relevant nodes and settings for a standard feather. Of course you can customize the feather’s shape by editing its curves. To change the feather’s barbs, you can change the parameters of the ![]() Feather Template from Shape SOP. For this scene, use the feather as created by the Feather Template tool.
Feather Template from Shape SOP. For this scene, use the feather as created by the Feather Template tool.

-
Go to the Resolution section and turn on Name. Replace the
$OSentry throughbodyor any other name. -
An important step is to terminate the feather network with a
 Null SOP. The null helps you to quickly find the feather geometry.
Add the null and connect its input to the output of the feather template node.
-
Rename the null to something like
FEATHERGEO.
The character 
The character can be everything: a sphere, a cube, one of Houdini’s test geometries, a custom model or an imported object.
-
Return to the obj level. There, add another Geometry OBJ and rename it to
groom. -
Open the new geometry node’s Misc tab and turn on Shade Open Curves in Viewport. Without this option you won’t be able to see the feathers as objects.
-
Double-click the node to dive inside.
-
Add a
 Sphere SOP, or any other object.
 -
Set Primitive Type to Polygon to create sphere without visible poles. This step isn’t necessary and more a visual “improvement”.
-
Increase Frequency to
15for a smoother surface.
Connecting the feather 
Right now, feather and character live inside separate containers and it’s necessary to connect both elements.
-
Inside the
groomcontainer, add a Guide Groom SOP and connect its second input with the output of the sphere node.
 -
Go to the Feathers section and turn on Create & Output Feathers. Then open the section.
-
Next to Template Geometry SOP, click the
 Open floating operator chooser button. From the panel, choose the
 FEATHERGEOnull and click Accept.In the input field you can now see a path like
/obj/feather/FEATHERGEO. -
Next to Template Group, open the dropdown. From the menu, choose
body. If you have different types of feathers, you will see their names listed here. -
Click Set Feather Settings. This button turns on the Create and Maintain orient Attribute checkbox. When you expand the associated Orientation Attributes section, you will see
barborientandNattributes. Both are required to align and brush the feathers.
Drawing guides 
Instead of drawing hundreds or thousands of feathers, you normally place a couple of guides. The feathers between the guides are then interpolated to create a dense plumage.

When you look at the Guide Groom SOP’s parameters, you can see a Tool dropdown, set to Draw. This mode lets you draw individual feathers onto the character. To see the underlying character (sphere), turn on its pink Template/Selectable Template flag.
On the Brush Options section you can find several useful parameters to shape the guides at creation time.
-
Turn off Interpolate Guides to avoid that guides are drawn inside the character.
-
Turn off Limit to Template Length to restrict the guides' maximum length to the actual length of the feather.
-
Hover the mouse cursor over the viewport and press Enter to turn on the drawing mode. A HUD in the viewport’s upper left corner indicates this mode and provides shortcuts.
-
Press ⇧ Shift + M for the Mirror Groom mode.
-
On the character’s surface click and drag the
 to draw the guides.
When you draw longer guides, you also get longer feathers. The guides' curvature will also be transferred to the feathers, along with their orientation.
Each guide will also get a
templatenamesprimitive attribute that contains the name you've applied on the Feather Template from Shape SOP. Here, the name isbody. -
Press ⎋ Esc to leave the drawing mode.
Hair generation 
Houdini’s feather system uses many hair-based nodes and methods to create the plumage, because both processes have many things in common, esp. in terms of guides. The guides that you've been drawing are in fact also hairs with extra attributes. Now you’ll interpolate hairs between the existing guides that will act as “seeds” for the feathers.
-
Lay down a
 Hair Generate SOP and connect its
-
first input with the second output of the guide groom
-
second input with the first output of the guide groom.
-
-
The Distribution section provides a Density parameter that lets you control the number of interpolated hairs.
-
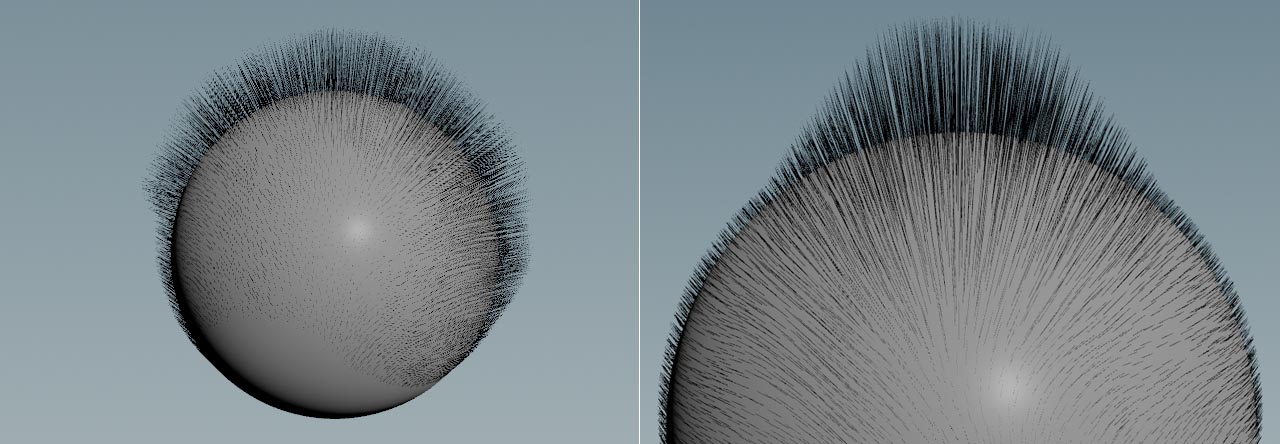
Turn on the node’s blue Display/Render flag to see the interpolated hair.
You can see that the node adds hair between the guides, but there’s no transition between longer and shorter guides. To fix that you need another node described below.

Guide interpolation 
This step creates guide attributes that are used by the Hair Generate SOP to correctly interpolate the guides and create smooth transitions between them.
-
Add a
 Guide Interpolation Mesh SOP. Connect its
-
first input with the first output of the guide groom
-
second input with the second output of the guide groom
-
output with the fifth input of the hair generate node.
The main idea of this node is to create a low-res proxy geometry to speed up the grooming process.
-
-
Select the Hair Generate SOP and go to the Guide Weights section.
-
Turn on Compute Weights Using Skin Coordinates.
-
Turn on Use Interpolation Mesh to take the proxy mesh into account.
-
From the Skin Guide Mode dropdown, choose Weight Array Pair (guides & weights) to use the proxy mesh’s attributes for the interpolation process.
With each step you can see how the guides change.
From guides to feathers 
Currently you have guides, but the feathers aren’t visible. The last step to complete the basic setup is to bring guides and feather geometry together.
-
Add
 Feather Template Interpolate SOP and connect its
-
first input with the first output of the hair generate node
-
second input with the second output of the hair generate node.
-
-
Lay down an
 Object Merge SOP and connect its output with the fourth input of the template interpolate node.
 -
On the merge node, go to Object 1 and click the
Open floating operator chooser button. From the panel, choose the FEATHERGEOnull and click Accept.
When you turn on the interpolate node’s blue Display/Render flag, you can see the feathers on the character. This network is a blueprint for more complex setups.
Masking 
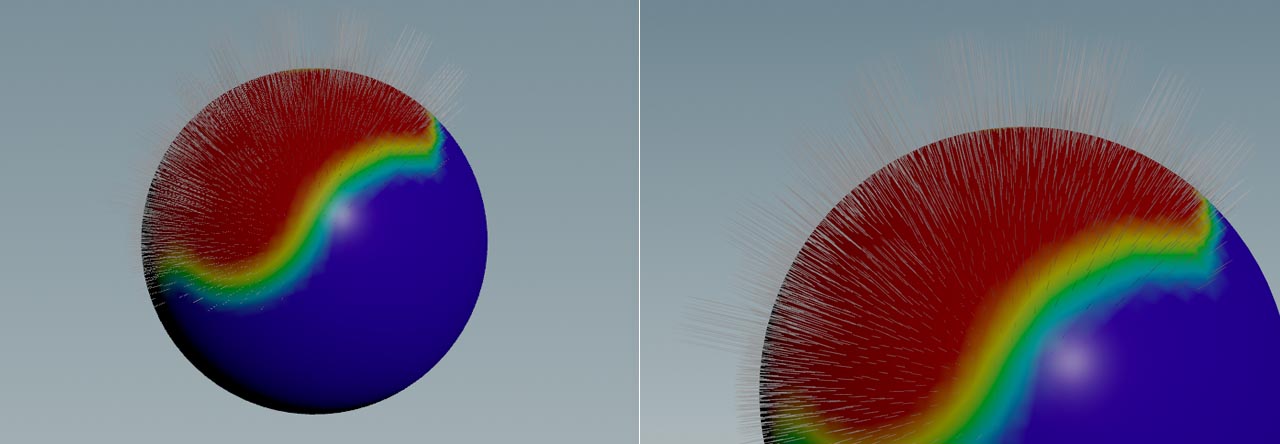
Right now the character is almost completely covered with feathers, but in many cases you would like to spare out certain areas. You can do this through masks. Houdini lets you create procedural masks or paint on an object. Here you're going to paint a mask to control the Hair Generate SOP’s Density parameter. But masks can do more: it is also possible to drive attributes like feather length. Whenever you see a parameter with a dropdown, set to No Override, you can control it with a mask. A mask for a Mohawk haircut could look as in the image below.
-
Put down an
 Attribute Paint SOP and connect its input with the second output of the Guide Groom SOP. The output is linked to the first input of the Hair Generate SOP.
 -
Open the new node’s Attributes tab. For Attribute Name, enter
density. This is the name of the attribute you’ll be using to remove feathers from unwanted areas. -
Open the Symmetry tab and turn on Enable Mirroring. You’ll now see a mirror plane in the viewport. You can change the plane with Direction parameter.
-
Hover the mouse over the viewport and press Enter to turn on the painting mode.
-
Use the
 to control the brush size.
 -
On the Hair Generate SOP, go to Distribution ▸ Density and set the dropdown to Skin Attribute.
The Density parameter is still usable and you can adjust the number of feathers, but now the they're created inside the painted area.
-
Turn on the Hair Generate SOP’s blue Display/Render flag and select the Attribute Paint SOP to see brush and mask.
-
Paint over those area where you want the feathers to grow.
-
Press ⎋ Esc to leave the drawing mode.
When you turn on the blue Display/Render flag of the Feather Template Interpolate SOP, you’ll see the feathers again.

Feather width 
For the final render it’s important to control the width of the feathers' shafts and barbs. The default values often create feathers that appear too thin or too thick. There’s a node for adjusting shaft and barbs individually and you can even use ramps to alter their thickness, e.g. from shaft to tip. Or you draw attribute masks. More experienced users will most probably write their own wrangles to control the width, width_barbl and width_barbr attributes.
-
Lay down a
 Feather Width SOP and connect its first two inputs to the first two outputs of the upstream Feather Template Interpolate SOP.
 -
Use Shaft Width to adjust the overall width of the shaft. Or click Ramp for a custom curve.
-
Turn on Create Barb Width if you want to control Barb Width. There’s also a Ramp button for creating a custom curve.
Brushing guides 
It’s often necessary to change the guides' growth direction and orientation. To do this, you can set the Guide Groom SOP’s Tool menu to Brush.
Tip
You can brush your guides and see the final result almost immediately. To do this, turn on the Hair Generate SOP’s blue Display/Render Flag and select the Guide Groom SOP. For better response times, temporarily decrease the generate node’s Density value.
-
If you're not in drawing mode anymore, hover the mouse cursor over the viewport and press Enter again.
-
The Guide Groom SOP has a Collide with Skin option that prevents guides from being drawn inside the character, but sometimes collision detection fails. For better results, increase Ray Bias, e.g. to
0.01. -
To mirror the brush, open the Mirroring section and turn on Mirror Groom.
-
You can change brush size interactively in the viewport with the
.
Colors 
Colors can help to get a better impression of the feathers and separate them visually.
-
Lay down a
 Color SOP and connect its input with the first output of the Feather Width SOP.
 -
Change Class to Primitive.
-
From the Color Type dropdown, choose an entry, e.g. Random. When set to Constant, you can use Color to define a custom color.