| On this page |
Houdini’s feather system uses a wide range of attributes to control shape, orientation, clumping, splitting, UVs, feather length, and many more. You can customize most attributes and calculate your own values, e.g. through different wrangles or even painting.
For example, add a Guide Process: Bend tool from the tab menu and open its Operations tab. The last three parameters provide dropdown menus with a default No Override entry. Open a dropdown and choose Guide Attribute. This option will read incoming attributes from the node’s first input. You can also see new Attrib parameters with an attribute: for the Random Angle parameters, the associated attribute is anglerandscale.
The dropdown indicates that you can override the node’s own parameters. With the Bend operator you can define overrides for Angle, Random Angle and Randomness Bias.
Attributes already play an important role on many pages of this documentation. For example when you create a geometry mask or set the different lengths of a feather’s barbs. This page is a summary of common techniques to change attributes and achieve more control.
The Geometry Spreadsheet is the place where you can see and monitor an object’s attributes and their values. Alternatively, you can also click a node’s Node info button to see its current attributes. This information helps to see if all attributes are still present at the selected node. Another thing you can do is to click an attribute in the info box and see its values in the viewport. Depending on the attribute, the values are color-coded vertex maps or appear as numbers.
Attribute transfer 
Depending on the feather’s state - condensed or uncondensed - you have different attributes. When you uncondense a feather, you will lose several important attributes like barborient. Since barborient´is essential for the grooming process, you should keep it.
-
One method is to add a
 Feather Match Uncondensed SOP to terminate the feather network. The node’s first input is connected to the Feather Template from Shaft SOP. All attributes, coming from the template node, are transferred.
 -
Another approach is to choose the
Feather Uncondense SOP’s and open the Attribute and Group Copy section.
There, go to Point Attributes and append the attributes you want to transfer. Note that attribute lists are space-separated, e.g. width barborient.
You can also add an ![]() Attribute Create SOP to create and promote attributes.
Attribute Create SOP to create and promote attributes.
Signatures 
When you work with attributes and overrides, you have to deal with signatures. A parameter always expects a value in a certain format, e.g. as an integer or a vector. This differentiation is essential, because you often have to specify the signature yourself. Signatures are also sometimes called data types. A few common types are listed in the table below.
|
Signature |
Description |
integer
|
Any positive or negative number and zero without decimals, e.g. id, segments.
|
float
|
Any number with decimals, e.g. density, angle, distance, pscale
|
vector3
|
Three related values (integers or floats), e.g. position, rotation, color, uv, normal
|
vector4
|
Four related values (typically floats), e.g. orientation, color4 (color + alpha)
|
string
|
Character sequence where numbers are also treated as characters, e.g.name, path
|
Controlling attributes 
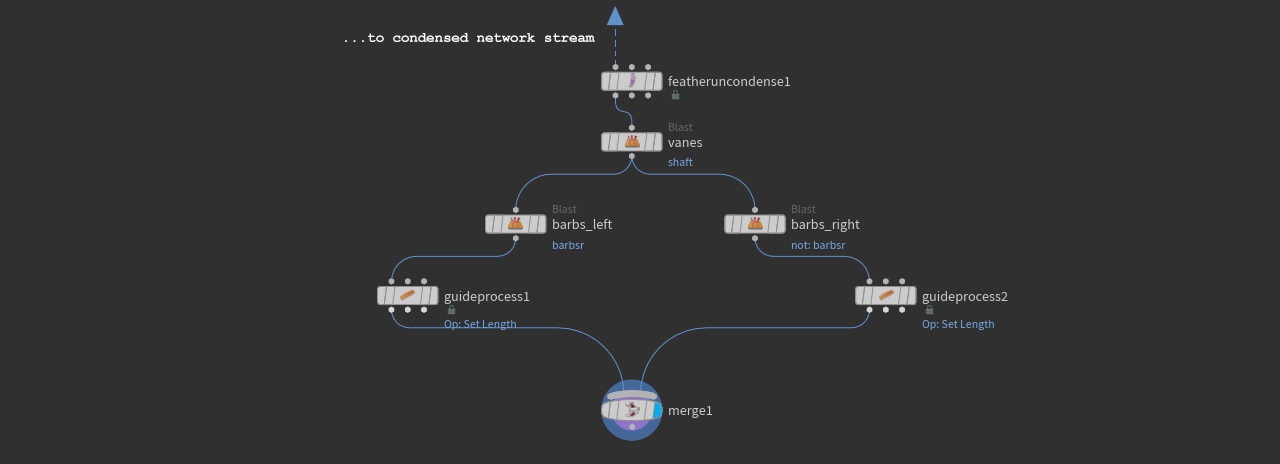
This standard workflow illustrates how to manipulate attributes and connect the result to a node to drive a certain parameter. The basis for this guide is an arbitrary feather like the one shown below: it’s an uncondensed down from the Creating an atlas page and separated into shaft, left and right barbs.
Note
To simplify things, the following methods are only performed on the feather’s left barbs. For the right barbs you have to repeat the steps, but you might need different parameter values. Masks and the shaft are also not considered here.
Here’s the relevant part of an uncondensed feather, split into left and right barbs.
Attribute Noise 
The first example uses an ![]() Attribute Noise SOP for randomizing the barbs' length. The method you're going to use here is actually what happens inside the
Attribute Noise SOP for randomizing the barbs' length. The method you're going to use here is actually what happens inside the ![]() Guide Process SOP. The difference is that you have direct access to all noise parameters and you can also customize attribute names.
Guide Process SOP. The difference is that you have direct access to all noise parameters and you can also customize attribute names.
-
On the Guide Process SOP’s Operations tab, set Operation to Set Length.
-
Go to the Length parameter’s first dropdown and change it to Guide Attribute. You can see a new Length Attrib parameter with
lengthas default. -
Add an Attribute Noise SOP and place it between
barbs_leftandguideprocess1to connect it. -
On the General section, change Attribute Names to
lengthand make sure that the signature dropdown is set to Float. -
Go to the Noise Value section. From the Range Values dropdown, choose Min/Max.
-
Set Min Value to, for example,
0.5and Max Value to1. Depending on the shape and scale of your own feather, you might need different values.Both values are multiplied with Guide Attribute SOP’s Length parameter. If you change Length, you also have to adjust the minimum and maximum parameters here.
Depending on the feather’s shape, you will often hardly see any differences as shown in the middle image below. Sometimes the feather appears wider or you observe deformations near the vanes' endpoints.
-
To get random barbs, open the Noise Pattern section. Element Size defines the noise’s size. Compared to the tiny barbs, the default value of
1is huge. To get more variation, decrease the value. In the image below, the value is0.002.
The left image shows the original state. In the middle you can see the impact of Min Value and Max Value, and on the right the randomized barbs.

Attribute Wrangle 
An ![]() Attribute Wrangle SOP lets you write custom VEX code to manipulate attributes and their values. It’s a very versatile method, but also requires knowledge of a scripting language.
Attribute Wrangle SOP lets you write custom VEX code to manipulate attributes and their values. It’s a very versatile method, but also requires knowledge of a scripting language.
Note
If you have already an Attribute Noise SOP from the previous chapter in your scene, delete it.
-
Add an Attribute Wrangle SOP and place it between
barbs_leftandguideprocess1to connect it. -
On the VEXpression field, enter
@length = fit(rand(@ptnum), 0, 1, 0.5, 1.1);
The script assigns random values to the @length attribute. The rand() function creates a random value between 0 and 1. To get different random numbers for each barb, the current point number @ptnum is used as a seed.
The fit() function remaps a range of values.
-
The first value is the random number.
-
0, 1defines the possible value range from therand()function. -
0.5, 1.1are the remapped values that are applied to the barbs. So, each barb will have a random@lengthattribute between 0.5 and 1.1. The values represent the noise node’s Min Value and Max Value parameters
The result will look differently from the Attribute Noise method, because the method of calculating the random numbers is also different.

Enhancements 
You can also make your script more user-friendly by defining custom parameters to adjust the remapped minimum/maximum values. On the VEXpression field, replace the current line with this code.
// Create custom parameter
float min_value = chf("min_value");
float max_value = chf("max_value");

// Use the input to drive @length
@length = fit(rand(@ptnum), 0, 1, min_value, max_value);
This script creates two float parameters: min_value and max_value. Both variables are only valid within the scope of the wrangle. The @ tag indicates that the variable is an attribute and promoted to other downstream nodes.
To add the parameter’s to the wrangle’s UI, click the ![]() Creates spare parameters of….
Creates spare parameters of….
The fixed values (0.5, 1.1) in the previous version of the fit() function are replaced by the variables. Now you can change the values numerically or interactively by dragging the parameters' sliders.
Other operators 
The examples from the Attribute Noise and Attribute Wrangle chapters also work with the Guide Process SOP’s other operators, for example Bend and Frizz.
The noise method works in the same way as described in the chapter above and you only have to change Attribute Names, the Range Values type and most probably Element Size. This is normally enough to get things working.
With a wrangle, it’s different, because your requirements determine the complexity of the VEX script. For some basic functionality as in the example above, the enhanced version of the script is a versatile template.
If you want to randomize the Bend operation, for example, you override the Angle parameter with a custom anglescale attribute. Here, you have two options: degrees and radians. Degrees uses angles likes 30°, 45° or 90°. Radians (input_value * 180 / PI), on the other hand, ranges between 0 and 1, and requires a degrees() function to reconvert the input value into degrees. Both approaches are valid and you can use what you like better. The first line of code creates a custom parameter where you can enter a value in degrees. The second line uses the radians method.
-
@anglescale = fit(rand(@ptnum),0.0, 1.0, 0, chf("random_angle")); -
@anglescale = fit(rand(@ptnum),0.0, 1.0, 0, degrees(chf("random_angle")));
Attribute Create SOP 
Another way to maintain or create attributes at any point in your network is to add an ![]() Attribute Create SOP. You can create new attributes or override the existing ones like the shaft’s
Attribute Create SOP. You can create new attributes or override the existing ones like the shaft’s width or the feather’s name.
The Attribute Create SOP lets you define multiple attributes through the Number of Attributes parameter. This option is very convenient, because you can manage all custom attributes inside a single node.
barborient 
This point attribute is a quaternion (vector4) and one the centerpieces of Houdini’s feather system. As the name suggests, the attribute controls the orientation of a feather’s barbs. When you uncondense a feather, the attribute is deleted and has to be transferred.
name 
Names are important when you create a feather atlas, because they help to distinguish the feathers. You can display the names in the viewport to have direct visual control over your template. There are several methods to apply names.
-
Use the
 Feather Template from Shape SOP’s Name parameter.
 -
Add a
 Name SOP.
 -
Use the Feather Template from Shape SOP’s third Label Points input.
Note that all name attributes are deleted when you uncondense a feather. The ![]() Feather Uncondense SOP node changes the feather geometry and creates large amounts of points. The node is therefore very selective with attributes, but you can transfer the
Feather Uncondense SOP node changes the feather geometry and creates large amounts of points. The node is therefore very selective with attributes, but you can transfer the name attribute.
id 
The id primitive attribute is only created with uncondensed feathers. If the attribute is missing, check if the Feather Uncondense SOP’s Attribute and Group Copy ▸ Create Output Id From Primitive Number Curve Id Missing is turned on. Each feather gets its own id attribute and the barbs' curves inherit the attribute.
If you want to enumerate the barbs, you need a custom primitive attribute. The most convenient way to do this is to add an ![]() Enumerate SOP after the Feather Uncondense SOP. For Attribute enter a name like
Enumerate SOP after the Feather Uncondense SOP. For Attribute enter a name like index or barbid.
uv 
By default, the Feather Template from Shape SOP’s Add Barb UV Attributes is turned on and creates a uv attribute. This attribute is even kept when you uncondense the feather.
If you don’t want to work with the default UV set, you can create custom UVs. For more information, read the Feather texturing and UVs page.
width 
You can adjust the shaft’s width through the Feather Template from Shape SOP. On the Shaft section, you can see Width Root and Width Tip. The values, you enter there, are written to the shaft’s points in the form of a width attribute.
The width attribute is kept when you uncondense the feather.
Groups 
Houdini’s feather system creates a couple of default groups. Note that only some are kept throughout the entire network, while others are deleted, e.g. after uncondensing a feather.

|
Group |
Description |
profile
|
Contains the profile curves to control the barbs' growth direction. Not kept. |
shape
|
Contains the two curves that outline the feather’s left and right vanes. Not kept. |
shaft
|
Contains the shaft curve. |
barbs
|
Contains the points of the barbs after uncondensing the feather. You can overwrite the barbs to create separate groups for the left and right barbs, e.g. barbsl and barbsr.
|