| On this page |
Houdini’s feather tools lets you create fully customizable feathers from simple curves. The curves don’t have to be planar, symmetrical, closed or sit at the scene’s origin, but they must exist on the XZ plane. It’s normally enough to roughly outline the shape by drawing a shaft and the left and right boundaries. You can import an image with feathers and trace their outlines to achieve realistic shapes.
In this first example you will keep things simple to get a feeling for shapes, looks, and parameters. All steps from Tracing a feather to Profiles are required for the creation of one feather.
Tip
Instead of adding the required nodes manually, you can also use the Feather Template tool from the tab menu. The workflow, described below, helps you to understand the steps, settings, and parameters you need to create a feather template of from scratch.
Reference image 
In most cases you’ll draw feathers from a reference image and trace the outlines. If you want to create a complete feather set, then you should assemble individual photos to a feather atlas. There, different types are depicted side by side. You can sometimes find appropriate images in online resources, but in most cases you have to create an atlas yourself. In such a case it’s important to mind the feathers' relative scale.
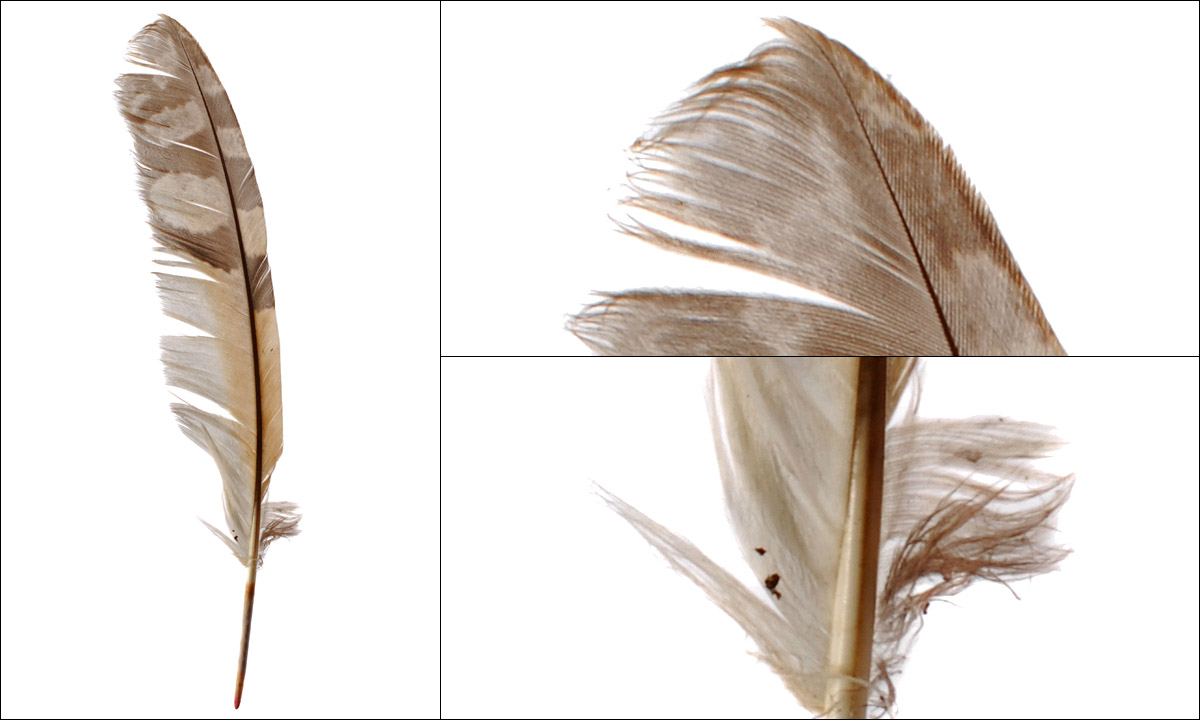
Here’s the reference image for this workshop with details of the tip and shaft areas.
Note
In many countries it’s not allowed to collect bird feathers, even if you find a single feather on the ground. This is to prevent birds from being killed for their feathers and protect endangered species. You should therefore only use photos from repositories.
Tip
A very good resource for feathers is the free The Feather Atlas from the U.S. Fish and Wildlife Service. There you can find feathers from more than 400 species. All images and data on the website are freely available to the public; no special permission is required for their use.
-
Move the mouse cursor over the viewport and press 2 to switch to top view.
-
Now press D to open the Display Options.
-
Open the Background tab, then click the Top tab.
-
Make sure that Disk File is turned on and click the
 icon to load a reference image.
 -
If the image is too large or too small, adjust its size with the Image Scale parameters. Mind the feather’s actual scale! In this example, the feathers' length is approximately 20 cm.
-
With Image Offset you can change the image’s viewport position.
It can sometimes help to hide the viewport grid with a click on ![]() . If you want to check your feathers without the background, open the Display Options again. On the Background tab, turn off Display Background Image/Video.
. If you want to check your feathers without the background, open the Display Options again. On the Background tab, turn off Display Background Image/Video.
Scale 
Scale is important and some reference images even provide a scale. This will help you to keep relations and create a realistic appearance. Inside Houdini it’s sometimes not so easy to maintain proportions or estimate an object’s size. Of course there’s the ![]() viewport grid and you can adjust its default spacing.
viewport grid and you can adjust its default spacing.

-
Hover the mouse over the viewport and press D to access the Display Options. There, open the Grid tab.
-
Go to Grid Spacing. The default spacing is
0.2; that’s 20 cm. For large feathers, a value of0.1(10 cm) is sufficient. For small feathers, you might need values of0.05(5 cm) or smaller.
You can change Grid Spacing at any time, depending on whether you're working on large or small feathers. However, a very dense grid can sometimes be distracting. In such a case it can be helpful to add a reference object like a ![]() Box SOP or a
Box SOP or a ![]() Line SOP. The advantage with objects is that you can position them precisely where you need them. Once you've found a working position, click the object node’s red Lock flag to protect it from changes.
Line SOP. The advantage with objects is that you can position them precisely where you need them. Once you've found a working position, click the object node’s red Lock flag to protect it from changes.
Tracing the feather 
Now you can start to trace the feathers with the ![]() Curve SOP. If you're familiar with 2D illustration programs, then you’ll immediately know how to draw curves and refine their shapes interactively. If you're new to curve drawing, please read the node’s help. There you can find valuable tips and workflow descriptions.
Curve SOP. If you're familiar with 2D illustration programs, then you’ll immediately know how to draw curves and refine their shapes interactively. If you're new to curve drawing, please read the node’s help. There you can find valuable tips and workflow descriptions.
Here you can see the complete network for this workshop. This basic setup will be the basis for all following guides and explanations. Don’t forget that this network is located inside a Geometry OBJ on the obj level.

Here are a few tips for tracing feathers.
-
On the obj level, press ⇥ Tab to invoke the Tab menu. From there, create a
 Geometry OBJ. Rename the new node to
 feather. -
It’s important to make the feather visible in the viewport. To do this, open the geometry node’s Misc tab and turn on Shade Open Curves in Viewport. This option will turn the area between the curves into a solid object.
-
Double-click the geometry node to dive inside.
Curves 
To get a feather’s shape you need three lines. You can draw any form, use as many curve points as necessary and you don’t have to close the curves. You can also draw the feather’s curves anywhere in the viewport and you don’t have to center them.
Note
You need one Curve SOP per feather.
-
Inside the geometry node, create a
 Curve Bezier SOP. This node is a standard Curve SOP, but with Primitive Type already set to Bezier Curve. If you feel more comfortable with NURBS, choose NURBS Curve.
 -
Rename the node to
shape. -
By default, the
 Draw Mode is active. Move the mouse cursor over the viewport. There, press Enter to activate the tool. A HUD appears in the viewport’s upper left corner. There’s also a red dot at the mouse cursor’s tip, indicating the position of a new point.
Now you can start to draw shaft and boundaries.
-
Start with the shaft in the middle. Press
 to add the first point.
 -
To get correct results, draw curves from bottom to top. Keep the
pressed while dragging the mouse to control the curve segment’s shape and roundness. If you want to draw a straight line, press ⇧ Shift + . Create more points until you have traced the shaft’s shape.You don’t have to be very precise and it’s enough to roughly outline the shape. You can adjust and correct the curves later in a second pass.
-
Hit Enter to terminate the shaft’s curve.
-
To adjust the curve, select the Curve SOP and click the
 Select/Edit Mode icon.
 -
When you click the point you want to adjust, it turns yellow. Curves with roundness also have two green handles attached. When you drag a yellow point, you change its positions. A green point changes curvature.
Vanes 
To process of drawing the feather’s left and right vanes is exactly the same as described for the shaft.
-
Click the
Draw Mode icon. -
Again, press the
to create new points. Hold the mouse button pressed and drag the mouse to control the curve segment’s roundness. You don’t have to consider splits and clumps. Also, don’t draw the frayed feathers at the bottom of the right vane. Those elements will be added through nodes in a later step. -
Press Enter to terminate a curve and use the Select/Edit Mode to refine the curve. On the viewport, use the
 to zoom in an out. With Alt +
  you can pan around.
 -
To leave the Curve SOP’s drawing mode, press ⎋ Esc.
Here are the curves for the feather.

Profiles 
When you take a closer look at the barbs, you can see that they all share more or less the same amount of curvature. Only barbs near the shaft are more rounded than those near the feather’s tip. The barbs on the reference photo, however, show different curvatures and angles. Profile curves help you to control the barb’s curvature. Drawing a profile curves works exactly as drawing the feather’s rough shape.
-
Add another Curve Bezier SOP and trace the curvature of some barbs. Houdini will interpolate the barbs between the profile curves. For better results, draw separate curves for the barbs on the left or right side of the shaft. Profiles don’t have to be symmetric or share the same number of points.
-
Rename the new node to
profiles.
Note
You can use multiple Curve SOPs to represent the barbs' curvatures, e.g. if you want to keep left and right profiles separated. Add a ![]() Merge SOP to combine the profiles.
Merge SOP to combine the profiles.
Normally you don’t need as many profiles as shown in the image below: two or three curves are often enough.

From curve to feather 
The next step groups the curves before you can turn them into a feather.
-
Add a
 Feather Shape Organize SOP.
 -
Connect its first input with the output of
shape. Then second input is linked to the output ofprofiles. If you have combined the profiles through a Merge SOP, connect this output instead.The node doesn’t have any parameters, but you can open the Geometry Spreadsheet and click the
 icon to see the
 shaftandshapegroups. -
Now, lay down a
 Feather Template from Shape SOP and connect its input with the shape organizer’s output. You should see a solid object with an UV grid. If not, return to the obj level and select the Geometry OBJ. From the Misc tab, turn on Shade Open Curves in Viewport. Then dive into the geo node again.
 -
Decrease Width Root and Width Tip to get rid of the alias effect. Depending on the size of your feather, the values can be very small. In the image below, the values are
0.0004and0.0002. -
The “skeleton” look is the result of an insufficient Barb Density. For good results, you will often need values of
1000,2000and even more. -
For smoother barbs, increase Barb Segments, e.g. to
7.
Note
When you draw more than one feather, e.g. for an atlas, make sure to use the same number of Barb Segments for all feathers. With different values, only the feather with the highest number of segments will be shown and processed after a merge.
The image shows close-ups of the feather with a reduced Barb Density to get a better view of the barbs' different directions.

Names 
Names play an important role with feathers, esp. when you work with different types. Houdini’s feather system provides various methods to add names, so they're discussed separately on the Feather naming page. We recommend reading this page, before you start to apply names, because there are cases, where the name attribute is deleted.
Condensed and uncondensed 
Right now, you only have the feather’s outlines, but real feathers show clumps, splits and barbs of different length. Left and right vanes are often differently shaped, and there are also fluffy down and countless transition forms. Before you start to add details, you have to distinguish between a feather’s fundamental states.
-
Condensed feathers have virtual barbs and this makes them very very resource-friendly. Furthermore, network setups are normally less complex, but possibilities are slightly limited.
-
Uncondensed feathers consist of real curves with points. You have generally more possibilities to shape your feathers, but this state needs more resources. Uncondensed networks are often more complex, because you can create separate streams for shaft, left and right barbs. You also have to manually promote some important attributes.
-
Houdini’s feather system provides a
 Feather Match Uncondensed SOP to reconvert a feather into its condensed state.
 -
For rendering, consider to turn condensed feathers into packed primitives by adding a
 Pack SOP after the Feather Template from Shape SOP.
Tip
The following guides cover the creation of a single feather from the reference image above. If you want to design a complete set of feathers, please read the Feather atlas page before you proceed. There you’ll find tips how to quickly randomize basic feathers.
Condensed workflows
Uncondensed workflows