| On this page |
In the chapters of the Drawing and shaping section you've learned how to draw and design individual feathers. You can use the methods, presented there, for the creation of a complete feather atlas. An atlas is a collection of several feather templates.
The advantage is that you're able to add lots of detail to each feather and get highly realistic results. This can be necessary for close-ups, but in such a project you normally don’t need a bird’s entire range of feather types. The flip side is that you’ll probably end up with large networks. Another aspect is time. In a production environment you normally don’t have the time to spend many hours on a single feather.
Houdini’s feather system addresses this issue and provides methods to randomize large amounts of instances from basic shapes. Interpolation nodes will also help you to blend between different feathers.
Note
This page is not a step-by-step guide, because the workflows for creating and customizing feathers are discussed in detail on various pages. This chapter is more a checklist of what you have to consider when you're creating an atlas.
Condensed and uncondensed 
When you draw a feather, you create an object with shaft and barbs through a ![]() Feather Template from Shape SOP. What you get here are create virtual barbs. The only real geometry with points in this condensed state is the shaft.
Feather Template from Shape SOP. What you get here are create virtual barbs. The only real geometry with points in this condensed state is the shaft.
If you want to work with actual curves, you add a ![]() Feather Uncondense SOP, but you’ll lose several attributes.
Feather Uncondense SOP, but you’ll lose several attributes.
Note
Basically it’s possible to create mixed templates with condensed and uncondensed feathers. However, when you bring everything together, the missing attributes can be problematic. We therefore recommend to decide, whether you want to proceed with condensed or uncondensed feathers.
There’s no static rule when you should use a condensed or uncondensed workflow. If you need a fast and resource-friendly method, it’s often better to keep the condensed state. If you need highly-detailed feathers or want to address the barbs' curves, e.g. for close-ups, an uncondensed workflow might be the right choice. Later, you can re-condense the feather.
Basic considerations 
No matter, how many feathers you're going to create and what method you want to use to shape the objects, the workflow is always the same: you draw the basic shapes, apply detail where necessary, bring everything together, add textures and prepare your template for exporting it to the groom. For each feather you need one network stream.
It’s also a good idea to create the atlas inside a separate network. You can do this by creating an Geometry OBJ on Houdini’s obj level. To make the new network identifiable, rename it to atlas. When you double-click the node you can dive inside and add your nodes.
The most important decision, however, is whether you want to add detail to feathers in the template or during the grooming process?
-
You can bring in your individual feather templates through Object Merge SOPs or, if you have saved them to BGEO files, through
 File SOPs.
 -
You can also use the Feather Template tool from the tab menu instead to speed up your workflow. This helper creates the three nodes you need for tracing a feather and sets up all relevant attributes.
Houdini’s grooming tools for feathers let you interpolate between different shapes. However, in scenes with complex feather templates and lots of different types, it’s often better to plant/place the feathers without interpolation.
With 20, 30 or more feathers, your network might become very large. It’s therefore a good idea to group the nodes, apply colors and network boxes to separate the networks visually.
Tracing the feathers 
Note
The reference image comes from the free The Feather Atlas website.
In an atlas you typically load a reference image where all feathers are depicted side by side. Don’t forget to scale the reference image in the Display Options. Then you [trace|drawing|#trace] the outlines and add [profile curves|drawing|index#profiles]. Sometimes, the feathers on reference images are also very hard to see. In this case it’s a good idea to invert the image, e.g. in Photoshop, and save a copy.
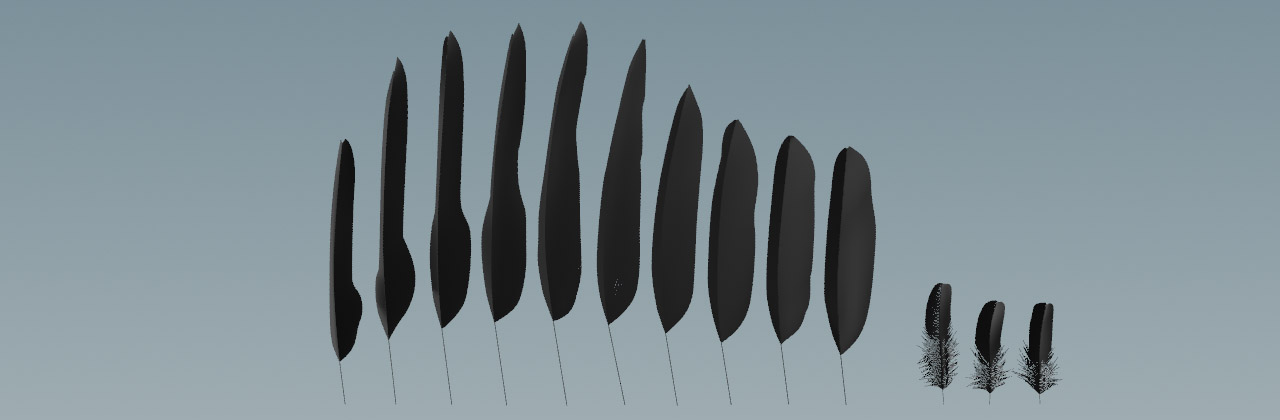
The image shows a small atlas with ten primary wing feathers and three down. This means that you’ll also need thirteen network streams with nodes for curves and basic feather geometry. A common workflow is to start with one feather and use copy ⌃ Ctrl + C and paste ⌃ Ctrl + V operations to duplicate the networks. Then, you work on the shapes and details.

And here you can see that the network is already pretty complex with just thirteen feathers. Therefore it’s essential to organize your network streams. You can also use Subnetworks to combine nodes and make the network more manageable.

Barb density and segments 
An important thing to consider is the ![]() Feather Template from Shape SOP’s Barb Segments parameter.
Feather Template from Shape SOP’s Barb Segments parameter.
When you have several feathers with different Shaft Density, Barb Density or Barb Segments and merge them, only the feather with the highest values will be shown. One way to overcome this limitation is to uncondense the feathers before the merge. Uncondensing, however, can create potentially hundreds of millions of points and allocate large amounts of your system’s RAM.
Another method is to use a ![]() Feather Resample SOP to unify the segments after the merge.
Feather Resample SOP to unify the segments after the merge.
The best approach, however, is to use the same number of segments for all feathers of your template.
The Side option 
On the Feather Template from Shape SOP’s Resolution section, you can find a Side checkbox. When you turn it on, the node applies a side primitive attribute and you will see c as the default option. The associated dropdown provides three option: Center, Left and Right. You've probably already guessed that c corresponds with Center.
To understand the options, take a look at the feather atlas above. Most shafts are curved and bent to the right. When you apply the feathers to a character and want to mirror them, you’ll see a mismatch: the template feathers' curvature only works for a bird’s left side. Lets also assume that the down don’t have to be mirrored, because they only appear on the bird’s body, not the wings. To get properly mirrored feathers you can use Side.
-
For the large wing feathers, set Side to Left or enter
l. -
For the down, Side should be Center or just
c. -
If you don’t have to care about mirroring, you can leave Side turned off.
The ![]() Guide Groom SOP provides another method for controlling sides: on the Feathers section you can find an Auto Assign Side toggle. This option also creates a
Guide Groom SOP provides another method for controlling sides: on the Feathers section you can find an Auto Assign Side toggle. This option also creates a side primitive attribute. When you open the Mirroring section, there’s a Direction vector that determines the mirror plane and also the appropriate side - l or r.
When you turn off the checkbox, you have access to the Selected to… buttons, but you’ll also lose the side attribute unless you press one of the buttons in conjunction with a selection of feathers. Selected to Left Side, for example, sets the side attribute of the selected feather to l, independent from the feather’s actual position. Unselected feathers have an empty side attribute.
Adding detail 
If you want to add detail to a single feather directly inside the template, follow the workflow descriptions for condensed and uncondensed feathers. To uncondense a feather you need a ![]() Feather Uncondensed SOP. It’s not necessary to apply this node each individual feather, but you can merge all or several feather into one group - and then they're uncondensed.
Feather Uncondensed SOP. It’s not necessary to apply this node each individual feather, but you can merge all or several feather into one group - and then they're uncondensed.
Condensed workflows
Uncondensed workflows
Grooming workflows
You can also add nodes like the ![]() Feather Clump SOP or
Feather Clump SOP or ![]() Guide Process SOP nodes to a complete atlas or its subsets. In such a scenario, you merge the feathers and then you apply the clump and process nodes to all feathers at once. The image below shows atlas feathers, where the clumps are created through a single node.
Guide Process SOP nodes to a complete atlas or its subsets. In such a scenario, you merge the feathers and then you apply the clump and process nodes to all feathers at once. The image below shows atlas feathers, where the clumps are created through a single node.

Alternatively, you can also randomize and interpolate the feathers during the grooming process to add variation.
Merging and exporting 
The individual feathers are combined through various ![]() Merge SOPs. For the down you merge together shaft, left and right barbs to reconstruct the complete feather. Then, the individual down are again combined with another Merge SOP.
Merge SOPs. For the down you merge together shaft, left and right barbs to reconstruct the complete feather. Then, the individual down are again combined with another Merge SOP.
Finally, all feathers are merged and then terminated with a ![]() Null SOP. We recommend renaming the null, e.g. to
Null SOP. We recommend renaming the null, e.g. to ATLAS, but you can use any other valid name.
Tip
For more information on how to group, merge and export feathers, please read the Exporting feathers page.