| On this page |
|
Overview 

Each tool and node in Houdini can have one or more handles that let you change parameters visually in the viewer by dragging the handle. (In Maya, these are called manipulators.)
For example, the move handle lets you move something by dragging its arrows.
The ![]() Move T,
Move T, ![]() Rotate R, and
Rotate R, and ![]() Scale E tools have handles for manipulating the selected object.
Scale E tools have handles for manipulating the selected object.
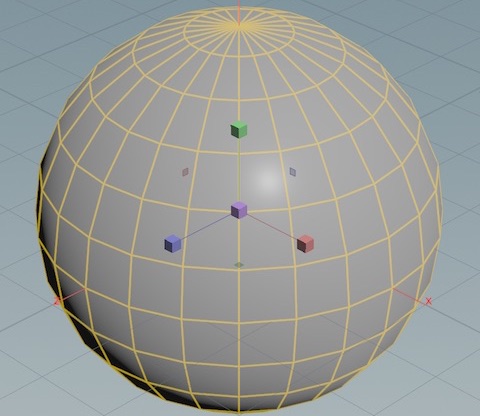
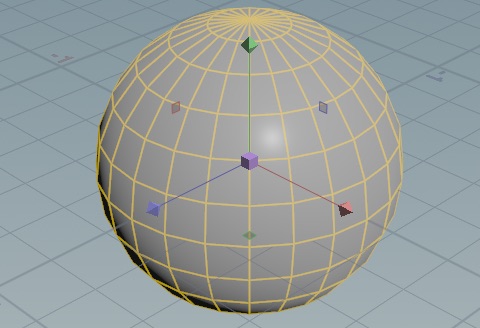
The ![]() Handles tool Enter shows the handles specific to the selected node.
Handles tool Enter shows the handles specific to the selected node.
See also HUD handles and the value ladder.
For more information, see the Handles section of the Main Preferences page.
Example 
-
In the shelf, click the Create tab and ⌃ Ctrl-click the
 Grid tool to create a new plane at the origin.
Houdini switches to the
 Handles tool. Since a geometry object is selected, it shows the generic object transform handle.
 -
In the network editor, double-click the
grid_object1container to go down to the geometry level. -
Select the
grid1geometry node (if it’s not already selected). The Handles tool shows a custom handle for setting up the grid that lets you move the grid and resize it from the corners and edges. -
Switch to the
 Select tool S and set the selection mode to
  Primitives 4.
 -
Select one of the polygons in the plane.
-
In the shelf, click the Polygon tab, then click
 Poly Extrude.
 -
Houdini adds a Poly Extrude geometry node and selects the
Handles tools, showing an extrude handle that lets you move and rotate the extrusion.Try dragging the up (Y) handle to extrude the selected polygon up from the plane.
Switching handles 

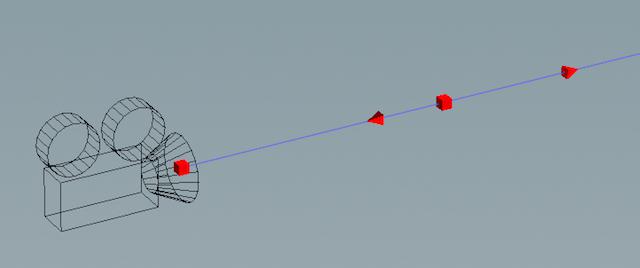
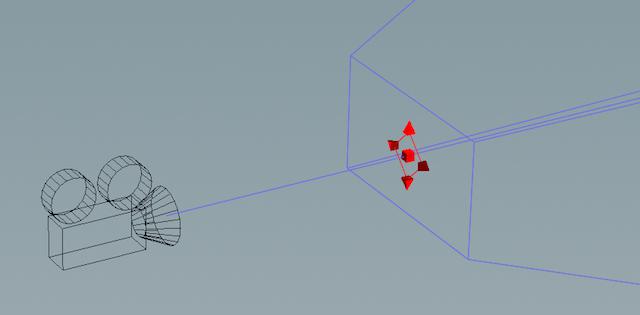
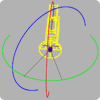
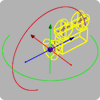
Some nodes have more than one handle. For example, the Camera has three handles: an orientation handle to set the camera’s position and direction, a focus handle to control the focal length, and a frustrum handle to visually edit the camera’s viewing region.
Right-click the handle and choose the handle mode from the menu.
Press O, Z, and F in the view to cycle between available handles for the selected node.
Basic handles 
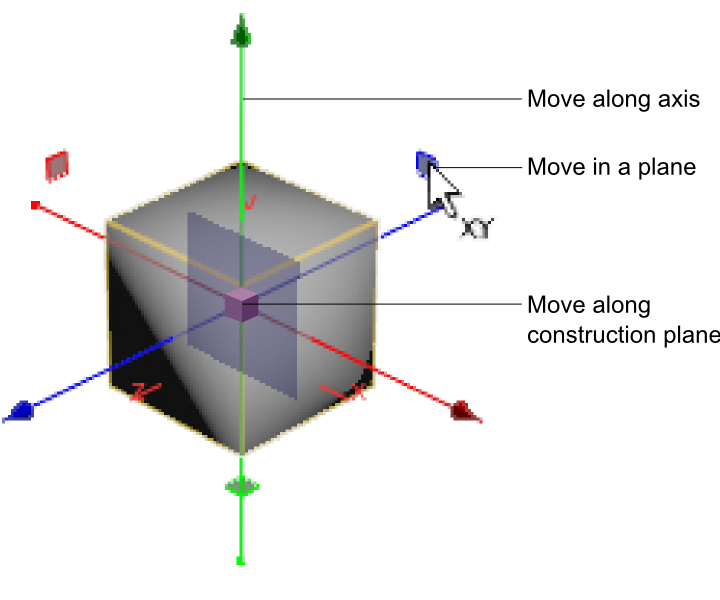
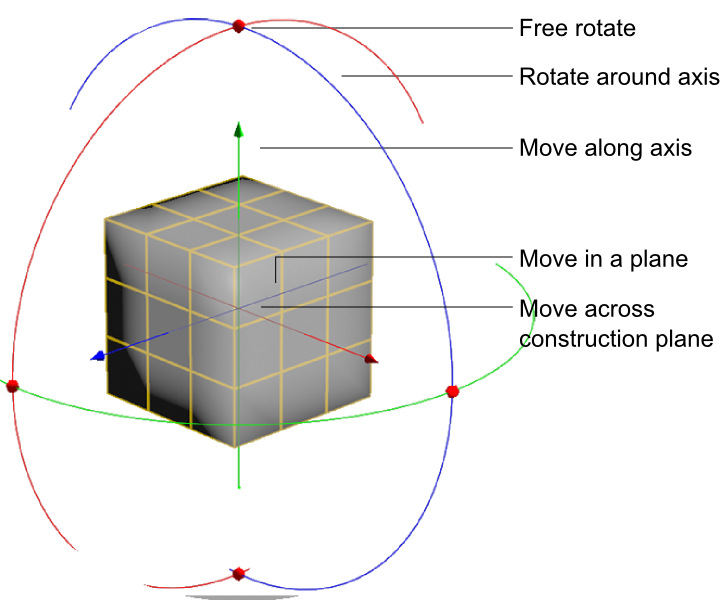
Move 
-
Drag an arrow to move along an axis.
-
Drag a translate plane to move across that plane.
-
Move the mouse pointer to the center to show a widget in the center. Drag it to move across the construction plane.
-
Hold ⌃ Ctrl and perform the above translate operations to move at the step size set in the handle parameters window (press P when hovering over the viewport), Handle Dialog tab, Translate Step option.
-
Drag the point at the center to move the box.
-
Hold ⌃ Ctrl and drag the point at the center to move the box parallel to the viewing plane along a primary axis or an axis that is 45 degrees from a primary axis. If the construction plane is displayed, the box moves parallel to the construction plane.
Move along the viewing plane Move along the construction plane
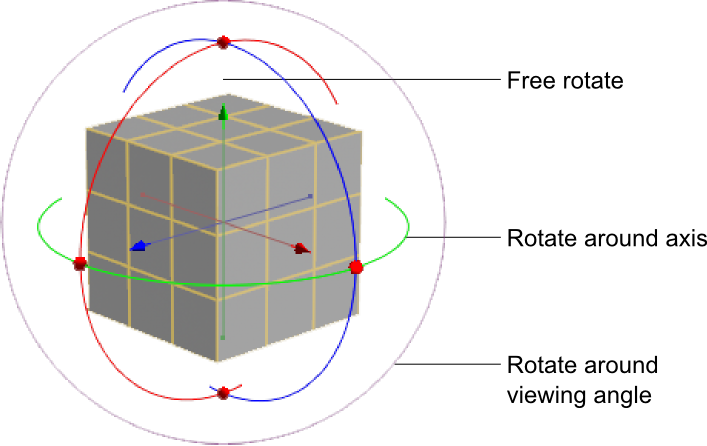
Rotate 
-
Drag a ring to rotate around an axis.
-
Drag the outer ring to rotate around the viewing angle.
-
Hold ⌃ Ctrl while performing the above operations to rotate at the degree step size set in the handle parameters window (press P when hovering over the viewport), Handle Dialog tab, Angle Step option.
-
Drag between the rings to rotate freely.
Scale 
-
Drag an arrow to scale in one axis.
-
Drag a translate plane to scale proportionally in two axes.
-
Drag the point at the center to scale proportionally in all axes.
-
Hold ⌃ Ctrl while performing the above operations to scale at the step size set in the handle parameters window (press P when hovering over the viewport), Handle Dialog tab, Scale Step option.
Squash and stretch 
You can switch the scale handle to “squash and stretch” mode by ![]() clicking the scale handle, and turning on Squash and Stretch. In this mode, decreasing one axis increases the other two proportionally, and increasing one axis decreases the other two.
clicking the scale handle, and turning on Squash and Stretch. In this mode, decreasing one axis increases the other two proportionally, and increasing one axis decreases the other two.
Hold ⌃ Ctrl while performing squash and stretch to scale at the step size set in the handle parameters window (press P when hovering over the viewport), Handle Dialog tab, Scale Step option.
Combined 
This handle combines the rotate and move handles.
-
Drag the ball at an intersection of the rotate rings to rotate freely.
-
Drag a ring to rotate around an axis.
-
The move handle in the center is the same as the regular move handle (see above).
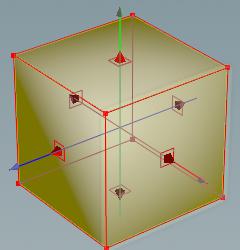
Box 
-
The move handle in the center is the same as the regular move handle (see above).
-
Drag a side to resize from that side.
-
Drag the arrow on a side to scale proportionally along that axis
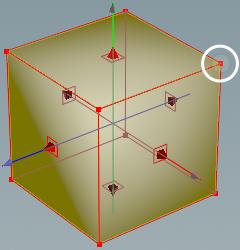
-
Drag the small box on a corner to resize from that corner.
-
⇧ Shift-drag the corner to resize from the center.
-
Drag the corner of a face to scale in two directions.
-
⌃ Ctrl-drag to scale proportionally.
Persistent handles 
You can keep a node’s handle on-screen while you work on other nodes. This can be useful when you want to change something in the node history and see its effects on the final result, or change something in one network and see its results in another network.
-
To make a handle stay visible when the node is not selected, right-click the handle and turn on Persistent.
-
To switch a handle back to only being visible when the node is selected, right-click the handle and turn off Persistent.
See also HUD handles, which let you create regular and permanent HUD handles in the viewer to control node parameters.
Middle mouse button 
When you're using a handle, you can often drag ![]() anywhere in the viewer to affect the handle. This can be useful when it’s hard to hit the handle widgets, or you've made the handle invisible.
anywhere in the viewer to affect the handle. This can be useful when it’s hard to hit the handle widgets, or you've made the handle invisible.
Different handles map different effects to dragging ![]() . For example:
. For example:
Handle |
|
|---|---|
|
Moves along the axis corresponding to your first movement. |
|
Rotates freely. |
|
Scales along the axis corresponding to your first movement. |
Combined |
Same as rotate. |
Camera orientation |
Moves the look-at target. |
Changing the pivot point 
| To... | Do this |
|---|---|
|
Move an object/selection’s pivot point |
Right-click the handle and choose Pivot mode or
Press Ins or " (double quote) to switch to the pivot handle. After you move the pivot point, turn off Pivot mode or press Ins or " again to return to the regular handle. |
|
Detach and move a handle from its default position |
This does not move the object’s pivot point permanently – it changes the position of the handle, which scales and rotates are relative to. So it has the same effect as moving the pivot point, but is more transitory, for when you want to scale or rotate relative to a certain point, but don’t want to mess with the actual pivot. |
How to 
| To... | Do this |
|---|---|
|
Show the handle for the currently selected node |
Click the |
|
Right-click the handle. |
|
|
Align the handles to world, object, camera, or parent space |
Right-click the handle and choose an option from the Align submenu. |
|
Adjust handle values in small or large increments |
|
|
Key the handle parameters |
Press K. |
Local space editing 
Normally, when you select multiple disconnected primitives, you transform them in world space.
| To... | Do this |
|---|---|
|
Switch the transform handle to transform each selection island in its own local space |
|
Tip
When in this mode, Houdini always snaps the handles to the most recently selected island. You can ⇧ Shift-click an already-selected polygon to move the handle to that island.
Handle appearance 
| To... | Do this | ||||
|---|---|---|---|---|---|
|
Make handles bigger or smaller |
You can also use hotkeys in the viewer to quickly change the handle size:
|
||||
|
Hide a handle |
Right-click the To make the handle visible again, select the node with the handle, right click the |
||||
|
Turn off axis coloring |
This makes Houdini draw handles all red, instead of using red, green, and blue to color the different axes.
|
Gimbal mode and fixing gimbal lock 
What is gimbal lock? 
Gimbal lock is when two rotation axes overlap, making it impossible to rotate them independently. This can cause problems in animation, where it can seem like rotations no longer have the proper effect.
This happens because Houdini can’t rotate all three axes at once, but must apply rotations to one axis at a time (this is a fundamental property of Euler angles). So, if the order is “X rotation, then Y rotation, then Z rotation” (the default), Y and Z necessarily rotate independently of X (that is, rotating in Y does not change the X rotation), and so you can make the axes overlap:
|
A camera begins with rotations set to 0,0,0. |
|
Camera rotated -45 degrees around Y (the green ring). Because Y rotation is applied after X, rotating around Y does not rotate X (the red ring). |
|
Camera rotated -90 degrees around Y (the green ring). The X axis (red ring) and Z axis (blue ring) now overlap. Since the axes overlap, changes to X and Y rotation values (in this example) do not rotate the camera around two axes… they rotate along the same axis (and may in fact cancel each other out). |
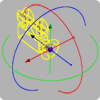
Gimbal mode 
Houdini’s rotate handle has a “Gimbal mode” option to control how the rotation handles work.
-
When Gimbal mode is off, Houdini does background work so you always see three rotation ring handles, and when you drag a ring, the other rings rotate with it, despite the order of rotations.
The benefit is that it’s impossible to gimbal lock the object by dragging the rotation handles. The downside is that in this mode Houdini will change all three rotation components, not just the one you're dragging. And doing rotations this way can lead to very bad animation curves.
-
When Gimbal mode is on, Houdini displays the true position of the rotation handles, and dragging the rotation handles changes the rotation components directly, without Houdini trying to fix gimbal lock.
The benefit is that you have direct, independent control over the three rotation components, and so you can use the handles to set up animation without worrying about Houdini changing the other components. The downside is the possibility of gimbal lock.
To turn Gimbal mode on or off, press ![]() on a rotation handle and choose Gimbal mode.
on a rotation handle and choose Gimbal mode.
How to avoid or get out of gimbal lock 
Use the following strategies to avoid gimbal lock:
Change the rotation order
Changing the rotation order changes which axes affect the others. By selecting a different order of rotations, you may be able to do the same rotations without gimbal locking.
Set the order of rotations for an object in the object’s parameters.
Use a parented null to separate rotations
-
Lock the object’s Rotate X and Rotate Y parameters.
-
Create a
 Null object, parent it to the object, and lock its Rotate Z parameter.
 -
Rotate the Null to control the object’s X and Y rotation, and rotate the object to control its Z rotation.
Because the rotations are on different objects, there is no chance for the axes to overlap, and so the object cannot gimbal lock.
(If it is more convenient, you can also stack up X and Y nulls and control Z on the object, or stack up X, Y, and Z nulls and lock all rotation on the object.)
Turn off gimbal mode on the handle
(See above.) When Gimbal mode is off, Houdini will do extra math in the background to let you rotate the handles without worrying about gimbal lock, by changing all three rotation components.
Control rotation with look-at and up vector
Instead of controlling an object’s rotation with the rotation handles, you can use a look-at object.
-
Create a
Null object and set it in your object’s Look at parameter. -
Transform the Null to control your object’s rotation. Use your object’s Rotate Z or Up vector parameters to roll the object.
This lets you rotate the object without directly setting rotations, avoiding gimbal lock, and it doesn’t require parenting. The downside is if your look-at Null passes through the exact position of your object, the object will flip across the axis.